Improved duplicate management in MultiMailer 2013

In MultiMailer 2013 (version 8.0.16 or later), we have improved the duplicate management in mailing lists. By pressing the F8 key or by selecting the menu item Edit – Select Duplicates MultiMailer displays now, in addition to the usual selection, two arrows in front of the duplicate contacts it founds (see picture below).

In previous versions of the program, MultiMailer highlighted duplicates only with regular (inverted) marks. However, this marking disappeared once you clicked on and selected another contact from the list. In order to get the duplicate marking back, you had to press the F8 key again. With the new duplicate management function, you can always see duplicates marked and you do not need to press F8 more than once. The picture below shows the way duplicates are marked when no contacts are selected in the list:

The new duplicate management function makes it easier to remove duplicates of contacts and to choose which duplicate to delete. You can quickly scroll through the list and if you see two duplicates after each other both marked with an arrow, you can easily choose which contact is to be retained and which is to be removed. To remove it, you simply highlight it and press Delete. Then you can continue scrolling to see if there are more duplicates on the list.

Quick method still available
If you only have e-mail addresses in your mailing list, it is not hard to decide which contact should be deleted. There is a faster method for removing such duplicates and that is to simply press F8 and directly after that Delete. Then all the duplicates will be erased from the mailing list in a single operation.

When MultiMailer marks duplicates in your mailing list, it never highlights the first instance of an entry, but only its duplicate copies. That is why pressing F8 and Delete quickly removes only duplicate copies. However, if your mailing list contains more data than just email addresses, you should go through the duplicates one by one to see which entry you actually want to keep in the list.

Number of duplicates is now displayed in the application’s status bar
MultiMailer 2013 shows you now the number of duplicates found on the list at the bottom of the application’s status bar (see image below):

MultiMailer 2013: When do people open your newsletter?

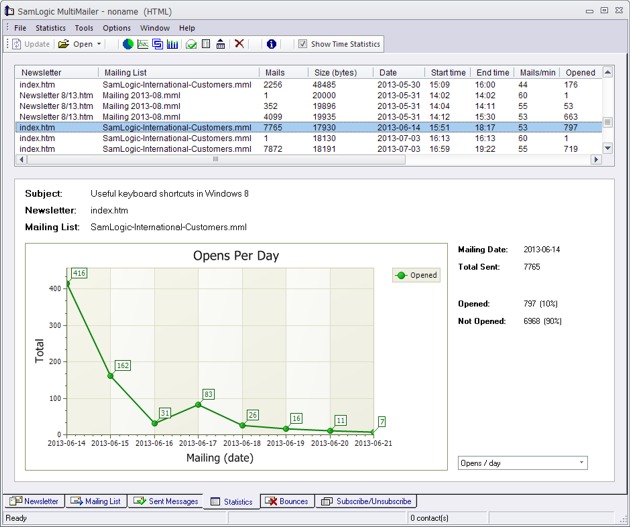
We have introduced new features for statistics monitoring and reporting in the new MultiMailer 2013. One new feature is that you can now see at what time your email recipients open your newsletter. You can also look at the dates on which your recipients open your newsletter. You can check how many open your newsletter on the dispatch date and also over the next coming 7 days. The picture below shows how it might look when you choose to view this information in a chart form:

Opens Per Day

In the picture above you can see (in the chart) number of newsletter openings on the dispatch date and number of openings over the next 7 days. In the drop down menu at the bottom right, you can switch between openings per day and openings per hour.

Information about the openings’ date and time can be exported from MultiMailer to other programs.

MultiMailer 2013: Statistic charts displayed directly in the ‘Sent Messages’ tab

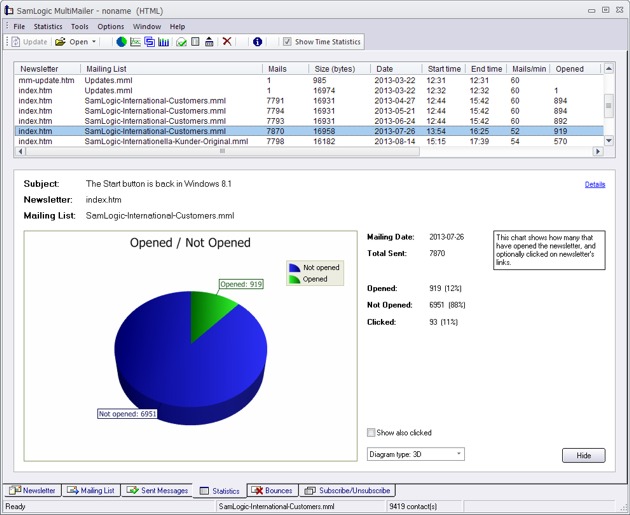
In MultiMailer 2012 and in earlier versions, all statistic charts were displayed in a separate window. Starting with MultiMailer 2013, the diagrams can be shown directly in the Sent Messages tab. This applies for all kinds of charts available in MultiMailer.

The image below shows a chart with the number of opened and unopened newsletters for an e-mail dispatch. The diagram is displayed directly in the Sent Messages tab under the list of e-mail dispatches. You just need to select a dispatch to see a chart for the particular e-mail dispatch.

Opened and Not Opened

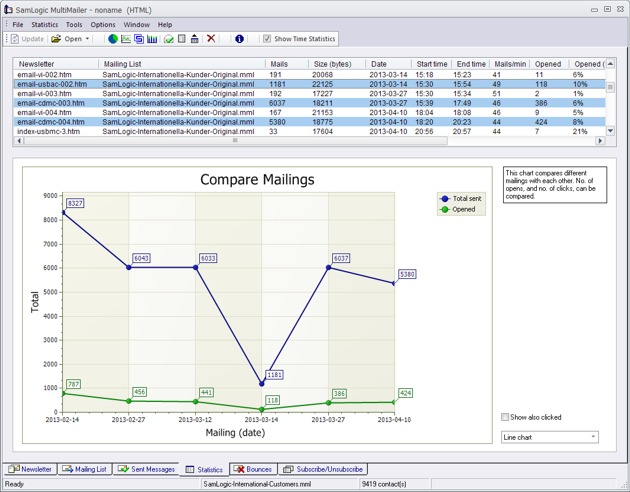
The picture below shows a chart where multiple e-mail dispatches are compared. The graphics represents the number of newsletters sent and opened for different dates.

Compare Mailings

It’s easy to choose e-mail dispatches you want to compare with each other. You just click on the chosen e-mail dispatch in the list and a new up-to-date chart appears immediately.

Just as before, you can change the chart type in the option bar at the bottom right. Similarly, you can also choose whether newsletters with links that people clicked on should appear in the diagram.

How to use the new Twitter feature in MultiMailer 2013

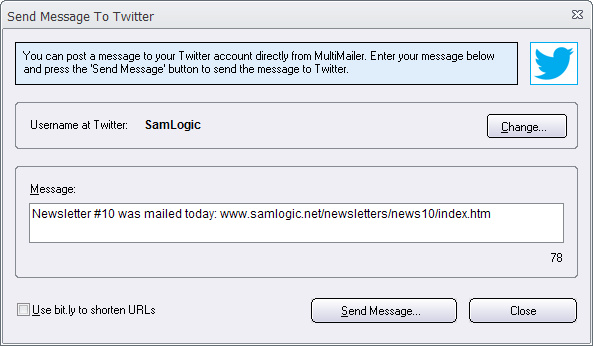
The email marketing software SamLogic MultiMailer 2013 has a new feature that you can use to publish Twitter messages (tweets) directly from the program. So when you send out a newsletter, you can inform on Twitter about it at the same time. You use the Twitter feature in MultiMailer by selecting the menu option File – Twitter. This opens the following dialog:

Web links in Twitter messages can be automatically shortened. You can choose to use the bit.ly service to shorten the links or let Twitter to shorten the link when the message is received. If you wish to use the bit.ly service, check the box Use bit.ly to shorten URLs in the Send message to Twitter dialog (see image above).

You can continuously see the length of your Twitter message while writing so you can make sure not to exceed the maximum limit of 140 characters in a tweet. To enter the username and the password for your Twitter account, press the Change button.

More use of social media
You can also add a Twitter icon to your newsletter, so if your customer clicks on it, he/she goes directly to your Twitter page. Check out our video about how to add support for social media in MultiMailer.

Related information
> Social media in MultiMailer
> New features in SamLogic MultiMailer 2013

Full Unicode support for creating newsletters in MultiMailer 2013

We have updated our email marketing tool MultiMailer 2013 so it now has a full support for Unicode (UTF-8) when you create and send out newsletters. That means that you can write and send newsletters in any language and with any character whatsoever, Chinese, Japanese, Thai, Russian, Arabic, Hebrew etc. Of course that MultiMailer 2013 also supports Western languages​such as English, German, French, Spanish, Greek, Italian and so on.


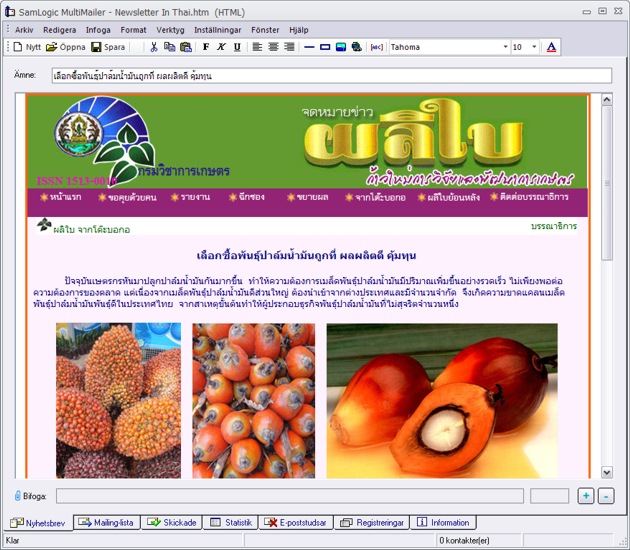
The image above shows a Thai newsletter displayed in MultiMailer.

Unicode
Unicode is a standard that handles all characters in all the world’s writing systems. The good thing with Unicode is that all characters can be displayed in any language or country regardless of what language your computer operating system is set to. This is not the case if you use a language-specific character set. In this case the recipient must have the same character system installed otherwise the characters are not displayed correctly. With Unicode, you do not have this problem.

Chinese text in USA
If you for example want to create a newsletter in Chinese and send it to email recipients in the US using American Windows, you can fix this easily by using the Unicode (UTF-8) character set. The newsletter will be displayed in Chinese for your receivers even if they do not use Chinese Windows.

Select Unicode (UTF-8) in MultiMailer
To create or send out a newsletter that uses Unicode, you have to set it in MultiMailer. To do this, follow these steps:

1. Start MultiMailer
2. Select from the menu Settings – Options
3. Select the tab Language
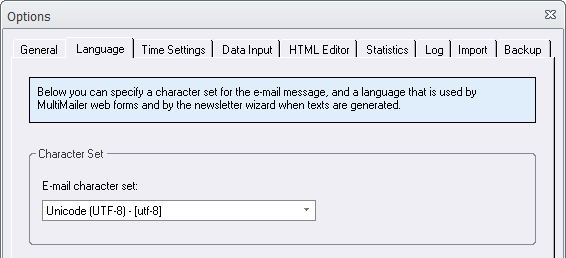
4. In the drop-down menu E-mail character set select “Unicode (UTF-8) – [utf-8]”
5. Close the dialog


In the picture above, the e-mail character set Unicode (UTF-8) is selected.

If you create your newsletter with a different HTML editor than MultiMailer, make sure that it is set to Unicode (UTF-8).

Full Unicode support even for sender’s name
Besides the advantage of creating newsletters with Unicode in MultiMailer, you can also use Unicode’s characters for the sender’s name. That means that you can enter a name of your newsletter sender in e.g. Chinese, Arabic or Thai. It will display correctly for your recipients regardless the language version of Windows they use.


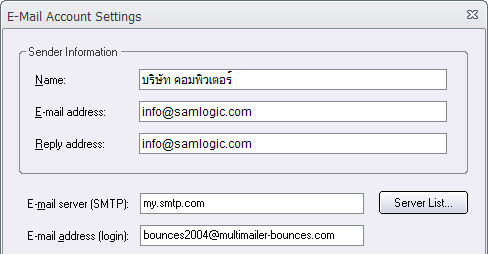
Even sender’s name has now full support for Unicode. In the example above, the sender’s name is written in Thai.

New Windows 8.1 will be released on October 18th

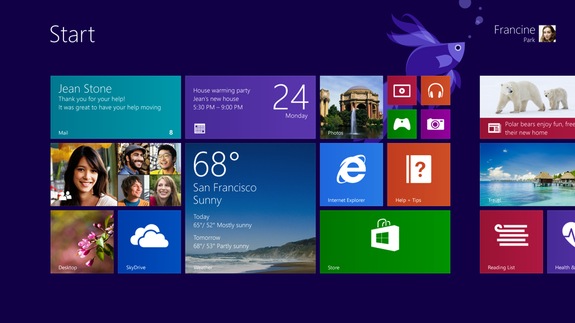
Windows 8.1, an update to Windows 8, will be released on October 18 according to Microsoft. Some of the new features in Windows 8.1 are that the Start button comes back, SkyDrive gets improved, VPN support is extended, Internet Explorer 11 is included and the Start screen becomes more flexible. It will also be possible to boot directly the traditional desktop in Windows 8.1 which was not possible in Windows 8 in an easy way.

Related information
> Start button back in Windows 8.1
> Article: Why Were the Start Button & Start Menu Removed in Windows 8?
> Article: New Keyboard Shortcuts (Hot Keys) in Windows 8

How to give a standard user write permission to a folder in Program Files

In Windows Vista, Windows 7 and Windows 8 the Program Files folder and the Program Files (x86) folder (and all subfolders beneath) are read-only folders for standard users (users that run programs with standard privileges). This means it is not possible for them to create files or update files in this location of the hard disk. The folders are write-protected. Why these folders are write-protected is explained in this technical article on our website.

The 'Program Files' and 'Program Files (x86)' folder

We sometimes get the question: is it possible to circumvent the write protection and allow also standard users write access to a folder beneath Program Files and Program Files (x86)?

The answer is: Yes, it is possible. You can do it by changing the permission settings for the folder.

This should always be the last resort if you can not find another way. All folders placed in Program Files and Program Files (x86) should be write-protected for standard users, but sometimes this can give problems to older legacy software. In some computers a virtualization system called VirtualStore can solve the problem, but in many computers this is turned off. And then it is impossible to write data to a file. A file can be neither created nor updated.

You should note that it requires a user with administrator rights to change the permission settings for a folder in Program Files and Program Files (x86). A standard user can not change any permissions.

How do I change the permission settings for a folder?
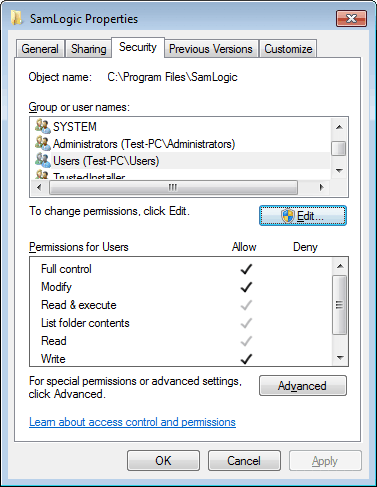
This can be done in different ways. One method is just to right click on the folder in Windows Explorer, choose the Properties menu item, open the Security tab, select the Users item and change permissions for the user.

The 'Properties' dialog box in Windows

Although this is achievable, this is not a user-friendly solution for end-users. Especially not for users that are not so familiar with computers. A much better method is to change the permissions programmatically.

Let the installation program change the permission settings
As mentioned above, the permissions should be changed programmatically, and the best method is to let the installation program change the permission settings. When a software is installed to the Program Files / Program Files (x86) folder, the setup program is always run with administrator rights. This means that the installation program is allowed to change permission settings for a folder. If you try to change the permission settings later, for example when the installed software is running, it is very likely that the software do not have administrator rights. It will very likely only have standard user access rights, and it can therefore not change any permission settings for folders in Program Files / Program Files (x86).

How Visual Installer can handle this
In our setup tool Visual Installer there is a special script command that can be used to change permission settings for a folder. The name of the command is SETPERM, and below you can see an example of how to use the script command:

The 'Execute script commands' dialog box in Visual Installer

%DESTDIR\MyDataFolder is a path to a folder that will have its permissions changed and PERM_ALL tells Visual Installer to give a standard user full access rights to the folder (including write access). Instead of PERM_ALL you can also use PERM_WRITE as a second parameter. PERM_WRITE will give the standard user write access to the folder, but no other permission settings are changed.

%DESTDIR is variable that contains the main destination folder for the installation. If for example the main destination folder is C:\Program Files\SamLogic\My Application, the full path to the folder entered above will be C:\Program Files\SamLogic\My Application\MyDataFolder.

Related information
> How to install files in the correct folder using Visual Installer
> Visual Installer’s Scripting Language

CD-Menu Creator: How to always open a DOC file with Word

It is very common to link a button in a menu created with CD-Menu Creator to a document file. One of the most used formats is DOC files (Microsoft Word documents).
In Windows XP and earlier a DOC file can be opened either with WordPad or Word. WordPad has the benefit to be loaded more quickly than Word, and it is always present in Windows. Microsoft Word is a large application, so in a slow computer it can take some time to load the application, so there may be a significant delay before the document is shown. Other disadvantage is that not all computers have Microsoft Word installed.

However, some Word documents require that they are opened with Microsoft Word. They can not be shown correctly with WordPad. That is the case if the Word document is complex and is advanced formatted. Then the only option is to open it with Microsoft Word.

In CD-Menu Creator you can select a setting that makes sure that the DOC file is always opened with Microsoft Word. The steps below show how to achieve this:

1. Start CD-Menu Creator and open the Buttons (text) tab.
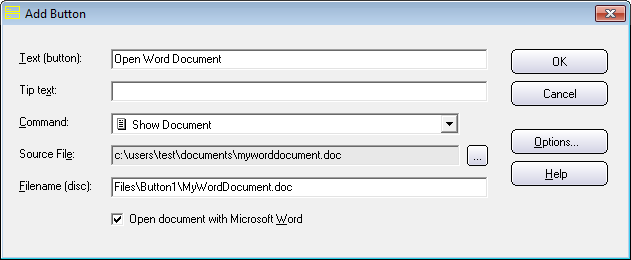
2. Click on the Add Button button. The Add Button dialog box is opened.
3. Enter a button text at Text (button).
4. Select the Show Documents command at Command.
5. Press the “…” button and select a DOC file.
6. Select the Open document with Microsoft Word option.

The 'Add Button' dialog box in CD-Menu Creator

7. Click OK to close the dialog box.
8. Create your menu.

When a user clicks on the button that you just added, the DOC file will always be opened with Microsoft Word. If you want the DOC file to be opened with WordPad in Windows XP or earlier, you can unselect the Open document with Microsoft Word option.

Notes
In Windows Vista or later, WordPad does not support DOC files anymore. So if your end-user for example uses Windows 7, the document will always be opened with Microsoft Word. If Microsoft Word is not installed, CD-Menu Creator will try to open the document with other software that can read Word documents. But if no such a software is installed in the computer, an information message is shown for the user. However, it is very rare that an end-user can not open Word documents. Almost all computers have some kind of software installed that can open Word documents.

How to add an ActiveX control to a Visual C++ 2010 project

In a previous blog post we showed how to add an ActiveX control to a Microsoft Visual Basic 2010 project. In this blog post we will show how to add an ActiveX control to a Microsoft Visual C++ 2010 project. We will also show how to create a variable that can be used to access properties and methods in the ActiveX control.
Twitter
In this step-by-step tip we will use the Twitter control that is included in our SamLogic Social Media Components component library. This control can be used to send tweets to Twitter, and we will show how to add this control to a Visual C++ project. Although this tip will cover Microsoft Visual C++ 2010, the steps in other versions of Visual C++ are very similar.

How to add an ActiveX component to a Visual C++ 2010 project

1. Start Visual Studio 2010 and choose New project in the File menu.

2. Select the MFC Application option in the Visual C++ node in the New project dialog box.

New Project - Visual C++ - MFC Application

3. In the MFC Application Wizard window that is shown, choose Dialog based in the Application Type step. We will create a dialog based Windows application.

4. In the Advanced Features step in the MFC Application Wizard, make sure that the ActiveX controls option is selected.

5. In the last step of the MFC Application Wizard, click on the Finish button.

We have now created a basic Visual C++ / MFC project that uses a dialog based window. Next will show how to add the Twitter ActiveX control to the project:

6. Right-click over the Toolbox window.

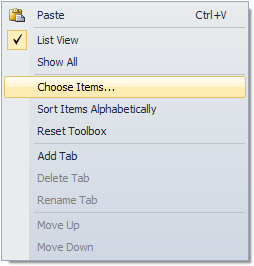
7. Select the Choose items menu item in the local menu that is shown.

The 'Choose Items' menu item

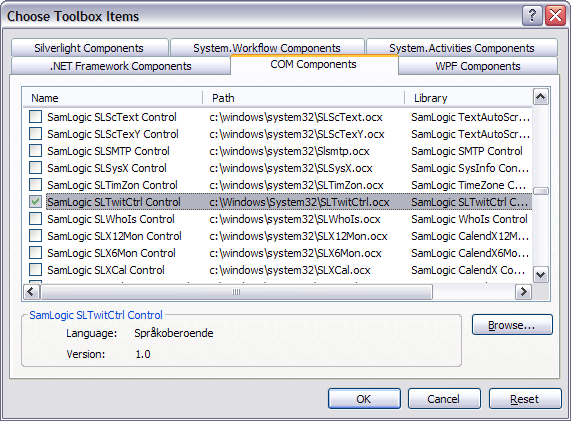
8. The Choose Toolbox Items dialog box is now shown. In this dialog box, open the COM Components tab.

9. If you have installed the Twitter component and want to use it, select the SLTwitCtrl control in the list. Otherwise, select the ActiveX component that you want to use.

The 'Choose Toolbox Items' dialog box in Visual C++

10. Click OK to close the dialog box.

11. The selected component should be visible in the Toolbox window; probably in the bottom of the window.

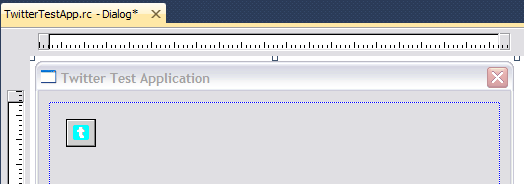
12. Now drag and drop the component on the dialog box.

The Twitter ActiveX control is placed in the dialog box

We have now included an ActiveX component into a Visual C++ 2010 project and put it in a dialog box. We will now show how to create a variable that can be used to access properties and methods in the ActiveX control.

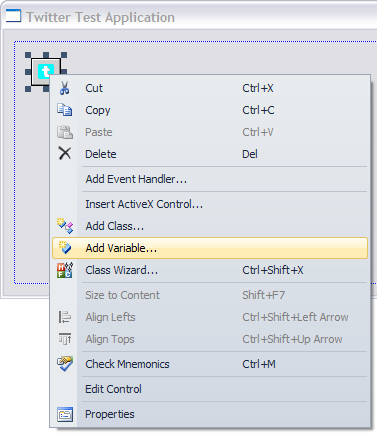
13. Right-click on the ActiveX control in the dialog box window.

The 'Add Variable' menu item

14. Click on the Add Variable menu item in the local menu that is shown.

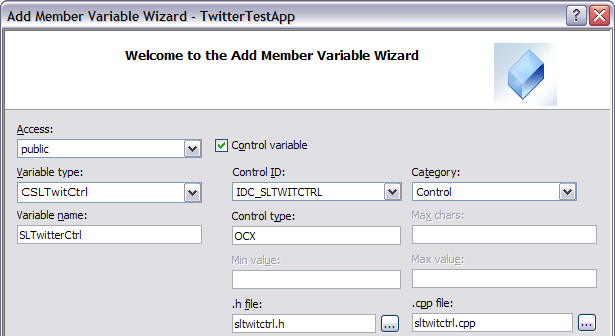
15. Enter a variable name in the dialog box that is shown, for example: SLTwitterCtrl.

The 'Add Member Varible Variable' dialog box

15. Click Finish to close the dialog box and create the variable

16. We have now created a variable that can be used to access properties and methods in the ActiveX control. The example below shows how to access the AppName property in SamLogic’s Twitter Control (it sets the ActiveX property to “Twitter Test Application”):

Code example - How to access the AppName property in SamLogic's Twitter component in Visual C++

Related Blog Posts
> How to add an ActiveX component to a Visual Basic 2010 project
> How to add an ActiveX component to an Excel 2010 sheet