An update of Visual Installer 2014 is now available

There is now an update of SamLogic Visual Installer 2014 available. The version number is 10.0.27, and some of the news and improvements in this version are:

• A German language file is now included. Texts in setup dialog boxes and message boxes etc. can now be displayed in German in an easy way. Read more.
• A new script command: UNINSTALL_XRUN. Can be used to run a program during an uninstallation. It works like XRUN, but the command is executed during the uninstallation process. This command is useful if some special processing must be done during the uninstallation process, for example to uninstall a Windows service that was installed during the installation process. The picture below shows an example of usage. Read more.

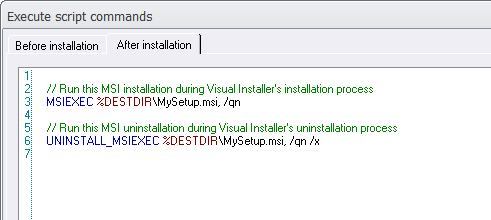
• A new script command: UNINSTALL_MSIEXEC. Can be used to run an external MSI installation or uninstallation during an uninstallation process. By combining MSIEXEC with UNINSTALL_MSIEXEC you have a nice and easy way to handle both installations and uninstallations of MSI files. The picture below shows an example of usage. Read more.

• Improved error handling when using the code signing functions in Visual Installer.

• Improved error handling when adding files to Visual Installer’s file list through a .DEP file.

• Easier to install side-by-side system files / runtime files like MFC42.DLL.

We have also fixed some bugs and other issues that have been reported. For example:

• Forward slashes in the main destination folder made the installation to fail. Visual Installer now converts forward slashes (“/”) to backslashes (“\”) automatically.

• If the source path was a UNC file path (a file path that starts with “\\”) the installation sometimes failed. Visual Installer now checks that the source path starts with a drive letter.

• Some updates in the English languages file. We have removed some outdated text.

How to download the update
If you have Visual Installer 2014 and a 12 months maintenance plan you can download the update from the following download page:

> Download – Visual Installer 2014 – Latest update

If you have an older version of Visual Installer, for example Visual Installer 2012, you can upgrade to the latest version of Visual Installer from this order page:

> Upgrade to Visual Installer 2014

A German language file is now included in Visual Installer

In the latest of update of Visual Installer 2014 (version 10.0.27) we have included a German language file. So you can now use German text in your setup packages in an easy way.

German text

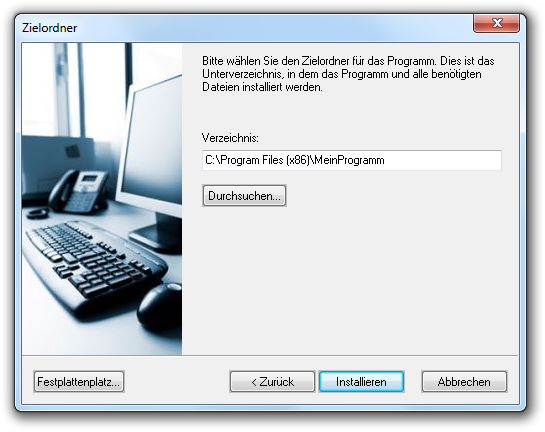
To choose German language to a setup project you must first open the Special – Language menu item in Visual Installer’s editor. And thereafter you choose the GERMAN.LNG language file in the list that is shown.

Some project specific texts must be entered via the Dialog boxes tab in Visual Installer’s editor, just as before. For example text that you want to show in the Welcome dialog box.

See also
> How do I change language for my setup dialog boxes?
> The ‘Program Files’ folder in different languages (Technical Article)

How to install and uninstall a Windows service using Visual Installer

The Visual Installer installation tool can be used to install and uninstall a Windows service. By combining the XRUN script command with the new script command UNINSTALL_XRUN this is very easy done. UNINSTALL_XRUN is a new script command that vi added to Visual Installer’s scripting language in the version 10.0.27 update of Visual Installer. UNINSTALL_XRUN runs a program during Visual Installer’s uninstallation process.

XRUN can be used to install (register) the Windows service and UNINSTALL_XRUN can be used to uninstall (unregister) the Windows service. In this new tip on our website we will explain in detail how to install and uninstall a Windows service using the scripting language in Visual Installer 2014 / Professional:

> Tip: How to install a Windows service using script

New script command in Visual Installer: UNINSTALL_MSIEXEC

Earlier this year we added the MSIEXEC script command to Visual Installer’s script language. MSIEXEC is used to run an MSI installation from a Visual Installer setup package. Windows Installer is used for the setup process. We have now added a new script command that functions like MSIEXEC but it is run during the uninstallation process instead. The name of the new script command is UNINSTALL_MSIEXEC.

Just like MSIEXEC, the UNINSTALL_MSIEXEC command takes three parameters:

%Filename : Full path to the MSI setup package
%Param : Command line parameters to send to Windows Installer
%Wait : Pause Visual Installer until Windows Installer is ready

By combining MSIEXEC with UNINSTALL_MSIEXEC you will have a nice and easy way to support both installation and uninstallation of a MSI setup package in a single Visual Installer project. The picture below shows how to use these two commands in a Visual Installer project:

As you can see, only two lines with script code is needed to handle both an installation and uninstallation of a MSI setup package. MSI_EXEC is run during the installation process and UNINSTALL_MSIEXEC is run during the uninstallation process.

Tips
We have published tips on our website that explains in detail how to use the MSIEXEC and UNINSTALL_MSIEXEC command. Click on the links below to read the tips:

> Tip: How to run an MSI installation from script
> Tip: How to run an MSI uninstallation from script

Visual Installer: How to password protect an installation

In Visual Installer you can protect an installation from unauthorized use in two ways: you can protect it with an license key or you can protect it with a password. License key protection and password protection works in a similar way, but there are differences. Below we explain some of the differences:

– When a user enters a license key, all characters that are entered are also shown on the screen. But if the user enters a password, only stars (*) are shown on the screen. Nobody can look on the screen and see which characters are entered.

– Passwords are case sensitive. License keys are not. So if you specify a password like “Orange“, only “Orange” will be accepted. Not “orange” or “ORANGE“. However, if you specify a license key as “Orange“, the user can enter “Orange“, “orange” or “ORANGE“. All three will be accepted by the setup program.

– Only one unique password can be specified for a specific installation. But if you use license keys, you can specify more than one key. In fact, you can specify thousands of unique license keys, if needed.

How to password protect an installation
Below we will show how to password protect an installation:

1. Start Visual Installer, and open an existing project or create a new one.

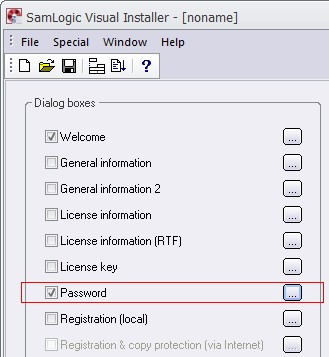
2. Open the Dialog boxes tab.

The Dialog boxes tab

3. Select the Password option in the Dialog boxes tab.

The Password option

4. Click on the “…” button to the right of the Password option.

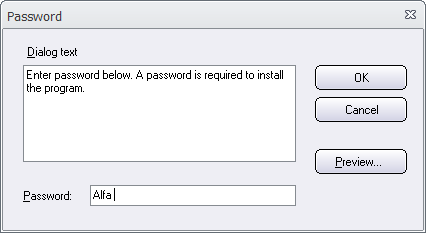
5. Enter a password in the Password text box in the Password dialog box.

The Password dialog box

6. Click OK to close the Password dialog box.

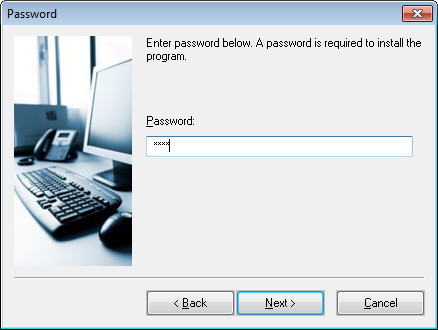
You can now create an installation and run it. The Password setup dialog box (see the picture below) will be shown in the setup wizard when you run the installation, and you can not continue the installation until you enter the correct password.

The Password setup dialog box

More tips
More tips for Visual Installer are available on this web page.

Visual Installer: How to change registration order during setup

When you install files using Visual Installer, files are normally registered in the order that they appear in the file list. But sometimes this may create a problem, if one file is dependent of another file, and they are registered in the wrong order. To handle a situation like this there is an option in Visual Installer that allows you to register files in a particular order.

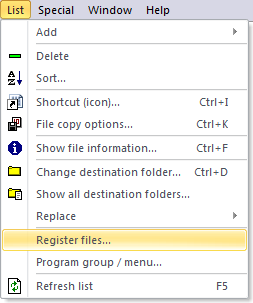
If you want to specify in which order files should be registered, you can choose the List – Register files menu item.

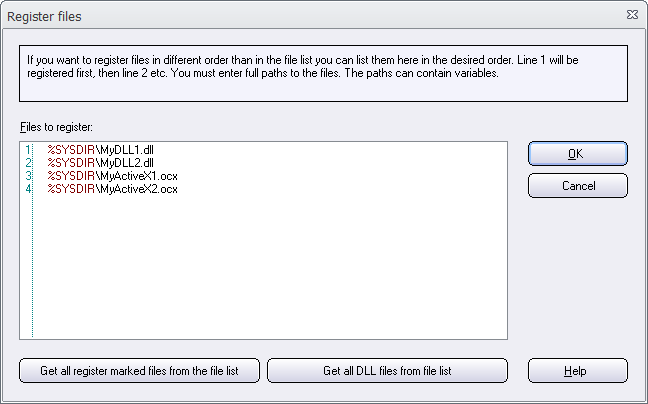
The Register files dialog box is then shown (see the picture below). In this dialog box you can specify the registration order by entering one file path per line. Each line must contain an installation path to every file that you want to have registered in another order than the default order. You can use variables in the file path (for example: %SYSDIR\MyDLL1.dll).

Line 1 is registered first. Then line 2. Then Line 3. Then line 4. Etc.

All files that you specify in the Register files dialog box are registered before any file in the file list is registered. So the list in Register files dialog box is handled first.

More information
Additional information is available in Visual Installer’s Help documentation. Click on the Help button in the Register files dialog box to obtain more information.

More tips
More tips for Visual Installer are available on this web page.