Visual Installer supports installation of VB6 applications, and most VB6 applications use ActiveX components. An ActiveX component is an easy way to give applications access to powerful functions in a library or to put well designed visual objects on the application interface.
Visual Installer can install ActiveX components. If you import a VB6 project to Visual Installer (via File – Import Visual Studio project – Visual Basic 6.0 project) all ActiveX components in the Visual Basic project will be added automatically to Visual Installer’s file list. But you can also add additional ActiveX components manually, in this way:
1. Choose the List – Add – Add files menu item in Visual Installer’s menu.
2. Browse to the ActiveX component you want to add.
3. Select the ActiveX file and click on Open.
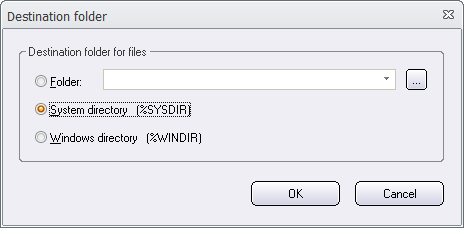
4. The following dialog box is now shown:

5. Choose a destination folder for the ActiveX.
Normally is System directory used as destination folder for ActiveX files in VB6 projects. If you don’t find other information about the destination folder, select the System directory option.
6. Now click OK.
The ActiveX component has now been added to Visual Installer’s file list. It will be automatically registered during the setup process. Registration is an important part when installing ActiveX components, and Visual Installer will do it for you.
Sometimes ActiveX are dependent on DLL files
Mostly ActiveX files can be distributed alone, but sometimes they are dependent on additional DLL files. If you add an ActiveX file manually (as described above) and you get problems in another computers when running your application, you should check the documentation for the ActiveX, if also DLL files must be distributed in the same time. You can add the DLLs to the file list in the same way as described above. The destination directory for the DLL file must be the same as the ActiveX file.
See also
> How to create an installation for a VB6 application (tip)
> How to install and register an ActiveX component (general article)
