Visual Installer: How to block a license key

In Visual Installer it is possible to block specific license keys from be accepted during an installation. This is useful when using prime number based license keys because they are created and verified mathematically. So if the license key is evaluated correctly, it will be accepted.

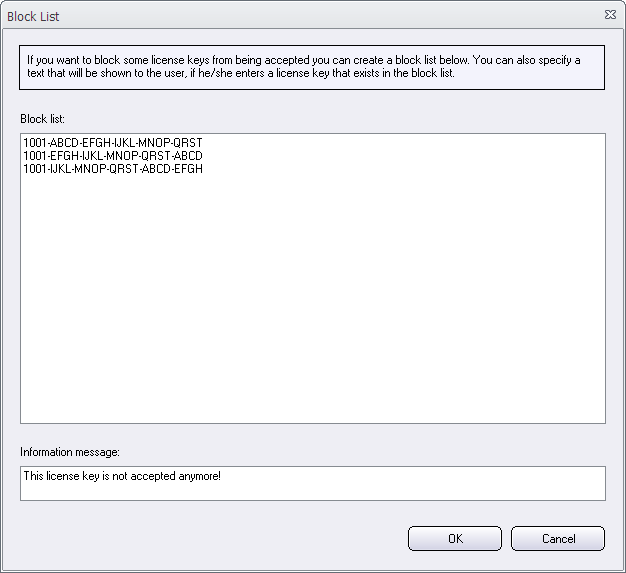
In Visual Installer you can create a block list with prime number based license keys that should not be accepted, although they are mathematically correct. This is done via the Block List dialog box in Visual Installer:

The 'Block List' dialog box in Visual Installer

In this dialog box you can enter a list with license keys that should not be accepted by Visual Installer during an installation. The block list is stored per installation project and is saved with the .VIP project file. So it is not a global block list. It only adds the block list to the specific installation project.

Where to find the ‘Block List’ dialog box?
You can open the Block List dialog box by following these steps:

1. Open the Dialog boxes tab in Visual Installer’s editor.
2. Click on the “” button to the right of the License key option.
3. Click on the More options button.
4. Click on the Block List button.

In the Block List dialog box that is now opened you can enter a list with license keys to block. One license key per row. You can also specify an information message that is shown to the user if he/she enters a blocked license key. If no text is specified, a default text is used.

Note
Both prime number based license keys and static license keys can be blocked with this method, although this function is most useful when used with prime number based license keys.

See also
> Visual Installer: Prime number based license keys
> Visual Installer can show visually when a license key is correct
> The setup wizard in Visual Installer

Visual Installer: How to run a program with administrator rights

Sometimes an installed program must be run with administrator rights when it is started. This gives the program more privileges, which sometimes is necessary to make a program function as expected. In Visual Installer you can set an installed program to run with administrator privileges in an easy way.

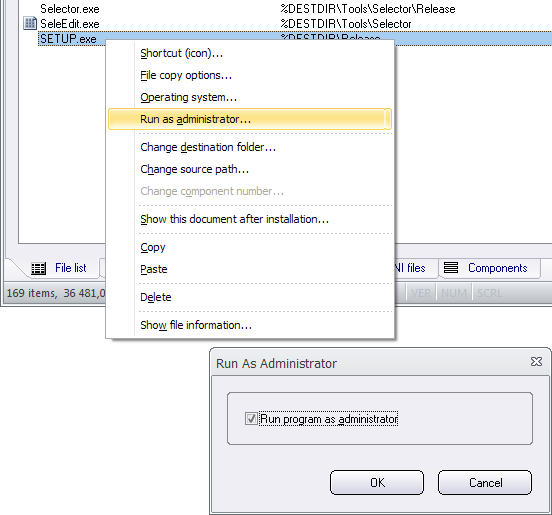
To make an installed program to run with administrator rights you can right-click on the program file in Visual Installer’s file list and choose the Run as administrator menu item in the menu that is shown. Thereafter you can select the Run program as administrator option in the dialog box that appears and press OK (see picture below).

Run program as administrator

After installation, the installed program will be run with administrator rights when it is started. If the UAC is activated in the Windows, the system will ask the end-user for permission before it elevates the privileges.

USB AutoRun Creator: The AutoRun driver can be downloaded from the Internet

USB flash drivesBefore AutoRun can work with USB flash drives in a computer, our AutoRun driver must be installed in the computer. You can distribute the AutoRun driver with your USB stick or you can let the user download and install it from the Internet.
In some situations using the Internet can be the preferable way because you can email your customers in advance and let them download and install the driver from your web site. And thereafter, when they receive your USB stick, AutoRun will work immediately when they plug the USB stick into the USB port.

When you install USB AutoRun Creator, the product is installed in this folder on your hard drive as default:

C:\Program Files (x86)\SamLogic\USB AutoRun Creator

If you look in this folder, you will find the following file there:

SETUP-USB-Supervisor-Internet.exe

You can upload this file to your web server and let the user download it, when needed.

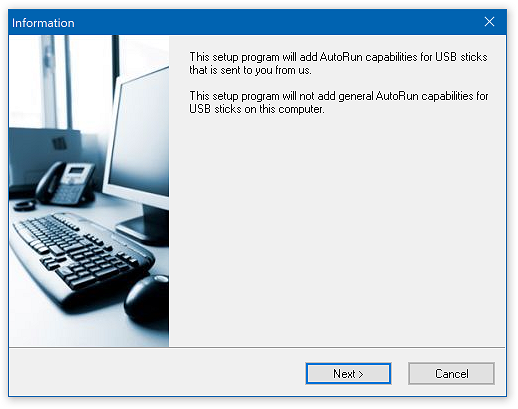
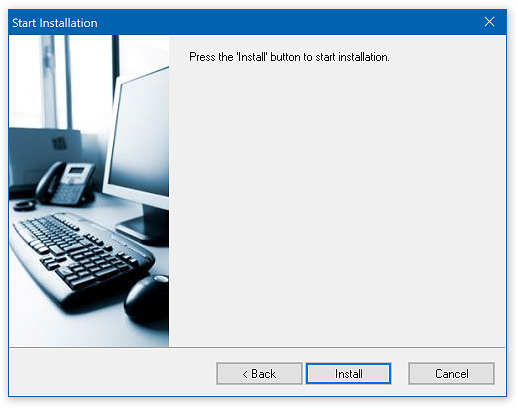
The SETUP-USB-Supervisor-Internet.exe file is a small installation package, and the installation is very simple. The following two steps-wizard is shown to the user:

Step 1:
Installation of the AutoRun driver - Step 1
Step 2:
Installation of the AutoRun driver - Step 2

So the installation of the AutoRun driver is done in seconds.

See also
> USB AutoRun Creator – Overview (PDF)

CD-Menu Creator: Using wildcard characters in a file path

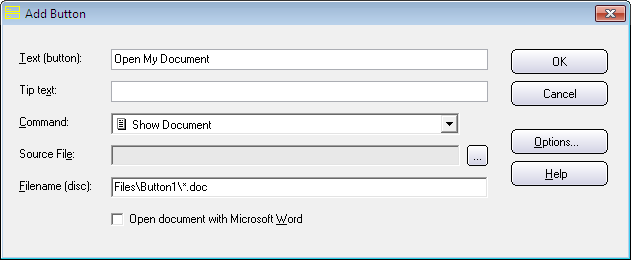
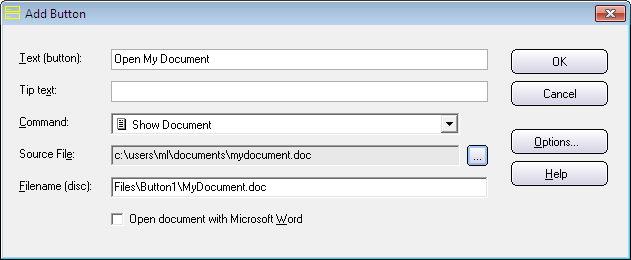
Normally you create a link between a menu button and a specific file on the disc or USB stick by specifying a file path to the file. For example: ‘Files\Button1\MyDoc.doc‘. When a user clicks on the button, the file (in this case ‘Files\Button1\MyDoc.doc‘) will be opened.

The 'Add Button'dialog box (example 1)

If the filename must be changed, for any reason, the whole menu must be created again when this technique is used. Otherwise the file will not be found when the user clicks on the button.

asteriskBut starting with version 8.5.3 of CD-Menu Creator, an alternative method can be used. Instead of specifying a file path to one specific file, for example ‘Files\Button1\MyDoc.doc‘, you can use a wildcard character (an asterisk: *) and specify a file path to the first occurrence of a file in a folder with a specified filename extension, for example ‘Files\Button1\*.doc‘. In this case the first file in the ‘Files\Button1‘ folder that has a ‘.doc‘ filename extension in its filename will be opened.

The 'Add Button'dialog box (example 2)

This technique allows you to change the filename of the file in the folder without re-creating the whole menu. The filename extension must be the same, but the rest of the filename can be changed freely on the CD/DVD/USB stick.

Works with documents and programs
This technique with a wildcard character can be used with the following three button commands:

Run Program
Run Program & Close
Show Document

Filename examples
Below are some examples of how filenames can be built when using this technique:

MyDoc1.doc
MyDoc2.doc
LatestNews-20170528.doc
LatestNews-20170529.doc
Journal-John-Smith.doc
Journal-Sam-Johnson.doc

File path examples
Below are some examples of how the file path can be built:

Files\Button1\*.doc
Files\Button2\*.xls
Files\Button3\*.exe

Files\Button4\journal*.doc
Files\Button5\app*.exe

An asterisk (*) is the only supported wildcard character. The asterisk must always be to the left of the dot that starts the filename extension.

Tip
When you create your menu for the first time, it can be a good idea to first select a source file and specify a complete file path to this file (do not use wildcards yet). After you have created your menu and everything works as expected with the selected file, you can change the file path to a file path that contains a wildcard character. Then you create your menu again. Henceforth you can change the filename of the file freely directly in the folder on disc or USB stick. You don’t need to create the menu again.

How to install a font with Visual Installer

True Type font logoSometimes the fonts that are included in Windows are not enough, and you need to distribute your own font(s) with your software. But before they can be used in another computer, they must be installed in the right system folder and registered in the system.

Luckily Visual Installer supports installation and registration of fonts. So it is easy to add a font to your installation and have it installed and registered in another computer. In the tip below we will show how to add a font file to an installation project and how to make sure it will be registered in the system during the installation.

How to install and register a font with Visual Installer

1. Open your project or create a new project.

2. Choose the menu item List – Add – Add files.

3. Browse and select your font file (must be a file with the filename extension .ttf).

(If you want to add a font file that is located in C:\Windows\Fonts, you can first copy the font file to another folder that you create, for example C:\MyFonts. Thereafter you add the font file to Visual Installer´s file list from C:\MyFonts. Adding the font directly from C:\Windows\Fonts may not always work because it is a special folder.)

4. Click Open in the Add files dialog box.

5. In the next dialog box that is shown, make sure that the destination folder is %FONTDIR.

6. Click OK to close the Destination folder dialog box.

7. Now select the font file in the file list.

8. Choose the menu item List – Register font.

9. Enter a font name in the Font name text box in the Register font dialog box.

10. Make sure that the Register this font after installation option is selected.

11. Click OK.

You have now added a font file to your installation project and it will be installed in Windows font folder, and registered in a proper way, during the installation.

How to check that a file is dual code signed

In Visual Installer 2015 we added a new function that makes it possible to dual code sign setup files. You can read about the new function in the following blog post:

> Visual Installer now supports SHA-2 and dual code signing

Before you distribute your installation package it can be a good idea to check that the dual sign process succeeded. You can do it easily by following the steps below:

1. Create your setup package from Visual Installer.
2. Locate the setup package file via Windows Explorer.
3. Right-click on the file.
4. Choose the Properties menu item in the local menu that is opened.
5. Open the Digital Signatures tab.

If the file has been successfully dual signed, there should be two rows in the signature list:

Windows Properties window

The digest algorithms should be sha1 and sha256, as shown in the picture above. If there is only one row in the signature list, the dual code sign process failed or you have not set Visual Installer to dual code sign setup packages. Read this tip to get more information about how to change code sign settings in Visual Installer.

See also
> What is SHA-1 and SHA-2 and what’s the difference between them?
> How to code sign a setup package (Visual Installer tip)

ComponentSource sells SamLogic’s new 2017 products

ComponentSourceComponentSource, the world’s largest reseller of software components and development tools, is an official reseller for SamLogic Software’s products, and sells our tools for developers and designers. From ComponentSource you can buy the following three products from SamLogic:

> SamLogic CD-Menu Creator 2017
> SamLogic USB AutoRun Creator
> SamLogic Visual Installer 2017

ComponentSource Customer Services representatives speak many languages, including English, French, German, Italian, Spanish, Japanese, Korean, Cantonese, and Mandarin, and are available to assist you with all of your sales and technical queries about the three products listed above. If you have questions about our products and prefer to talk or write in other language than English (for example in Spanish or German) it can be a good idea to contact ComponentSource and ask your questions.

You can call ComponentSource free of charge in 47 countries. You can also send an email to the following e-mail address: sales@componentsource.com

Related links
> SamLogic Software’s products on ComponentSource
> You can call ComponentSource toll free in 47 countries
> About ComponentSource

Visual Studio 2017 can be downloaded now

Visual Studio 2017 editor

The new Microsoft Visual Studio 2017 was released this Tuesday (March 7) and can now be downloaded from Microsoft’s web site:

> What’s new in Visual Studio 2017 & Download links

The Community version of Visual Studio 2017 can be downloaded and installed for free. Visual Studio Professional 2017 and Visual Studio Enterprise 2017 are also available for download, but if you want to use them you need to purchase them.

System requirements for Visual Studio 2017 can be read on this page.

The new Visual Studio 2017 will be released on March 7

Visual Studio 2017 Logo

According to Microsoft, the new Visual Studio 2017 will be released on March 7. Visual Studio 2017 is the latest version of Microsoft´s powerful suite of development tools. The first version of Visual Studio was released 1997, so Microsoft will also celebrate Visual Studio’s 20th anniversary when the new version of Visual Studio is released.

Microsoft Visual Studio 2017 includes enhancements to code navigation, IntelliSense, refactoring, debugging, Azure etc. And Xamarin is now integrated in the product which means developers can build Android, iOS and Windows apps directly from Visual Studio. The installation of Visual Studio is also faster and you only need to install the features that you need. Microsoft has also added new features to the C#, C++ and VB languages.

A detailed list of all new features and improvements in Visual Studio 2017 is available here:

> What’s New in Visual Studio 2017
> Visual Studio 2017 Release Notes

Visual Installer 2017 is compatible with Visual Studio 2017
Visual Installer 2017, that we released last week, is fully compatible with Visual Studio 2017 and Visual Basic 2017 (VB 15). This means you can import solution files and project files, that is saved with Visual Studio 2017, to Visual Installer.

Visual Installer 2017 has now been released

We have now released a new version of our setup tool SamLogic Visual Installer. The name of the new version is SamLogic Visual Installer 2017 and the version number is 11.0. Some new features in the new version are:

• The support for Windows 10 has been improved.
• Supports Visual Basic 2017 / Visual Studio 2017.
• Supports AutoCAD 2017.
• Supports Microsoft .NET Framework 4.6.2.
• Supports Microsoft Edge.
• The file information window now displays info about digital certificates. Read more.
• Line breaks can now be included in message boxes that are opened via script. Read more.
• You can specify your own default folder for your Visual Installer project files. Read more.

A detailed list of new features in Visual Installer 2017 is available on this web page.