New menu interface examples in CD-Menu Creator 2014

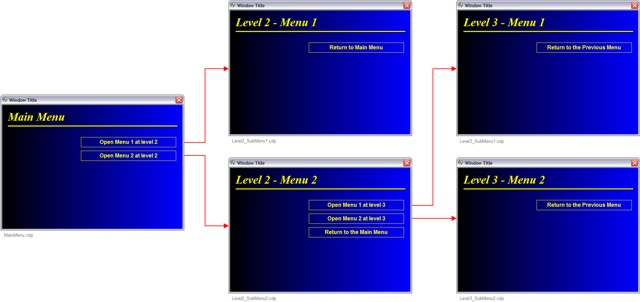
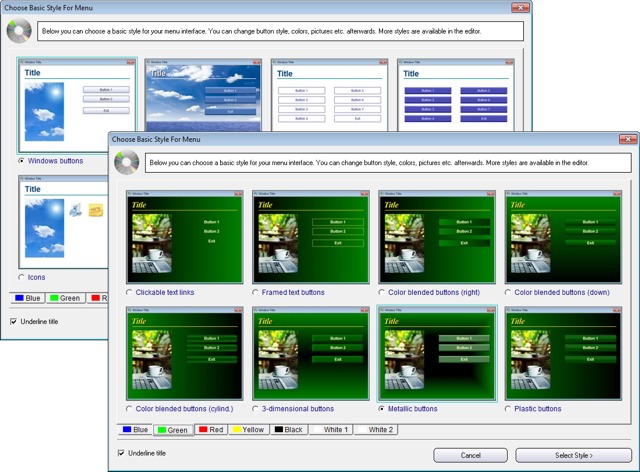
We have included some new menu interface examples in CD-Menu Creator 2014. The new menu interface examples are available in CD-Menu Creator 2014 version 7.5.9 and later (read more in this blog post).

New menu example

The menu interface examples that follow CD-Menu Creator gives you examples of which kind of menu interfaces that can be created with CD-Menu Creator. You can also use the menu interface examples as templates when you create your own menus.

Read more:
> CD-Menu Creator 2014 – New Menu Examples

See also this tip:
> Tip: How you use CD-Menu Creator menu examples as templates for your own menus

USB AutoRun Creator can now handle SD memory cards

SD memory cardWe have now released version 2.0 of USB AutoRun Creator and the new version of the tool has been extended to also support SD memory cards (for example SDHC cards and a SDXC cards). So it is now possible to add AutoRun capabilities also to SD memory cards.

It works in a similar way as USB flash drives. When the user inserts the SD memory card into the card slot, a menu interface, a program or a document is opened automatically. Or if you prefer, a video starts playing automatically on the screen.

The same security system is used for SD memory cards as for USB flash drives, so only files distributed from you will be opened automatically. If somebody changes the contents after creation, nothing will happen.

Supports all Windows from Windows XP to Windows 8.1
The following operating systems are supported by the updated AutoRun function (that handles SD memory cards): Windows XP, Windows Vista, Windows 7, Windows 8 and Windows 8.1.

More information
More information is available on the following web page:
> USB AutoRun Creator – Add AutoRun to a SD Memory Card

Updated Visual Installer 2014 with many new functions

We have now released an update of SamLogic Visual Installer 2014 (version 10.0.20) that contains many new functions and improvements. Below are some examples of new functions that we have included in the update of Visual Installer:
– You can now add version information (for example a version number, product name and company name) to a self-extracting setup package. Read more.

– Visual Installer can now register a .NET assembly and add a COM object interface to the assembly, so it can be accessed from unmanaged (native) applications. Read more.

– A new script command with the name MSIEXEC has been added. It can be used to start an MSI installation from Visual installer. Read more.

– A new script command with the name EXIT has been added. It can be used to cancel an installation, for example if some conditions or system requirements are not met.

– A new condition has been included in the scripting language that can be used to check if a specific application or library already has been installed. Read more.

– A new condition has been included in the scripting language that can be used to check if the operating system is 32 bit or 64 bit. Read more.

– Support for Autodesk AutoCAD 2014.

– The OpenSSL library that is used by the Twitter function in Visual Installer has been updated to use the latest version of OpenSSL (version 1.0.1g) which contains a bug fix for the Heartbleed bug. If you use the Twitter function in Visual Installer we recommend you to install the update.

How to download the update
If you have Visual Installer 2014 and a 12 months maintenance plan you can download the update from the following download page:

> Download – Visual Installer 2014 – Latest update

If you have an older version of Visual Installer, for example Visual Installer 2012, you can upgrade to the latest version of Visual Installer from this order page:

> Upgrade to Visual Installer 2014

Visual Installer: How to add version information to a setup package

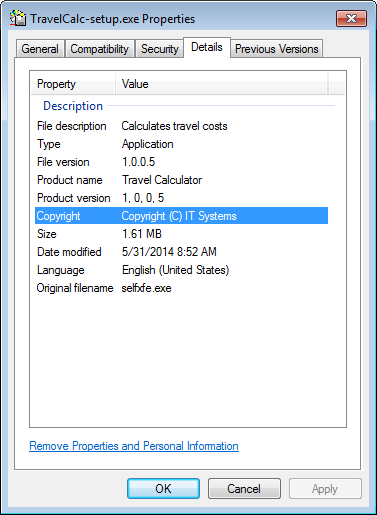
One new function in Visual Installer 2014 (version 10.0.20, and later) is the possibility to add version information to a self-extracting setup package. You can for example add version number, product name, company name and copyright text. The version information can be seen in Windows Explorer and in other places in Windows.

Where in Visual Installer can the version information be entered?
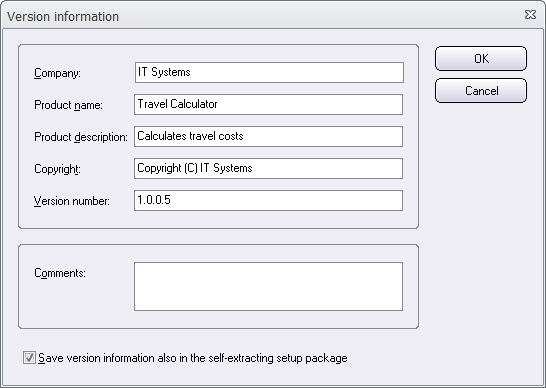
You can enter the version information in the Version information dialog box in Visual Installer. The dialog box can be opened via the menu item Special – Version information. The picture below shows how the dialog box looks like:

The 'Version information' dialog box in Visual Installer

The Version information dialog box has existed in Visual Installer for many years, but what is new is the Save version information also in the self-extracting setup package option in the bottom of the dialog box. This option was added to the dialog box in version 10.0.20 of Visual Installer. If you select this option, the version information that you enter in this dialog box will be stored in the setup package file. If the option is not selected, no version information will be stored in the setup package and the dialog box will function as in previous versions of Visual Installer (for example, as a way to identify installation project files).

The version information can be viewed in Windows Explorer
If you have chosen to add version information to the setup package, the information can be shown in Windows Explorer and other places in Windows. For example, when the mouse pointer is above the filename in Windows Explorer, a tip text with the version information is displayed (as shown in the picture below):

Tip text in Windows Explorer (with version information)

Also the Details tab in the Properties dialog box in Windows Explorer contains this information (the dialog box can be opened by right-clicking on the filename and choosing the Properties menu item). The picture below shows how the information is shown in the Details tab if the text that was entered in this blog post’s first picture is used:

The 'Properties' dialog box in Windows Explorer

Version number
If you want to add a version number to the setup package, you must use 4 numbers when you specify the version number; for example: 1.2.0.5. Both commas and semicolons are allowed to use as a delimiter. So it is also ok to enter the version number like this: 1,2,0,5.

If you use more than or less than 4 numbers for the version number (for example 1.2) the version number is not stored in the setup package. If you want a version number like this to be stored in the setup package, you can extend the version number with zeros and enter the version number like this: 1.2.0.0.

Visual Installer: How to register a .NET assembly

An ActiveX component must always be registered before use and sometimes also a (native) DLL file must be registered before it can be used. This is very essential in many software projects so Visual Installer have had built-in functions to register ActiveX components and (native) DLL files for many years. In Visual Installer 2014 we have extended this functionality so also a .NET assembly can be registered.

A NET assembly is an application, component or class that is compiled for use with Microsoft .NET Framework. A NET assembly can have an .EXE filename extension or a .DLL filename extension. If the filename extension is .DLL, the assembly is a library assembly and can be used by other .NET code in an easy way. But the assembly can not be used from native (unmanaged) code, unless it is registered in the system and a COM object interface (a COM-callable wrapper) is added to the assembly. The new function that we have added to Visual Installer will make such a registration.

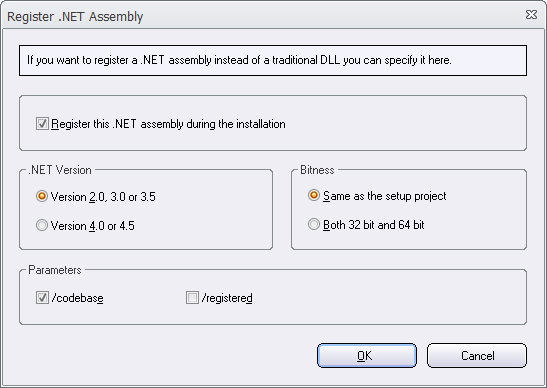
If you add a .NET assembly (with the filename extension .DLL) to Visual Installer’s file list and select the file in the list, a new menu item is added to the List menu. The name of the new menu item is Register .NET assembly (see the picture below):

If you choose this menu item, the following dialog box is shown:

The 'Register .NET assembly' dialog box

In this dialog box you can set some options that will be used when the .NET assembly is registered, for example which .NET version to use and which bitness (32 bit or 64 bit) to use.

See also
> Visual Installer: Register a .NET assembly
> Tip: How to register a .NET assembly

Visual Installer: New conditions in the scripting language

We have added two new conditions to Visual Installer 2014’s scripting language. One condition can be used to check if the operating system where the setup package is run is 32 bit or 64 bit. Another condition can be used to check if an application or library already has been installed in a computer or not. The later condition is very useful when it is combined with the MSIEXEC script command because it gives you the possibility to only start an MSI installation if the software has not been installed before. This will speed up the installation process in many computers.

Read more
You can click on the links below to read more about the two new conditions in Visual Installer’s scripting language:

> Check if a product already is installed
> Check if the operating system is 32 bit or 64 bit

What is included in the 12 months maintenance plan?

When you buy a software from us you have the option to choose whether you want to include an 1 month maintenance plan or a 12 months maintenance plan, for the software. An 1 month maintenance plan is always included in the product price, but for an additional fee you can have a 12 months maintenance plan instead. Below we will explain what the differences are between these two maintenance plans:

The 1 month maintenance plan includes:
– 1 month technical support for the product(s) that you bought
– Temporary download link(s) for the software that you have bought (expires after 2 weeks)

The 12 months maintenance plan includes:
– 12 months technical support for the product(s) that you bought
– Permanent download link(s) to all software that you have licenses for (for 12 months)
– Always access to the latest version of software that you have licenses for (for 12 months)
– We can resend license keys for software that you have bought, at request

One big benefit when choosing the 12 months maintenance plan is that you can download your software whenever you want, for example if you change computer. You will also have access to the latest product version (with the latest updates), and if you for some reason lose your license key, we will send it to you again without any extra cost.

What does the 12 months maintenance plan cost?
You only need to pay additional $20$40 to obtain a 12 months maintenance plan instead of an 1 month maintenance plan. The exact price depends of the product and its price. For CD-Menu Creator the additional cost is $20 and for Visual Installer the additional cost is $40, for example. So the additional cost is very small, so we recommend you to choose a 12 months maintenance plan instead of a 1 month maintenance plan.

Is it possible to buy a 12 months maintenance plan afterwards?
Yes, you can buy a 12 months maintenance plan afterwards for a product, if you don’t bought it when you bought the software. The price when you buy the 12 months maintenance plan afterwards is $39. You can read more on this page.

Some products have always a 12 months maintenance plan included
Some of our products have always a 12 months maintenance plan included. That is the case for the following products from us: SamLogic Media Tools, SamLogic USB Menu Creator and our component libraries. But for CD-Menu Creator, USB AutoRun Creator, Visual Installer and MultiMailer you can choose whether you want to have an 1 month maintenance plan or a 12 months maintenance plan with the software.

See also
> How to download the latest version of a program
> How to download an old version of a program

How to download the latest version of a program

If you also ordered a 12 months maintenance plan when you ordered a software from us, you will have access to a download page on our website from where you can download the latest version of the software, whenever you want. You will have access to the download page for 12 months.

The download page is password protected, but if you bought a 12 months maintenance plan we have sent to you a username and a password that you can use to login to the download page.

If you don’t have a 12 months maintenance plan and don’t have a username and password, but want to have access to the latest product versions, you can read this page to get more information about how to get access to the download page:

> How to download latest product version

See also
> How to download an old version of a program

How to download an old version of a program

We recommend you to always use the latest version of a product from us, to make sure it works as smoothly as possible in new operating systems. Microsoft updates Windows constantly and release new versions of Windows more frequently than before, and we update our software often to make sure it works as expected also in new Windows versions.

However, it is possible to get a download link to an older version of a software if you need that for some reason. We have a download page on our website that contains all product versions that we have released the last years. If you have bought earlier a license for a specific product version, that now is outdated, you can still download it from the download page. You can click on the link below to read more:

> How to download an old product version

See also
> How to download the latest version of a program

How to create an AutoRun menu for portable applications

What is a portable application?
Portable applicationsA portable application (portable app) is a computer program that you can carry around with you on a portable device and use it on any computer. It does not require any installation, you simply plug your USB flash drive, portable hard drive, iPod, iPad or other removable drive into the computer and run the program. A portable application can be a game, or a utility program such as a text editor, email client, web browser, antivirus software, backup tool etc. or similar.

A portable application gives you access to your software and personal data just as you would have on your own PC. However, all the portable application settings and data are stored on your external drive so when you unplug it, none of your personal data is left behind. Furthermore, the computer you run your portable application on does not get affected as all data is saved on the drive from where you run your application.

A portable menu will give an easy access to the portable applications
A portable menu will provide you with a simple way to access your portable applications. You only have to plug in the device and open the menu interface, and thereafter all applications are just one click away. You don’t need to browse the drive and its folders using Windows Explorer (or similar software) to find a particular application.

An AutoRun menu will make it even simpler
USB stickAn AutoRun menu will take this one step further. You don’t need to open the portable menu manually – the menu interface will be opened automatically when your portable device (for example a USB stick) is plugged into the computer. And thereafter you can launch one of the portable applications with just one mouse click.

Create an AutoRun menu with USB Menu Creator
SamLogic provides you with an easy solution to create an AutoRun menu for your portable applications: USB Menu Creator. USB Menu Creator gives you the possibility to create an AutoRun menu for USB sticks / flash drives. That means that your created menu will be shown automatically on the screen after plugging your USB stick into the computer’s USB port. All you need to do is to choose the application you want to run.

With USB Menu Creator you can easily design and personalize your portable application’s menu interface so it fits your needs and desires. USB Menu Creator offers you a wide range of effects such as shadows, glass effects, 3D effects, a large palette of graphical button styles, it allows you to place hyperlinks, hotspots, images or videos in your menu and even add different music and sound effects. The picture below shows an example of how an AutoRun menu interface created with USB Menu Creator may look like:

AutoRun menu for portable applications

When you want to start an application, just click on one of the buttons in the menu interface.

Wait a minute; doesn’t Microsoft removed AutoRun support for USB sticks?
That is correct. Window’s AutoRun function does not work with USB sticks anymore. So if you plug your current USB stick into a random computer, nothing will be run automatically. But we have developed an alternative system that gives back Autorun to USB sticks. If you use our USB Menu Creator software to add menu interfaces to USB sticks, they will support AutoRun.

Compatible with Windows 8, and Windows XP / Vista / 7
USB Menu Creator can create menu interfaces for portable applications that are compatible with all modern Windows operating systems, including Windows 8, Windows 7, Windows XP and Windows Vista. The menu interface picture above shows an AutoRun menu, created with USB Menu Creator, that is run in Windows 8.

More information
More information about USB Menu Creator is available on the tool’s product page:
> SamLogic USB Menu Creator – Product Page