
![]() We have added 3 new variables and 2 new script command to Visual Installer 2014. The variables can be used to handle shared files and shared settings, and the script commands can be used to change permissions for folders on the hard disk during the installation process.
We have added 3 new variables and 2 new script command to Visual Installer 2014. The variables can be used to handle shared files and shared settings, and the script commands can be used to change permissions for folders on the hard disk during the installation process.
THREE NEW VARIABLES
Three new variables were added to Visual Installer 2014. Below they are described briefly:
%SHAREDDOCUMENTS : Can be used to install shared documents.
%PUBLICDIR : Can be used to install shared files (documetns, images, videos etc.).
%APPDATADIR_ALLUSERS : Can be used to install shared settings.
TWO NEW SCRIPT COMMANDS
We have also added two new script commands to Visual Installer 2014. They can be used to change permissions for hard disk folders. Below are the script commands described briefly:
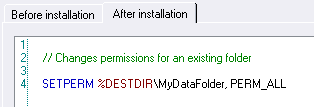
SETPERM : Changes permissions for an existing folder on the hard disk.
XCREATEDIR : Creates a folder on the hard disk with specified permissions.
More detailed information about the script commands is available on this information page and on this blog post. The picture below shows how the SETPERM command can be used to set read, write and execute permissions for a hard disk folder during the setup:
 We have now released a new version of our easy-to-use setup tool
 ")
")
")


")

