How to display a text message during an installation

It is possible to display a text message during an installation (that is created with Visual Installer). You can do it via Visual Installer’s script language. There are two commands available for this purpose:

MESSAGE : Displays a text message on the progress bar window.
MSGBOX : Shows a message box with a title, text and an OK button.

If you use the MESSAGE command, the text will be shown until another text need to be displayed or the progress bar is closed. If you use the MSGBOX command, the installation will pause until the end-user click the OK button in the message box.

MESSAGE
Below is an example of how to use the MESSAGE command:

MESSAGE My MSI installation is running
MSIEXEC %DESTDIR\MySetup.msi, /qn, WAIT

   
MSGBOX
Below is an example of how to use the MSGBOX command:

IF NOT OFFICEINSTALLED
  MSGBOX Information, There is no MS Office installed in this computer! , 2
  EXIT
END IF

   
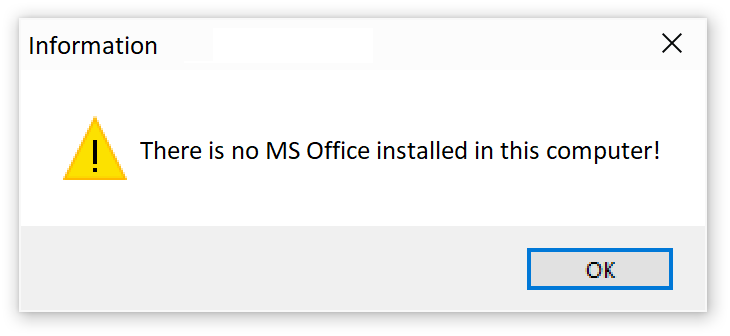
MSGBOXThe picture to the right shows how the message box created in the scripting code example above will look like when shown during an installation. When the end-user clicks on the OK button, the installation continues to the next script line, where the EXIT command halts the installation.

More information
More information about the commands described above is available in Visual Installer´s Help Documentation and User´s Guide. General information about Visual Installer’s script language can be found on this web page.

FAQ about destination folders for EXE, DLL & OCX files in Visual Installer

FAQThere are some common questions about destination folders for binary files (EXE, DLL, OCX files etc.) in Visual Installer that we sometimes get asked from our customers. You will find the questions & answers below, and if you are new to Visual Installer we recommend you to read them:

Questions and answers:


#1
Q: Should I use the C:\Program Files folder or the C:\Program Files (x86) folder as a destination for my application file?

A: It depends of the bitness of your application. 32 bit applications should be installed to the Program Files (x86) folder and 64 bit applications to the Program Files folder.

However, Visual Installer will choose correct folder automatically for you, if you specify your application’s bitness in the 32/64 bit tab in the Setup options dialog box in Visual Installer.
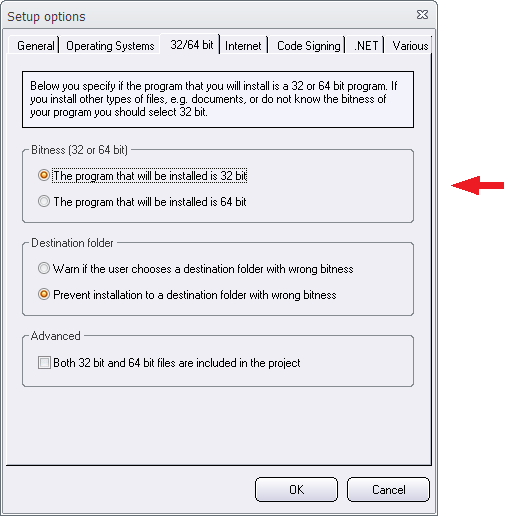
The Setup options dialog box

You can open this dialog box by choosing the Setup options menu item in the Special menu.


#2
Q: How do I do in Visual Installer to install a file to the program files folder?

A: Installing a file to the program files folder (the Program Files or the Program Files (x86) folder) is easy done in Visual Installer, but you need to specify the settings for this in two steps:

Step one:
1. Open the File list tab in Visual Installer’s editor.
2. Click on the […] button to the right of the Main folder text box in the tab (it is located in the upper right part of the editor window).
3. Select the %PROGRAMFILES option in the dialog box that is shown (see the picture below).
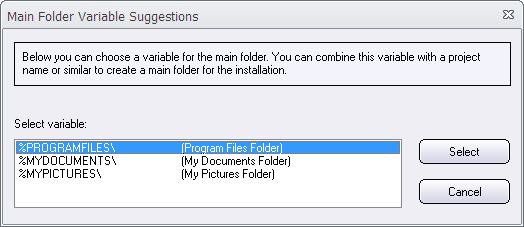
The Main Folder Variable Suggestions dialog box

4. Click the Select button.
5. Add (enter) a sub folder name after the %PROGRAMFILES variable in the Main folder text box. Below is an example:
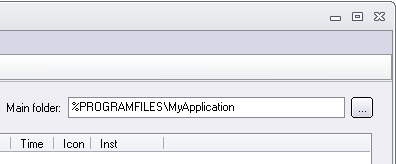
Main folder

You have now specified the main destination folder for your installation. In the next step we will specify the destination folder for the specific file that you want to install.

Step two:
1. Choose the List – Add – Add files menu item in Visual Installer’s editor.
2. Select your file in the Add files dialog box.
3. Confirm that the text after the Folder text box is %DESTDIR in the following dialog box:
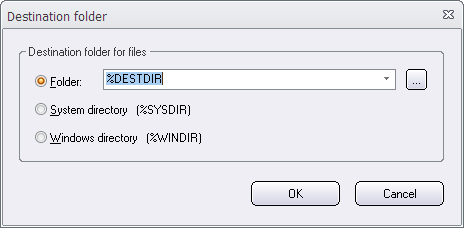
The Destination folder dialog box (1)

4. Click the OK button.

Now this file will be installed to the Program Files or the Program Files (x86) folder during the installation. If your application is a 32 bit application, the Program Files (x86) folder will be used as a destination. You can read more in this blog post and in this tip.


#3
Q: How do I install a file to the system folder?

A: If you have for example a DLL or OCX file that need to be installed to Windows’ system folder it can be done in Visual Installer. Follow the instructions below to do it:

1. Open the File list tab in Visual Installer’s editor.
2. Choose the List – Add – Add files menu item in Visual Installer’s editor.
3. Select your file in the Add files dialog box.
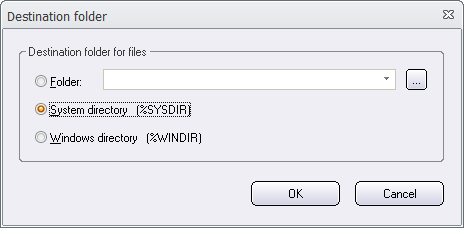
4. Select the System directory option in the following dialog box:
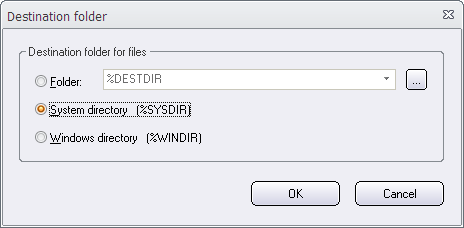
The Destination folder dialog box (2)

5. Click the OK button.

Now this file will be installed to Window’s system folder during the installation. The exact folder that is used depends of your installation project’s bitness (see question 1 above).


#4
Q: In some dialog boxes and other places in Visual Installer’s editor I see words like %PROGRAMFILES, %DESTDIR and %SYSDIR etc. What are they?

A: %PROGRAMFILES, %DESTDIR and %SYSDIR etc. are called variables. The name of the variable will be replaced with an actual text during the installation.

Variables are used when the actual text is not known, until the installation starts. Variables are usually used as a place holder for folder paths. For example the %PROGRAMFILES variable is a place holder for the program files folder in the system. When the installation starts, %PROGRAMFILES is replaced with the actual folder path. For example with C:\Program Files.

You can read more about variables in this blog post.


#5
Q: I have an international application. The name of the program files folder is different in different countries / languages. Can Visual Installer handle this?

A: Yes. Visual Installer will find the correct path to the program files folder regardless of country / language or version of Windows. You can read more in this blog post.

More information
If you want more information about the settings in the dialog boxes above, you can press the F1 button on your keyboard when the dialog box is open. We recommend you also to take a look on Visual Installer’s tips and tricks pages:

> Tips & tricks for SamLogic Visual Installer

How to install an ActiveX component with Visual Installer

ActiveX Logotype

Visual Installer supports installation of VB6 applications, and most VB6 applications use ActiveX components. An ActiveX component is an easy way to give applications access to powerful functions in a library or to put well designed visual objects on the application interface.

Visual Installer can install ActiveX components. If you import a VB6 project to Visual Installer (via File – Import Visual Studio project – Visual Basic 6.0 project) all ActiveX components in the Visual Basic project will be added automatically to Visual Installer’s file list. But you can also add additional ActiveX components manually, in this way:

1. Choose the List – Add – Add files menu item in Visual Installer’s menu.

2. Browse to the ActiveX component you want to add.

3. Select the ActiveX file and click on Open.

4. The following dialog box is now shown:

The Destination Directory dialog box

5. Choose a destination folder for the ActiveX.
Normally is System directory used as destination folder for ActiveX files in VB6 projects. If you don’t find other information about the destination folder, select the System directory option.

6. Now click OK.

The ActiveX component has now been added to Visual Installer’s file list. It will be automatically registered during the setup process. Registration is an important part when installing ActiveX components, and Visual Installer will do it for you.

Sometimes ActiveX are dependent on DLL files
Mostly ActiveX files can be distributed alone, but sometimes they are dependent on additional DLL files. If you add an ActiveX file manually (as described above) and you get problems in another computers when running your application, you should check the documentation for the ActiveX, if also DLL files must be distributed in the same time. You can add the DLLs to the file list in the same way as described above. The destination directory for the DLL file must be the same as the ActiveX file.

See also
> How to create an installation for a VB6 application (tip)
> How to install and register an ActiveX component (general article)

Frequently asked questions about titles in Visual Installer

FAQThere are some common questions about titles in Visual Installer that we get then and then from new customers. You will find the questions and answers below, and if you are new to Visual Installer we recommend you to read the questions and the answers:

Questions and answers:

#1
Q: I have created my first installation. But when the software is installing, there is the word “Title” in the top left hand corner of the graphical window. How can I change that to my application name?

A: If you want to change the text of the title in the graphical setup window to another text, you can follow the steps below:
1. Open the Design tab in the editor.
2. Select the menu option Object – Title.
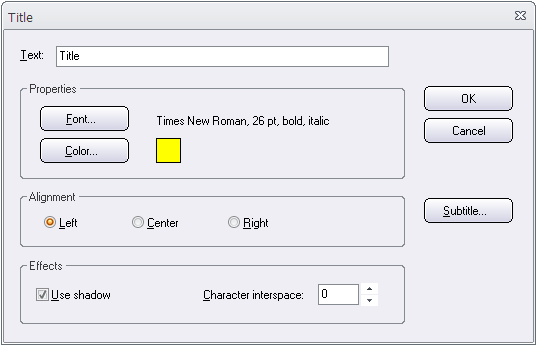
3. The following dialog box is opened:

The Title dialog box

4. Enter a new title at Text. Enter for example your application name here.
5. Click OK to close the dialog box.

The title is now updated. If you also want to add a subtitle, you can press the Subtitle button in the Title dialog box.

#2
Q: I have put the application name in the title of the graphical window. But all of that text is covered up by the installation dialog boxes in the beginning of the installation. How do I make this text visible?

A: There are two things that you can look at:
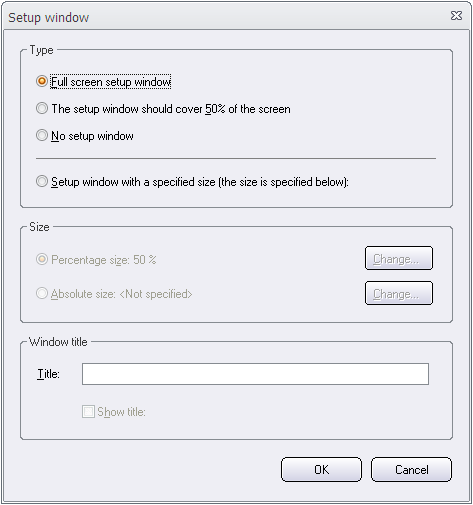
1. You can adjust the size of the graphical setup window by opening the Object – Setup window menu item in the editor and adjust the windows size in the dialog box that is shown. Full screen size is the biggest size. But you can also have another size.

The Setup Window dialog box (1)

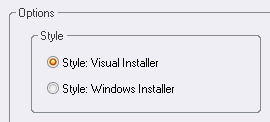
2. In the Dialog boxes tab in the editor you can choose the “Style: Visual Installer” style, if you have not. It creates smaller dialog boxes.

Style

#3
Q: In the Setup window dialog box in the editor, there is a Title input box in the Window title frame. What is the difference between this title and the title that is specified when choosing the Object – Title menu item?

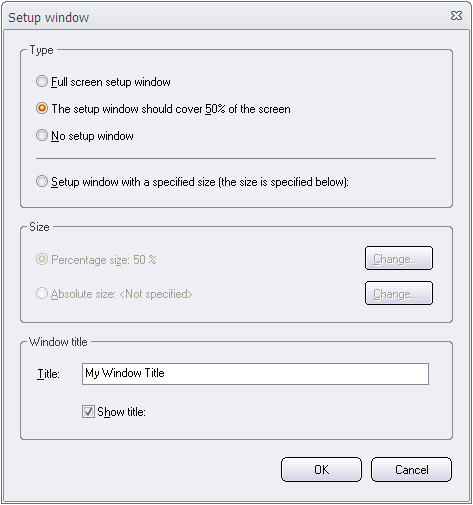
A: The title that you specify in the Title input box in the Setup window dialog box (see the picture below) is shown in Window’s task bar, and in the caption bar of the setup window if you have also selected the Show title option in the dialog box.

The Setup Window dialog box (2)

The title that you specify via the Object – Title menu item is the title that is shown in the graphical setup window. You can change font, colors, size, alignment etc. for this title.

More information
If you want more information about the settings in the dialog boxes above, you can press the F1 button on your keyboard when the dialog box is open. We recommend you also to take a look on Visual Installer’s tips and tricks pages:

> Tips & tricks for SamLogic Visual Installer

How to copy/move many files at once in Visual Installer’s script language

There is a built-in script language available in Visual Installer. The script language is very versatile and with the script commands you can do different kind of file operations and other types of operations during an installation.

File copy operationOne common operation is to copy or move files during an installation. There are commands available in Visual Installer’s script language that can do this. If you need to copy or move many files at once, you can use the MCOPY and MMOVE commands for this purpose. Below is the syntax of these two commands described:

MCOPY %Source, %DestinationDir
Copies many files at once. %Source specifies the source file path and %DestinationDir specifies the destination folder for the files.

MMOVE %Source, %DestinationDir
Moves many files at once. %Source specifies the source file path and %DestinationDir specifies the destination folder for the files.

   
You can use wildcards with the %Source parameter. Example: “%DESTDIR\Data\*.txt”. The code examples below show how to use these two commands with wildcards etc.:

Example 1 – Copy many files at once
Copies all files in the %DESTDIR\Data folder to the %DESTDIR\NewPlace folder:

MCOPY %DESTDIR\Data\*.*, %DESTDIR\NewPlace

Example 2 – Move many files at once
Moves all text files in the %DESTDIR\Data folder to the %DESTDIR\NewPlace folder:

MMOVE %DESTDIR\Data\*.txt, %DESTDIR\NewPlace

To add script commands to an installation, you need to open the Special – Execute script commands menu item in Visual Installer’s editor. More information is available in this tip.

   
More information
For more information about Visual Installer’s script language, see this web page:

> Advanced Tips & Tricks for SamLogic Visual Installer

SamLogic’s Newsletter Issues in 2020

We have an international newsletter that is targeted for our international customers where we publish information and news related to our products and our company. We send the newsletter about 6-7 times/year. In the newsletter you can read about:

– Information about SamLogic Software’s products
– Tips and tricks for SamLogic Software’s programs
– Technical and non-technical articles
– Videos (tip videos and information videos etc.)
– Special offers

Below you can view all newsletter issues that we sent during 2020:

> 07/2020 – 100 tips for SamLogic’s tools (part 3 of 3)
> 06/2020 – 100 tips for SamLogic’s tools (part 2 of 3)
> 05/2020 – 100 tips for SamLogic’s tools (part 1 of 3)
> 04/2020 – How to create an installation for a Visual C# application (with Visual Installer)
> 03/2020 – If you need to inform about the company’s actions regarding the coronavirus
> 02/2020 – You can now set an absolute position for a title object in CD-Menu Creator
> 01/2020 – Top Lists 2019 – Most read articles, read blog posts and viewed videos

Subscribe to our newsletter
If you want to subscribe to our newsletter you can visit the web page below:
> Subscribe to SamLogic Software’s newsletter

Create / Install an AutoCAD profile from Visual Installer

CAD, computers and people

Visual Installer is a very flexible setup tool and has built-in support for installation of AutoCAD profiles for Autodesk AutoCAD. Visual Installer can create a named profile for AutoCAD directly in Windows Registry, and add the settings and values that you want to use with the AutoCAD profile directly from the installer. You can also update an installed profile afterwards, or uninstall an installed profile.

AutoCAD - LogotypeTo give you a great flexibility when creating or updating AutoCAD profiles, we have added some special variables to the Registry tab in Visual Installer. By using these special variables it is easy for you to install or update AutoCAD profiles. These variables can also be used to find folder locations and other information that is used by Autodesk AutoCAD.

Visual Installer can handle different versions of Autodesk AutoCAD, and we update the support for this well-known CAD software continuously. Both AutoCAD and AutoCAD LT, and both 64 bit and 32 bit versions of the software are supported.

For more information about Visual Installer’s AutoCAD support and the special variables mentioned above in this blog post, see the AutoCAD profiles section in Part VII in Visual Installer´s User Guide.

How to add DKIM and DMARC to your domain

Abstract

We have published two articles on our website that explains what DKIM and DMARC are and why it is good to add them to your domain name (if you have not done it yet). It is especially important if you send email newsletters. Click on the links below to read the articles:

> Article: DKIM – How to add this to your domain
> Article: DMARC – How to add this DNS record to your domain

See also
> How to add / update SPF for a domain

Special Newsletter Series: 100 tips for SamLogic’s Tools

We have published many tips for our tools on our website, and in a special newsletter series we have listed links to more than 100 tips for Visual Installer and CD-Menu Creator / USB Menu Creator. You can read the newsletter issues by clicking on the links below:

> Special Issue #1 – 100 tips for SamLogic’s tools (part 1 of 3)

> Special Issue #2 – 100 tips for SamLogic’s tools (part 2 of 3)

> Special Issue #3 – 100 tips for SamLogic’s tools (part 3 of 3)

Subscribe to our newsletter
If you want to subscribe to our newsletter you can visit the web page below:
> Subscribe to SamLogic Software’s newsletter

Why SPF is important + How to update SPF for your domain

SPFSpammers often try to use false domain names in the sender’s e-mail address, and to prevent this happen, a technology called SPF can used. By utilizing SPF you can reduce the risk of abuse of your domain name.

SPF is also important if you send your own e-mail newsletters, because correct SPF settings will increase the deliverability of your e-mail newsletters and reduce the risk that your e-mails are rejected or put in the spam folders. The recipients’ servers will trust your domain name more if they find correct SPF settings for the domain.

We have published an article on our web site that explains more what SPF is, how it works and how you can use it to protect your domain names from abuse. The article also explains more in detail why it improves the deliverability of legitime e-mails.
Click on the link below to read the article:

> Article: How to add / update SPF for a domain