How to check if Microsoft Office is installed during an installation

Sometimes it can be useful to check if Microsoft Office is installed in a computer during an installation. There are conditions available in Visual Installer’s script language that can be used for this. The conditions in the script language can examine the following:

• check whether Microsoft Office is installed in the computer or not
• check if the installed Microsoft Office is 32 bit or 64 bit

This can be useful if you for example:

• install files that require that Microsoft Office is installed in the computer
• install files that require a specific bitness of Microsoft Office (for example 32 bit Office)
• want to install different files depending on the bitness of Microsoft Office

How to check if Office is installed
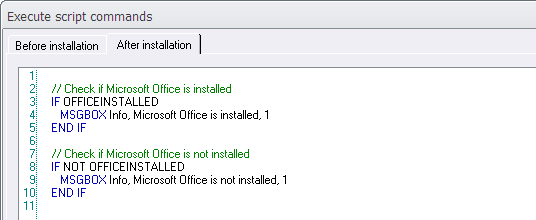
If you want to check if Microsoft Office is installed in the end-user’s computer you can use the IF OFFICEINSTALLED condition in Visual Installer’s script language for this purpose. If you want to check the opposite, if Microsoft Office is not installed in the computer , you can use the IF NOT OFFICEINSTALLED condition instead.

Below you can see how these two conditions can be used:

The 'IF OFFICEINSTALLED' condition

How to check Office bitness
There are 32 bit and a 64 bit versions of Microsoft Office available, and if you distribute executable files or components that co-operate with Microsoft Office (for example with Microsoft Excel or Microsoft Access) the bitness of the executable files or components that you install must often be the same as the bitness of the installed Office.

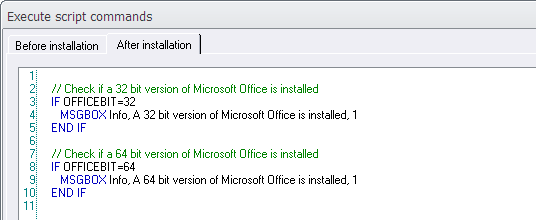
To handle this in a smooth way, you can use a another condition in Visual Installer’s scripting language. The name of the condition is IF OFFICEBIT=?? where ?? can be 32 or 64. For example IF OFFICEBIT=32, which checks if a 32 bit version of Office is installed.

Below you can see how this condition can be used:

The 'IF OFFICEBIT=' condition

Another example
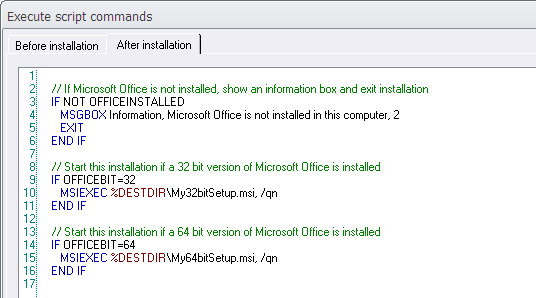
Below is another example, where the conditions above are combined. First the script lines checks if any version of Office is installed in the computer, and thereafter the script lines starts an installation with the same bitness (32 bit or 64 bit) as the installed Office:

All Office check conditions altogether

If no Office application is installed in the system, an information message box is shown (line 4) and the installation stops (line 5).

See also
> Visual Installer’s Scripting Language
> Check if the operating system is 32 bit or 64 bit

How to handle menu interfaces with many buttons

With the CD-Menu Creator menu designer tool you can create a graphical menu interface that contains more than 40 buttons in one menu window. This allows your customer to open many documents, applications or sub menus from the same menu page, but sometimes it can be difficult to make all buttons fit in one menu window in a proper way. Luckily there are some tricks that you can use and we will explain them below:

1. Place the buttons in 2, 3 or more columns
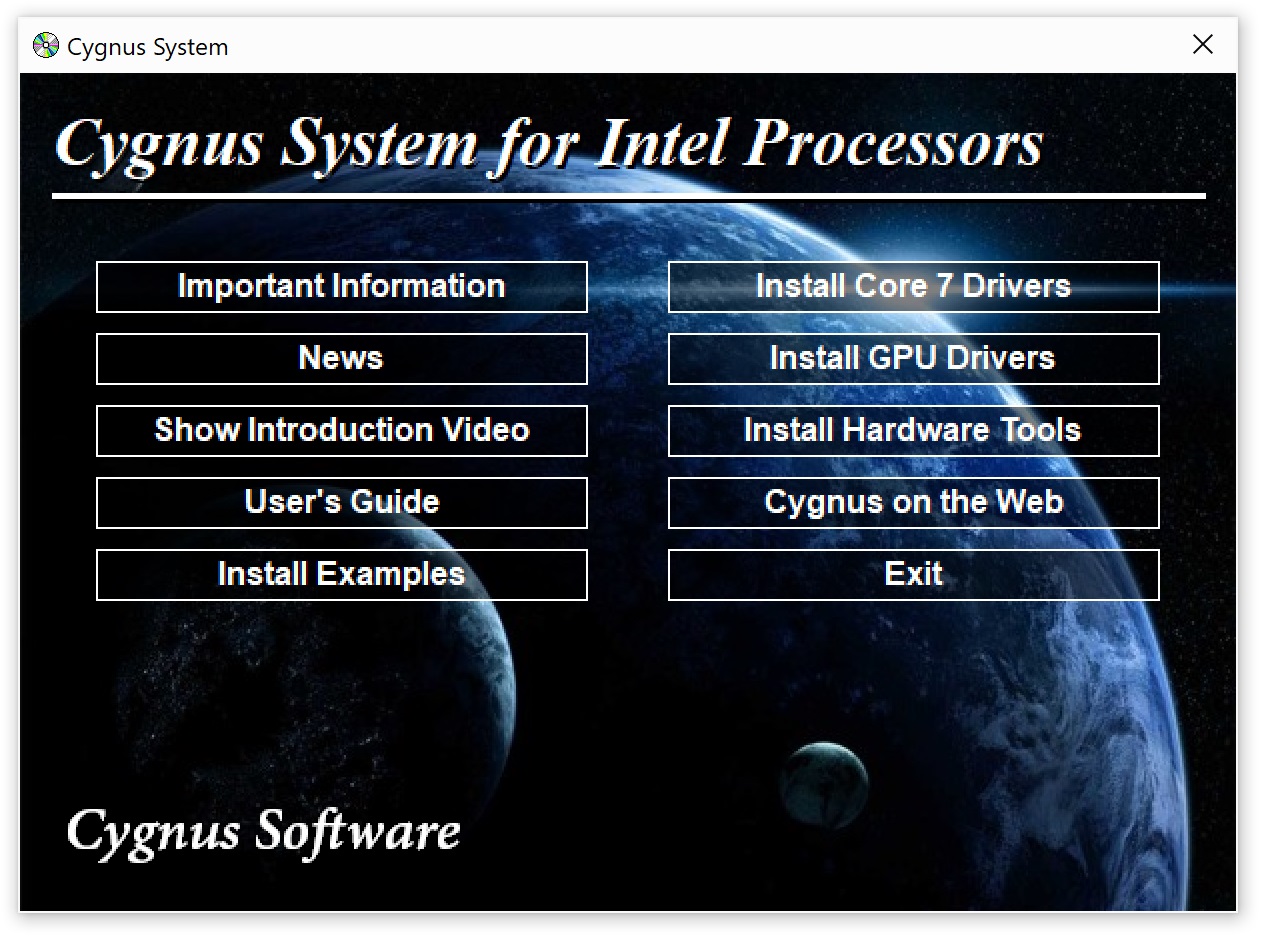
With CD-Menu Creator you can create a menu interface where the buttons are placed in columns. You can place them in 2, 3 or more columns. The picture below shows how it may look like with 2 columns of buttons:

Menu with 2 columns of button

Information about how to arrange the buttons in columns is available in this tip:
> Tip: How to create a menu interface with 2 or 3 columns with buttons

2. Use clickable links instead of framed buttons
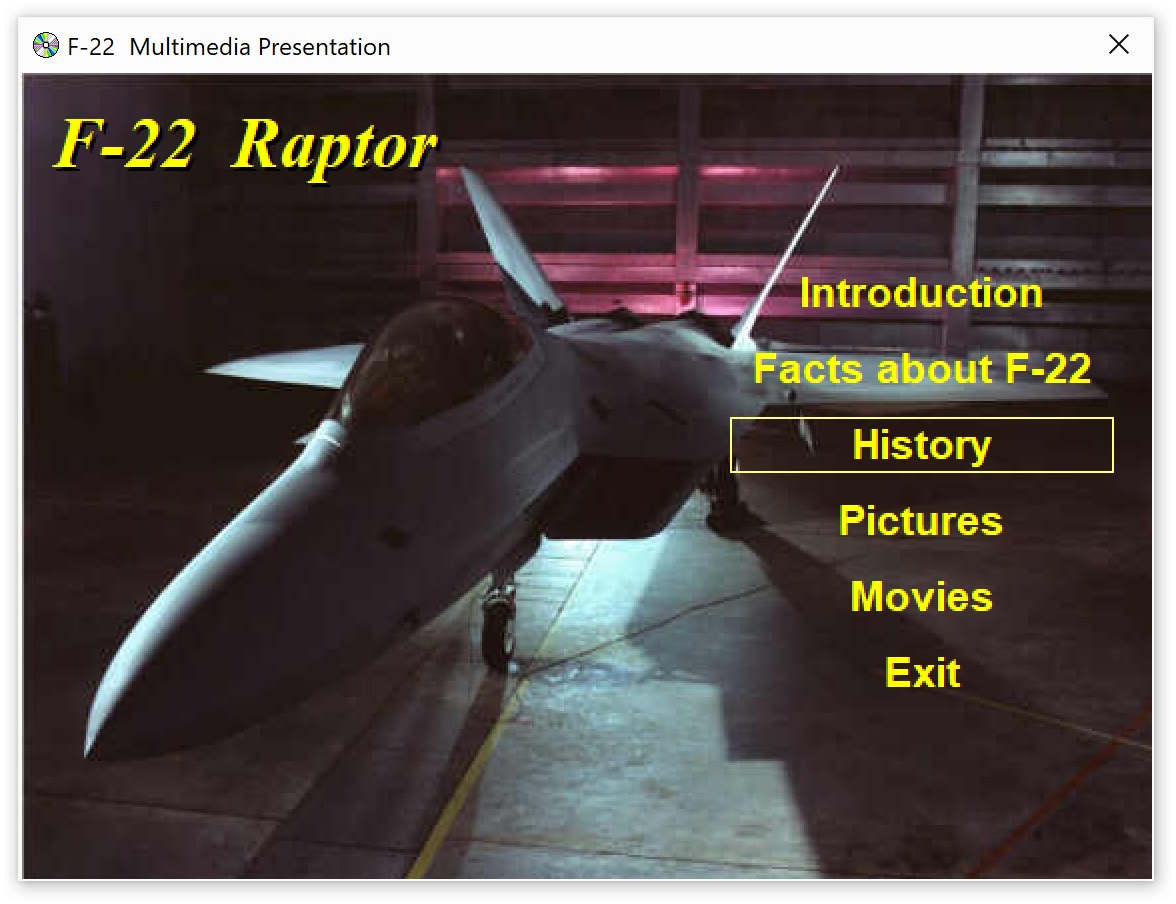
Another solution is to use clickable links instead of framed buttons. Links takes less space than buttons. The picture below shows how it may look like:

Menu with clickable links

To use clickable links in a menu, choose the Text only option in the Style combo box in the Buttons tab in CD-Menu Creator.

3. Shrink button height and distance between buttons
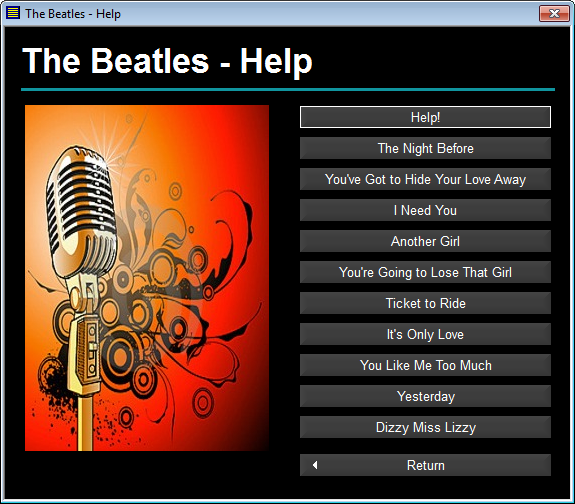
You can also change the height of the buttons, so they take less vertical space. The vertical distance between buttons can also be reduced, so they are placed more close to each other.

Menu - The Beatles

The height of the buttons in a menu can be changed in the Height text box in the Buttons tab in the CD-Menu Creator editor. Information about how to shrink the distance between buttons is available in this tip:
> Tip: How to adjust the button’s position in the menu window

But what to do if you need even more buttons?
Sometimes one menu window is not enough – no matter how you arrange the buttons. The solution then is to split the buttons (or clickable links) in two or more menu pages; for example a main menu and couple of sub menus. Luckily there is an easy way to do this, and the following tip shows how:
> Tip: How to create multiple menus – Two levels of menus

Bonus tip: Create button groups with titles
If there are some free space available in a menu, it can be a good idea to group the buttons in a logical way and add titles to the groups. This will make it easier for a user to locate a specific button. You can read more about button groups and group titles below:
> CD-Menu Creator: You can now create button groups with titles
> Tip: How to create button groups with titles

How to create an installation for a Visual C# application

For many years Visual Installer have had built-in functionality to create an installation for a Visual Basic 6.0 and Visual Basic .NET application, and in the latest version of Visual Installer we have added the same functionality for Visual C#. You can now create an installation for a Visual C# application in an easy way.

Besides collecting necessary files and setting correct destination folders for your project, you can also specify minimum system requirements (for example minimum .NET version) for the installation package. If the necessary .NET versions are not installed, the installer can inform and handle the download directly from the installation wizard.

Read more
Here is some more information about the new function:
> Visual Installer 2020: Visual C# is now supported

And here is a step-by-step tip that show how to use the function:
> Tip: How to create an installation for a Visual C# application

If you need to quickly inform about the company’s actions regarding the coronavirus

If you quickly need to inform customers, suppliers and your employees, what measures the company has taken to deal with the coronavirus then e-mail is a very effective way. We have therefore decided that anyone who needs can get a free 3-month license of the SamLogic MultiMailer e-mail tool. More information about the tool is available at:
> https://www.samlogic.net/multimailer/multimailer.htm

Send an email to support@samlogic.com and we will email you the download link and a 3-month license key for SamLogic MultiMailer.

User’s Guide
This PDF contains information about the functions in MultiMailer:
> https://www.samlogic.net/multimailer/pdf/MM.pdf

Tips
On this website you will find tips & tricks for MultiMailer:
> https://www.samlogic.net/multimailer/tips/index-tips-tricks-multimailer.htm

How to delay deletion of a file until reboot

Sometimes a file need to be deleted during an installation, but it can not be done because of the file is active and locked by the system. To handle this we have added a new script command to Visual Installer with the name RDELETE that can be used to mark a file for deletion and let the system delete the file when the computer restarts.

When you use this command, no attempt will be made to delete the file during the installation. Instead Visual Installer will inform the system that the file need to be deleted during the next system reboot.

The command syntax is the following:

RDELETE filepath

Example:

RDELETE %DESTDIR\CleanUp\CleanUp.exe

This command is useful when a file need to be deleted, but there is no hurry to delete the file. You can then call this command and let the system delete it later.

See also
> 4 delete commands available in the script language – when to use which
> Visual Installer’s Scripting Language

You can now set an absolute position for a title

You can now in CD-Menu Creator set an absolute position for a title, subtitle and button group title. In the latest update of CD-Menu Creator we have added this functionality.

Normally the X and Y position of a title, subtitle and button group titles are set automatically by CD-Menu Creator. But now you can set the coordinates for these objects manually. This is useful if you really want to have total control of these objects’ positions in a menu window.

How to set coordinates
To set coordinates for a title, subtitle and button group titles, you can add a prefix before the actual title text. The syntax is the following:

[X,Y] My Title

Where X specifies the X position of the title and Y specifies the Y position of the title (in pixels). Below is an example where X and Y has been replaced with numerical values:

[10,50] My Title

In the example the X position is set to 10 pixels and the Y position is set to 50 pixels.

When you add coordinates to a title, the coordinates must be set between brackets, “[” and “]”, and the X coordinate and the Y coordinate must be separated with a comma (“,”). Like this:

[20,80]

The actual title must then be placed after the ending bracket. For example:

[20,80] My menu title

See also the picture below for an example. The main title coordinates have been set to [50,60] and the sub title coordinates have been set to [160,120]:

Also button’s positions can be set in this way
There is already functionality in CD-Menu Creator to set absolute positions for buttons (via the Button Options dialog box) but this new method can also be used for buttons, if you prefer it and want to be consistent with how to set coordinates for objects.

SamLogic’s Newsletter Issues in 2019

We have an international newsletter that is targeted for our international customers where we publish information and news related to our products and our company. We send the newsletter about 6-7 times/year. In the newsletter you can read about:

  • Information about SamLogic Software´s products
  • Tips and tricks for SamLogic Software´s programs
  • Technical and non-technical articles
  • Videos (tip videos and information videos etc.)
  • Special offers

Below you can view all newsletter issues that we sent during 2019:

> 07/2019 – Special Issue – 40 tips for Visual Installer 2020 and CD-Menu Creator 2020
> 06/2019 – How to comment files in Visual Installers file list
> 05/2019 – The new Visual Installer 2020 supports Visual C#
> 04/2019 – Visual Installer 2020 and CD-Menu Creator 2020 has now been released
> 03/2019 – Summer special – 40 tips for Visual Installer and CD-Menu Creator
> 02/2019 – How to test an installation before creating it
> 01/2019 – Top Lists 2018 – Most read articles, read blog posts and viewed videos

Subscribe to our newsletter
If you want to subscribe to our newsletter you can visit the web page below:
> Subscribe to SamLogic Software’s newsletter

Word To HTML Converter

A common problem when copying formatted text from Word to a HTML editor or to an e-mail / newsletter editor is that a lot of Word / Office specific tags follows, which creates problem in the HTML. It can be problematic to get everything correct afterwards. A better idea is to filter out (remove) the Word / Office specific tags before the formatted text is inserted in the HTML.

We have a .NET class that does this work. It converts HTML received from Word to a clean HTML with a simple syntax that can be used in all kind of HTML editors. The class is written C# but can be used with other .NET programming languages also.

The class is system independent and can be used with .NET Framework 2.0 and later, .NET Core, .NET Standard and Xamarin. You can read more about the class on this web page:

> SamLogic Word To HTML Converter Class

Tips & Tricks Pages for SamLogic Software’s Products

Did you knew that there are tips & tricks pages available for our programs? In the tips & tricks pages we show how to use the software in different circumstances, and we describe some technical details about the programs that are not found in the program’s User’s guides. The tips are in step-by-step format which makes them easy to follow. Many of the tips contain images (screen dumps etc.), and some of the tips have also informative video clips that demonstrate the tip.

Below are direct links to tips index pages for our programs. Click on a link to read more about the tips that are available for every program:

> Tips & tricks for SamLogic CD-Menu Creator
> Tips & tricks for SamLogic USB AutoRun Creator
> Tips & tricks for SamLogic USB AutoRun Creator / Small Office
> Tips & tricks for SamLogic Visual Installer
> Tips & tricks for SamLogic MultiMailer

The tips index pages are also available via the Help menu in our programs. If you click on the Tips and Tricks menu item, your web browser is opened with the tips index page (for your product) opened.