Visual Installer: How to add version information to a setup package

One new function in Visual Installer 2014 (version 10.0.20, and later) is the possibility to add version information to a self-extracting setup package. You can for example add version number, product name, company name and copyright text. The version information can be seen in Windows Explorer and in other places in Windows.

Where in Visual Installer can the version information be entered?
You can enter the version information in the Version information dialog box in Visual Installer. The dialog box can be opened via the menu item Special – Version information. The picture below shows how the dialog box looks like:

The 'Version information' dialog box in Visual Installer

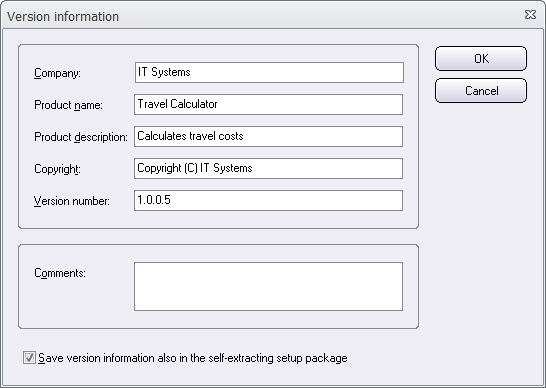
The Version information dialog box has existed in Visual Installer for many years, but what is new is the Save version information also in the self-extracting setup package option in the bottom of the dialog box. This option was added to the dialog box in version 10.0.20 of Visual Installer. If you select this option, the version information that you enter in this dialog box will be stored in the setup package file. If the option is not selected, no version information will be stored in the setup package and the dialog box will function as in previous versions of Visual Installer (for example, as a way to identify installation project files).

The version information can be viewed in Windows Explorer
If you have chosen to add version information to the setup package, the information can be shown in Windows Explorer and other places in Windows. For example, when the mouse pointer is above the filename in Windows Explorer, a tip text with the version information is displayed (as shown in the picture below):

Tip text in Windows Explorer (with version information)

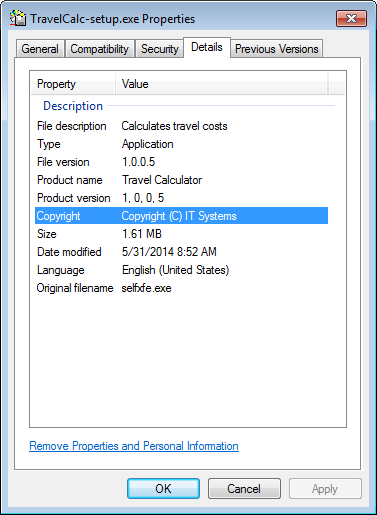
Also the Details tab in the Properties dialog box in Windows Explorer contains this information (the dialog box can be opened by right-clicking on the filename and choosing the Properties menu item). The picture below shows how the information is shown in the Details tab if the text that was entered in this blog post’s first picture is used:

The 'Properties' dialog box in Windows Explorer

Version number
If you want to add a version number to the setup package, you must use 4 numbers when you specify the version number; for example: 1.2.0.5. Both commas and semicolons are allowed to use as a delimiter. So it is also ok to enter the version number like this: 1,2,0,5.

If you use more than or less than 4 numbers for the version number (for example 1.2) the version number is not stored in the setup package. If you want a version number like this to be stored in the setup package, you can extend the version number with zeros and enter the version number like this: 1.2.0.0.

Visual Installer: How to register a .NET assembly

An ActiveX component must always be registered before use and sometimes also a (native) DLL file must be registered before it can be used. This is very essential in many software projects so Visual Installer have had built-in functions to register ActiveX components and (native) DLL files for many years. In Visual Installer 2014 we have extended this functionality so also a .NET assembly can be registered.

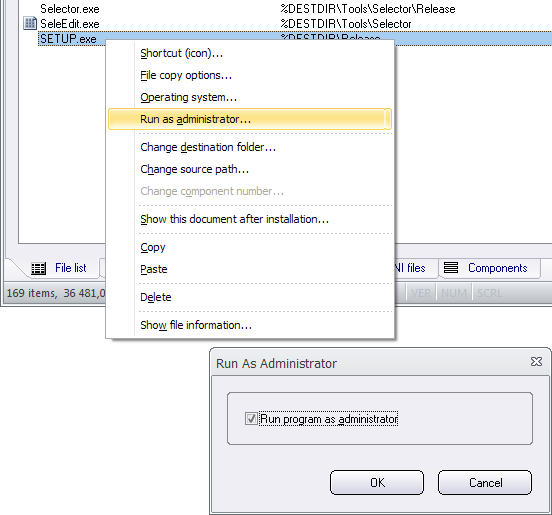
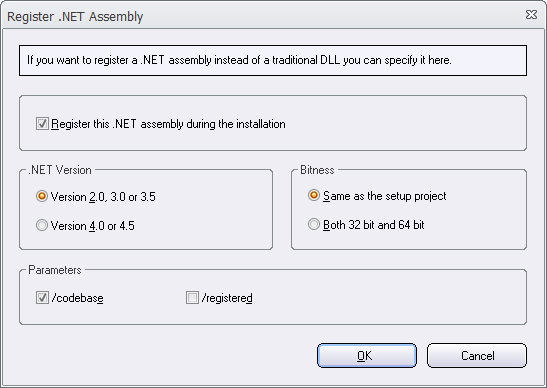
A NET assembly is an application, component or class that is compiled for use with Microsoft .NET Framework. A NET assembly can have an .EXE filename extension or a .DLL filename extension. If the filename extension is .DLL, the assembly is a library assembly and can be used by other .NET code in an easy way. But the assembly can not be used from native (unmanaged) code, unless it is registered in the system and a COM object interface (a COM-callable wrapper) is added to the assembly. The new function that we have added to Visual Installer will make such a registration.

If you add a .NET assembly (with the filename extension .DLL) to Visual Installer’s file list and select the file in the list, a new menu item is added to the List menu. The name of the new menu item is Register .NET assembly (see the picture below):

If you choose this menu item, the following dialog box is shown:

The 'Register .NET assembly' dialog box

In this dialog box you can set some options that will be used when the .NET assembly is registered, for example which .NET version to use and which bitness (32 bit or 64 bit) to use.

See also
> Visual Installer: Register a .NET assembly
> Tip: How to register a .NET assembly

Visual Installer: New conditions in the scripting language

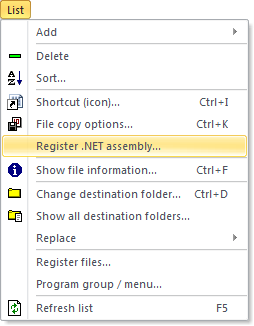
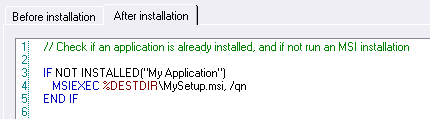
We have added two new conditions to Visual Installer 2014’s scripting language. One condition can be used to check if the operating system where the setup package is run is 32 bit or 64 bit. Another condition can be used to check if an application or library already has been installed in a computer or not. The later condition is very useful when it is combined with the MSIEXEC script command because it gives you the possibility to only start an MSI installation if the software has not been installed before. This will speed up the installation process in many computers.

Read more
You can click on the links below to read more about the two new conditions in Visual Installer’s scripting language:

> Check if a product already is installed
> Check if the operating system is 32 bit or 64 bit

What is the difference between the Standard and Professional version of Visual Installer?

SamLogic Visual Installer is an easy-to-use installation tool that can be used to install software, documents, Excel sheets, videos, etc, and there exist two versions of the tool: Standard and Professional. In this blog post we will describe the difference between these two versions.

Visual Installer / Standard
The Standard version of Visual Installer is designed to handle smaller setup projects. It is also very suitable if you want to install documents, Excel sheets and videos, and other file types that are not software. The Standard version is very easy to use and no programming is ever needed.

Visual Installer / Professional
The Professional version of Visual Installer is designed to handle larger setup projects and it is specialized to install software. It is also more flexible than the Standard version of Visual Installer thanks to the powerful scripting language that is included in Professional. The scripting language will give you a great control over the installation and can be used to handle all special cases that may happen when dealing with complex installations. It is not necessary to use the scripting for most tasks, but if the normal settings are not enough for your installation project, you can always include powerful script commands that will handle these circumstances.

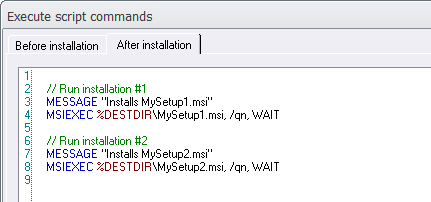
The Professional version is also necessary if you need to handle prerequisites during an installation. From Visual Installer / Professional you can run other installations during the installation process in a controlled manner. If you need to install 64 bit applications, you must also use the Professional version. The Standard version only support installation of 32 bit applications.

Summary – Major functions that are included only in Visual Installer / Professional
Below is a list with some major functions that are only included in Visual Installer / Professional:

– A script language that can be used for advanced installations.
– A project manager that keeps track of your created project files.
– Functionality to create multiple levels of menus with shortcuts in Windows.
– Functionality to install 64-bit applications.
– Functionality to handle prime number based license keys.
– Functionality to send messages to Twitter.
– A special tool, SamLogic Selector, which can create system dependent program starts.

See also
> SamLogic Visual Installer – Features
> Visual Installer’s Scripting Language
> Tips & tricks for SamLogic Visual Installer

How to complete MSI installation #1 before #2 starts (when running multiple installations)

Sometimes it is necessary to run and complete one MSI installation before the next MSI installation starts. This may happens if your software is dependent of some specific prerequisites, also during the installation. One common problem is that one component can not be installed and registered in the system, in a proper way, before some basic components that it needs are installed first. The installation of these basic components must be completed first, otherwise the next installation may fail.

It is possible to create setup packages where one installation is completed before the next one starts, but this can normally be tricky to achieve. But with the new script command MSIEXEC that we have added to Visual Installer, this is very easy done.

The MSIEXEC command is used to install MSI packages and MSIEXEC has a parameter with the name %Wait that is useful when multiple MSI setup packages need to be installed, and they must be installed in a specific order. If you set this parameter to WAIT Visual Installer will pause its own setup process until the installation of the MSI package is completed. Thereafter the installation (for example processing of more script lines) will continue.

Example
Below we will show you an example of how to use the MSIEXEC command.

MSIEXEC

In this example Visual Installer will first install MSI file #1 (MySetup1.msi), waits until the installation of the MSI file is completed, and then install MSI file #2 (MySetup2.msi), and wait until this installation is completed, and then continue the rest of the installation.

(The script command MESSAGE can be used to inform the user what happens during the setup process. If the MSI installations are time consuming it can be a good idea to inform the user that another installation is running for the moment.)

More information about MSIEXEC
For more details about the new MSIEXEC script command, and for more examples of usage, see this tips & tricks page:
> Tip: Run MSI installation from script

See also
> Visual Installer: New script command that handles MSI installations

Visual Installer: New script command that handles MSI installations

We have added a new script command to Visual Installer’s scripting language that handles MSI installations (Windows Installer installations). The name of the new script command is MSIEXEC and it is very flexible in its use. Via this script command you can for example start a silent or visible MSI installation, and you can choose whether Visual Installer should pause it’s own installation until the MSI installation is completed, or if the MSI installation and Visual Installer’s installation should be run in the same time (a parallel installation). And by combining the new script command with conditions, you can make Visual Installer run different MSI setup packages depending of the operating system.

MSIEXEC

We have added a tip page to the tips & tricks section of our website that explains in detail how to use the new script command. You can open the tip page by clicking on the link below:
> Tip: Run MSI installation from script

To use this script command, you must have Visual Installer 2014 / Professional version 10.0.15 or later installed in your computer.

SamLogic’s tools adapted to Windows 8.1

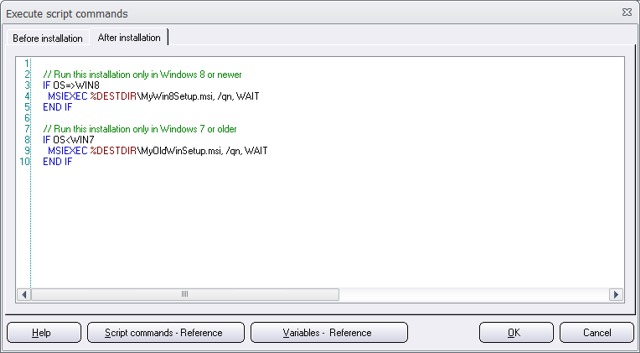
All of SamLogic’s programs, and other tools, are now adapted to the new Microsoft Windows 8.1. But the software also work fine with Windows XP, Windows Vista, Windows 7, and some other older operating systems. If you want more information about a specific product, you can click on a link below:

Programs
> CD-Menu Creator – AutoRun menu designer program.
> USB AutoRun Creator – AutoRun USB stick creator.
> Visual Installer – Installation software / setup tool.
> MultiMailer – Newsletter / e-mail marketing software.

Product suites / Bundles
> Media Tools – Program bundle with 5 tools.
> USB Menu Creator – Program bundle with 3 tools.

We have also tested our component libraries in Windows 8.1, and they are fully compatible. If you want to test a program you can visit the web page below:
> Download a Demo / Free Trial

Visual Installer 2014: How to change user interface

In the previous blog post we informed about Visual Installer’s new user interface and the possibility to change visual theme for the user interface. In this blog post we will show how to change visual theme for the user interface.

If you want to change the visual theme for the editor, follow these steps:

1. Start Visual Installer
2. Open the Special menu
3. Choose the Editor options menu item
4. Open the Application window’s style combo box

Application window's style

5. Select the style / theme that you want to use
6. Click OK

Below you can see some samples of the visual themes included in Visual Installer 2014:

STYLE: Theme Silver 1
Theme Silver 1

STYLE: Theme White 1
Theme White 1

STYLE: Theme Blue 1
Theme Blue 1

Visual Installer 2014: Run program as administrator

Sometimes a program must be run with administrator rights in the system. This gives the program more privileges, which sometimes is necessary to make a program function as expected. In Visual Installer 2014 you can set an installed program to run with administrator privileges in an easy way.

To make an installed program to run with administrator rights you can right-click on the program in Visual Installer’s file list and choose the Run as administrator menu item in the menu that is shown. Thereafter you can select the Run program as administrator option in the dialog box that appears and press OK (see picture below).

Run program as administrator