How to add an ActiveX component to an Excel 2010 sheet

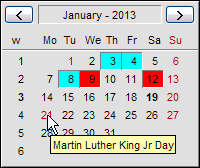
1 month calendarIn the previous blog post we described how to add an ActiveX component (control) to a Visual Basic 2010 project. In this blog post we will describe how to insert an ActiveX component in an Excel sheet. We will show the necessary steps to include an ActiveX component in a sheet in Microsoft Excel 2010. We will use the same calendar component as in the previous blog post in this step-by-step example (we will use the one month calendar from SamLogic Calendar Components).

How to add an ActiveX component to an Excel 2010 sheet

1. Start Microsoft Excel 2010.

2. First make sure that the Developer tab is visible in the Ribbon interface. If not, follow the steps (A-E) below:

A. Open the File tab in the Ribbon.
B. Select Options.
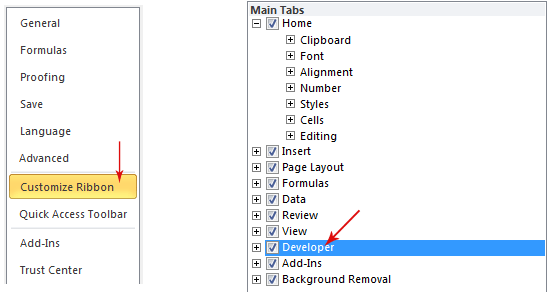
C. Choose Customize Ribbon.
D. Check the Developer checkbox.

Customize Ribbon - Developer

E. Close the Excel Options dialog box. The Developer tab in the Ribbon interface should now be visible.

3. Open the Developer tab.

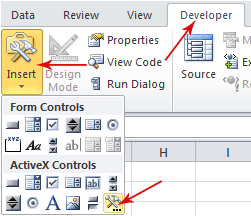
4. Click on the Insert Controls option.

5. Click on the More Controls option in the ActiveX Controls group.

Developer - Insert Controls - More Controls

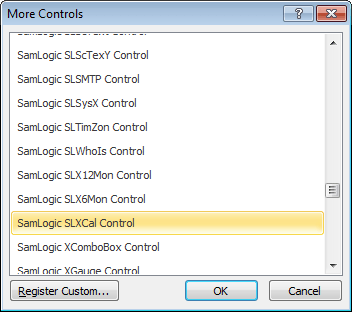
6. From the control list in the More Controls dialog box, choose the SamLogic SLXCal Control control and press the OK button.

More Controls

7. A cross-like cursor will now appear. Click somewhere in the sheet to specify the calendar component’s position in the sheet.

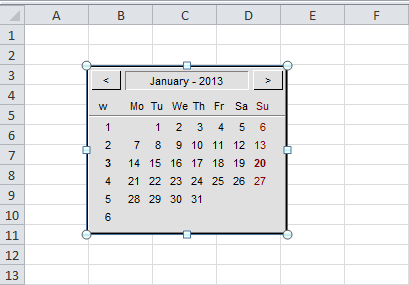
The calendar component in an Excel sheet

The calendar component should now appear in the sheet as shown in the picture above.

That’s all steps that we need. We have now added an ActiveX component to an Excel sheet!

Events
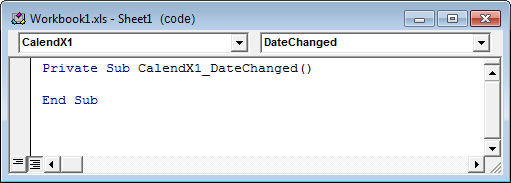
The calendar component is event driven, so if you want to open up an event handler for the calendar you can double-click on the calendar component. The DateChanged event handler will now be shown in a code window.

The code window in Microsoft Excel

If you click on the dropdown list in the upper right of the code editor you can choose another event handler, for example the DateSelected event handler. The DateChanged event is fired when a user changes month in the calendar and the DateSelected event is fired when a user clicks on a date (day number) in the calendar.

Properties
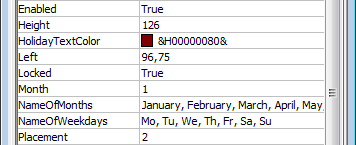
You can set some properties for the calendar component before it is used. If you switch back to the Excel sheet with the calendar and right-click on the calendar and choose the Properties menu item in the local menu that is shown, you will find a list with properties for the calendar component. If you want to set any properties before any code is executed you can set them here.

Properties

After the execution of the code has started, you can change properties for the calendar component programmatically.

More information about the one month calendar component
More detailed information about the one month calendar component in SamLogic Calendar Components, including a complete list of all properties, events and methods in the component, is available on this web page:

> One-Month Calendar Component (ActiveX)

In the next blog post
In the next blog post we will show how to install an ActiveX component in a Windows system. Just copying an ActiveX component to a computer’s hard disk is not enough; no, it needs also to be registered in the system. And it is important that the component is installed in the correct folder on the hard disk, otherwise a software using the component may get problem finding the component. In the next blog post we will describe the process of installing an ActiveX component in a Windows system closer.

How to add an ActiveX component to a Visual Basic 2010 project

The components in our toolboxes, for example SamLogic Calendar Components and SamLogic Internet Components, are based on the ActiveX technology. That’s a component technology that was introduced already in 1996 by Microsoft, but it is still supported by many tools, including the latest versions of Microsoft Visual Studio and Microsoft Office.

1 month calendarIn this blog post we will show how to add an ActiveX component (control) to a Visual Basic 2010 project by using Microsoft Visual Studio 2010. We will add our one month calendar component from the SamLogic Calendar Components tool box to the Visual Basic project.

If you want to use the calendar component in your own project you must install SamLogic Calendar Components first. But you can also consider this tip as a general step-by-step tip that shows how to insert an ActiveX component into a VB 2010 project. The steps are the same also if you add another ActiveX component to your project.

How to add an ActiveX component to a Visual Basic 2010 project

1. Start Visual Studio 2010 and open a Visual Basic 2010 project, or create a new project. The project type must be Windows Form Application.

2. Right-click over the Toolbox window.

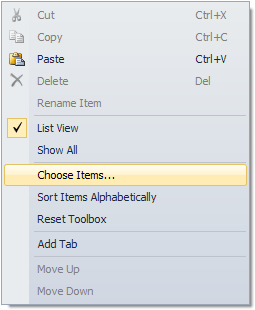
3. Select the Choose items menu item in the local menu that is shown.

Menu

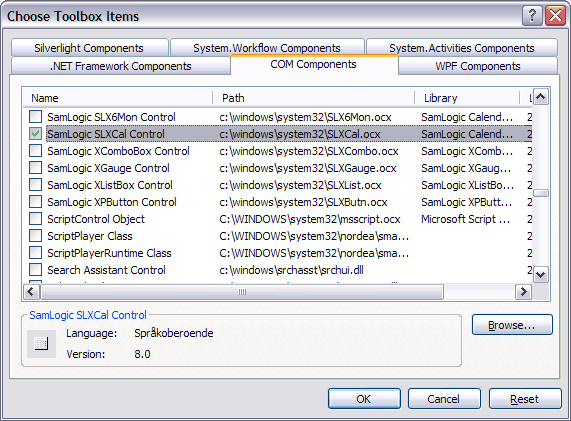
4. The Choose Toolbox Items dialog box is now shown. In this dialog box, open the COM Components tab.

The 'Choose Toolbox Items' dialog box

5. If you have installed SamLogic Calendar Components and want to use the 1 month calendar, select SamLogic SLXCal Control in the list (in the COM Components tab). Otherwise, select the ActiveX component that you want to use.

6. Click OK to close the dialog box.

7. The selected component should be visible in the Toolbox window; probably in the bottom of the window.

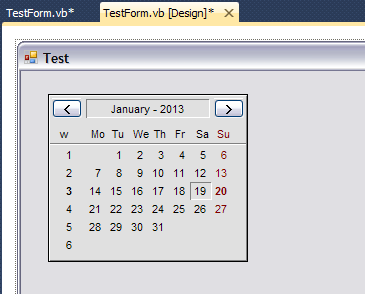
8. Now drag and drop the component on the Windows form, in the position that you want to have the component.

The one month calendar component placed on a Windows form

That’s all steps that we need. We have now included an ActiveX component into a Visual Basic 2010 project and put it on a form! You can use the ActiveX component in a similar way as a visual .NET component / .NET class.

The calendar component’s event handlers
If you double-click on the calendar component in the form, the DateChanged event handler is created in the source code (as seen in the picture below):

The DateChanged event

The DateChanged event occurs when a user changes month in the calendar (for example by clicking on the right arrow). From the event handler dropdown list in Visual Studio’s source code editor you can choose another event handler for the calendar, for example the DateSelected event handler. The DateSelected event occurs when a user selects a date in the calendar by clicking on a date (day number) with the mouse button. There is also a DateDeselected event handler that is fired when somebody unselects a date (removes a selection) in the calendar, for example by clicking with the right mouse button.

More information about the one month calendar component
More detailed information about the one month calendar component in SamLogic Calendar Components, including a complete list of all properties, events and methods in the component, is available on this web page:

> One-Month Calendar Component (ActiveX)

In the next blog post
In the next blog post we will show how to insert an ActiveX component in an Excel sheet. We will use the same calendar component as above in the example, but the tip can also be used for other ActiveX components.

Responsive Email Design: One newsletter for a smartphone, tablet, laptop and desktop computer


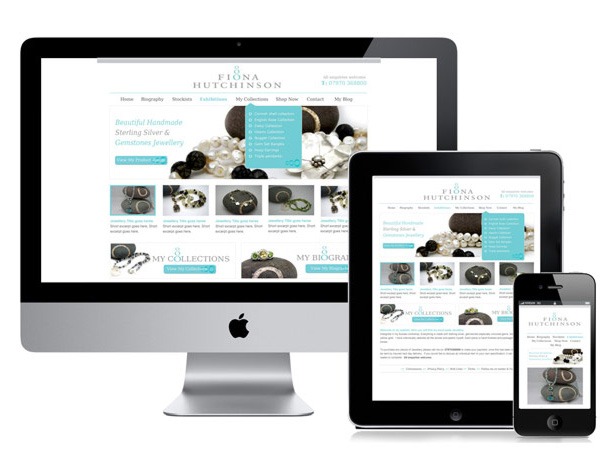
In this blog post we wrote some words about how to design a newsletter so it can be read on a smartphone, tablet, laptop and desktop computer without modifications. The email will adapt itself automatically to the width of the display / screen. This is called responsive email design and in the following blog post, written by Christian Vasile, you will find more details about how to utilize responsive email design to design a newsletter so it can be read on devices with very different display widths:

> Responsive Email Newsletter Design: Increase Mobile Readership

We also recommend you to read this article on our web site; it contains information about how to design an email newsletter for a mobile phone and smartphone:

> How to Create a Newsletter for a Mobile Phone & Smartphone

Useful keyboard shortcuts in Windows 8

If you are using Microsoft Windows 8 on a computer that has no touch screen interface (for example a traditional desktop computer) you may find it hard to access some functions in the operating system. Things will be easier if you are familiar with some of the new keyboard shortcuts that were added to Windows 8. With these keyboard shortcuts you can handle apps, search for files, configure settings etc. more easily.

Article – New Keyboard Shortcuts in Windows 8
In this article on our web site you will find a list of useful keyboard shortcuts in Windows 8, that will help you to manage and master Windows 8 also on devices that have no touch screen interfaces:

> New Keyboard Shortcuts (Hot Keys) in Windows 8

How to install files in the correct folder using Visual Installer

As described in this blog post, there exist two Program Files folders in a 64 bit computer with a 64 bit Windows. One folder is used as a storage place for 32 bit programs and the other folder is used as a storage place for 64 bit programs. And it is important that your program files are installed in the correct folder in a 64 bit system, otherwise there is a risk that your program will not function as expected.

Windows in different languages
If you create an application that may be installed in non-English versions of Windows it is important to know that the name of the Program Files folder may be different compared to the English version of Windows. For example in a Spanish version of Windows the name of the Program Files folder is Archivos de programa. In a Spanish 64 bit Windows, where 32 bit and 64 bit program files / binary files also must be placed in different folders, there will exist the following two folders on the user’s hard disk:
C:\Arquivos de Programas : For 64 bit files
C:\Arquivos de Programas (x86) : For 32 bit files

This can be compared with the folders in an English 64 bit Windows:

C:\Program Files : For 64 bit files
C:\Program Files (x86) : For 32 bit files

(more examples of localized folder names is available in this article on our web site.)

Use an environment variable
It is impossible to handle all of the above combinations by hard-coding the folder path to the Program Files folder. We also advise against any tries to do so. Instead you should use an environment variable in Visual Installer that has the name %PROGRAMFILES to handle this. By placing this variable in the beginning of a folder path, for example like this:

%PROGRAMFILES\SamLogic\Visual Installer

the %PROGRAMFILES variable will be changed to correct folder path, regardless of the bitness of the program files / Windows and regardless of the language of the Windows. This replacement will occur during the setup process in the user´s computer.

Easier to select a variable in Visual Installer 2012
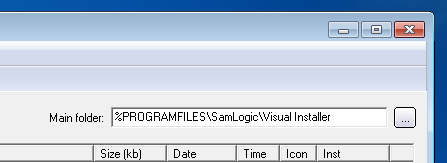
In Visual Installer 2012 (version 9.5.15 or later) it is easier to select correct variable to the main folder of the setup project. We have added a button to the right of the Main folder text box:

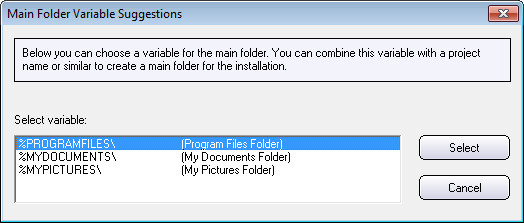
If you click on this button (the button with three dots) the dialog box below will be opened:

Via this dialog box you can choose and include the %PROGRAMFILES variable, or another relevant variable, to the main folder of your installation project in an easy way.

How Visual Installer handles 64 bit folders in Windows

In a 64 bit computer with 64 bit Windows installed there exists two Program Files folders and two System folders. The reason to this is that 32 bit binary files and 64 bit binary files must be placed in different folders. When you distribute and install a program it is important that you install your files in correct folders. 64 bit binary files must be installed in 64 bit folders and 32 bit binary files must be installed in 32 bit folders, otherwise your program may not work. It is not necessary to install data files with 64 or 32 bit data in specific folders; this is only important when binary / executable files are installed (for example EXE files and DLL files).

Our setup tool SamLogic Visual Installer handles all this automatically if you specify the bitness for your setup project in the 32/64 bit tab in the Setup options dialog box in the editor, and uses the %PROGRAMFILES and %SYSDIR variables when you specify destination folders for your installaton files.

The %PROGRAMFILES variable can be used in the Main folder text box in the File list tab in the Visual Installer editor. The picture below shows an example of usage:

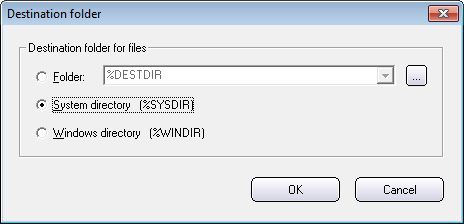
And if a file should be installed to the System folder in Windows, you can choose the System directory (%SYSDIR) option in the Destination folder dialog box, as shown below:

If you use these variables in the way described above, your files will always be installed to correct folders in the system.

More information
More information about 32 and 64 bit folders is available in this article on our web site:
> Windows 64-bit: The ‘Program Files (x86)’ and ‘SysWOW64’ folders explained

Portable Applications (Portable Apps) & USB AutoRun Creator

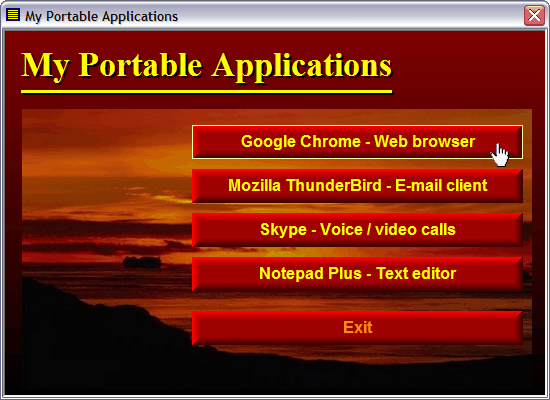
A menu interface for portable applications (portable apps)

Portable applications – also called portable apps – are small programs that do not require an installation in a computer before they are run; instead they are run directly from a removable drive, for example a USB flash drive. A portable application is usually a utility program, for example a text editor, email client, web browser, antivirus software, backup software, system tool etc, but can also be a game or something else.

One of the biggest advantages using portable apps is that the system itself (for example the Windows Registry) is not affected. All settings are stored in a local folder on the storage device, although there sometimes can be exceptions from this behaviour and some settings can be stored on the computer’s hard disk.

AutoRun menu for your portable applications
If you use our AutoRun tool USB AutoRun Creator in concert with our menu designer tool CD-Menu Creator you can create a menu interface for your portable applications that is automatically opened when the USB stick is inserted into a computer’s USB port – a so called AutoRun menu. This menu interface lets you quickly and easily start a portable app with just one mouse click. The picture in the top of this blog post shows how a menu interface for portable applications can look like. If you press on one of the buttons in the menu, the portable program is launched immediately.

More information
If you want to read more about USB AutoRun Creator, CD-Menu Creator and portable applications, click on the link below:

> Using Portable Applications with USB AutoRun Creator

Responsive Email Newsletter Design

Responsive Web Design (RWD) is something that have attracted much attention over the past year, and we at SamLogic Software sometimes get this question from our MultiMailer users: can I implement responsive design also on an email newsletter? The answer is: yes, it is possible.

Responsive Web Design
Responsive Web Design is normally used on web pages that need to be adapted to very different displays widths; for example the display width of a mobile phone / smartphone, the display width of a tablet (like iPad) and the display width of computer’s screen (that can be very wide today). By implementing responsive web design on the web page, the same version of the web page can be used on all displays. There is no need to create different web pages for different display widths.

Responsive Email Newsletter Design
Same techniques that are used on web pages can also be used with email newsletters. If you are familiar with HTML and CSS then maybe you are familiar with the media query rule (@media). By using this rule you can create a responsive web page and HTML newsletter. More information about responsive email newsletter design and the media query rule is available in this article on our web site:

> Adapt a Newsletter for Different Display Width (Mobile Phone etc.)

If you are not familiar with the media query rule, you will find links to pages with more information in the article.

Free Email Newsletter Templates

There are many web sites on the Internet that offer free email newsletter templates. The templates can be used for email marketing / email campaigns, or for other purposes. A big advantage of using a ready-made newsletter template is that you will save much time. You don’t need to create a complete newsletter from scratch; you only need to make the changes that are unique for your company, for example adding your company’s logotype. Or maybe adjusting some colors or font sizes in the template.

HTML templates
The templates are mostly created with HTML, but plain text templates are also available. HTML templates are preferable for newsletters because they allow you to include images, colors, different fonts etc. If design is important for you, you should choose an HTML template for your newsletter.

Web sites with free email newsletter templates
If you need to find a well-designed email template you should read this article on our web site:

> Free Newsletter Templates for Email Marketing

There we list some good web sites that offer free email newsletter templates. The web sites also sell newsletter templates, but the price is generally quite low. Some of the web sites also offer to design a tailor-made template just for you or your company.

Compatible with our email software MultiMailer
The newsletter templates on the web sites that we list in the article are compatible with our email software MultiMailer. So if you are a MultiMailer user, you can download the email templates and use them directly in the program.

Compatible with Microsoft Outlook etc.
The newsletter templates are also compatible, and can be edited, with email clients like Microsoft Outlook and Lotus Notes. Some of the templates can also be edited with Adobe Photoshop. And if you are a web designer and have installed software like Adobe Dreamweaver or Microsoft Expression Web, they can be edited also with these programs. Technically, an HTML newsletter template is just an HTML web page.