How to show a document after an installation

In this blog post that we posted last week on our blog we described how to run a program after that an installation (created with Visual Installer) is completed. It is also possible to show a document (for example a PDF document) after the installation, and below we will describe how to do that.

In the tip below we assume that you want to give the user an opportunity to open a PDF document with the name ReadMe.pdf. Reading the document is optional, but if the user want to read it, it will be opened when the user closes the last installation dialog box in the setup wizard. Below are the tip steps:

1. Select the document file in the installation project’s file list (ReadMe.pdf in our case).

File list

2. Right click over the selection.

3. Choose the Show this document after installation menu item in the local menu that appear.

4. The dialog box below is now shown:

Show document after installation

5. Confirm that the file path (at Document) is ok.

6. Select the Show check box in the ‘Installation completed’ dialog box option.

7. Check that the text at Check box text is ok.

8. Click on OK.

When your user run the installation, there will be a check box in the last installation dialog box, where the user can decide if he/she wants to read the document or not. See the picture below for an example of how it may look like:

Installation Completed

If the check box is selected, the document that you specified will be opened and shown when the user closes the installation dialog box (for example by clicking on the Exit button).

The dialog box that is shown at step 4 above can also be opened via the Special menu in Visual Installer’s editor.

See also
> How to run a program after an installation

How to run a program after an installation

Sometimes there is a need to start a program immediately after the installation. This is possible with our installation tool Visual Installer.

If the program that you want to run is included in the installation project’s file list, you can follow the steps below:

1. Select the program file in the installation project’s file list.

File list

2. Right click over the selection.

3. Choose the Run this program after installation menu item in the local menu that appear.

4. The dialog box below is now shown:

Run program after installation

5. Confirm that the file path (at Filename) is ok.

6. If you need to send a parameter to the program, enter it at Parameters.

7. Check the other settings. Change if you need.

8. Click on OK.

Now the program file that you selected in the steps above will be run when the installation is completed. It will be run after the last dialog box in the installation is closed.

You can open the Run program after installation dialog box (that is shown at step 4 above) also by choosing the menu item Run program after installation in Visual Installer´s Special menu. The same dialog box will be shown. But there is one difference; if you open the dialog box this way, the file path at Filename will not pre-filled. You need to enter it manually.

The program that you want to run after the installation does not need to exist in the file list. But if you want to run a program outside your setup package, you need to be careful and make sure that it exists at the specified location.

See also
> How to show a document after an installation

How to change font size for the tip text in a menu

Do you want to use a larger font size for the button’s tip text in a menu interface created with CD-Menu Creator or USB Menu Creator? This is possible.

Tip text with normal font size
When you hover the mouse pointer above a button in a menu interface, a tip text is shown in the bottom left or bottom right part of the menu interface. The font size of this tip text can be changed. If you add one of these two prefix before the text in the tip text, you will have larger font size for the tip text:

[L]  : increase the font height with 25%
[XL] : increase the font height with 50%

For example, to increase the font size with 25%, enter the [L] prefix before the text:

[L] This is a tip text.

You can add and edit the tip text via the Add Button and Edit Button dialog boxes in the CD-Menu Creator and USB Menu Creator editor:

The 'Add Button' dialog box

Below you can see the size of the tip text when the [L] and the [XL] prefix are used. In the first example is the [L] prefix used and in the second example is the [XL] prefix used.

Example 1:   [L] – Large font size

Tip text with large font size

Example 2:   [XL] – Extra-Large font size

Tip text with extra-large font size

Tips for improving computer and network performance

Improving computer performance

Does your computer or Wi-Fi feels slow? Below are links to some informative tip articles that will help you to improve the performance of your computer and your Wi-Fi:

Computer:

Microsoft:
1.  10 tips to improve PC performance in Windows

Windows Central:
2.  20 tips and tricks to increase PC performance on Windows 10

Computerworld:
3.  17 ways to speed up Windows 10

PC Mag:
4.  12 Simple Tips to Speed Up Windows

Wi-Fi:

HighSpeedInternet.com:
5.  Improve Your Wi-Fi Speed in 10 Simple Steps

WIRED:
6.  11 Ways to Upgrade Your Wi-Fi and Make Your Internet Faster

Create your own Christmas e-card with MultiMailer

MultiMailerChristmas is fast approaching and it’s time to send Christmas cards to friends, acquaintances, customers and other contacts. With the e-mail newsletter tool MultiMailer, you can both create your own Christmas e-cards and send them easily as e-mails. You can create your Christmas e-card either by using ready-to use e-card templates/examples or by using MultiMailer’s built-in visual e-card wizard.

Ready-to-use templates
Below is some examples of templates that can be used for your own Christmas e-cards:

Template 1
Template 1

Template 2
Template 2

Template 3
Template 3

The e-cards can be personalized. You can for example include the receiver’s personal name and company name, and other unique information, in the e-card text.

You can open a Christmas e-card template by choosing the menu option Help – Open Example in MultiMailer and choosing a HTML file that starts with “Christmas Card” in the filename.

How to know how many contacts that opens a newsletter

When you send a newsletter, it is always useful to know how many have opened the newsletter. This is a way to see if the newsletter reach the receivers inboxes or if it is filtered out by spam filters. You can also compare the open rate between mailings and see which newsletter that has been the most popular.

In our newsletter tool MultiMailer you can obtain open rate statistics for each unique mailing. You can also get information about how many contacts have clicked on links in the newsletter.

MultiMailer - Open rate

We have published a tip on our website that explain how to get this information:

> How to see the number of contacts who opened a newsletter

How to use a product gallery in MultiMailer

In this blog post we informed how to insert and update a table in a newsletter in MultiMailer. There is another function available in MultiMailer that reminds of the table function, but is much more powerful. It is the Product Gallery function.

Product Gallery in MultiMailer

With the Product Gallery function you can create a database with products, images, hyperlinks, prices, buttons mm. And you can insert this information whereever you want in your newsletter. It is also easy to update a product gallery afterwards. You can easily add and remove articles, or update images, texts and links etc.

We have published a tip on our website that shows how to create, insert and edit a Product Gallery in a newsletter:

> How to insert a product gallery in a newsletter

How to insert and edit a table in MultiMailer

Our e-mail/newsletter application MultiMailer can be used to create and send all kind of emails and newsletters. MultiMailer have many powerful built-in functions and one such a function is the table function in MultiMailer. With the table function in MultiMailer it is easy to insert, edit and format tables in e-mails/newsletters.

We have published detailed tip pages on our website that show how to use MultiMailer to insert a table in a newsletter and how you change the look and properties for the table after it has been created (for example if you want to extend the table with more rows and columns, or change colors, text alignment etc.)

Table in MultiMailer

Click on the links below to open the tips pages:

> How to insert a table in MultiMailer
> How to edit a table in MultiMailer
> How to change width for a column in a table

Visual Installer 2022 / Enterprise supports batch files & build servers

In the Enterprise version of Visual Installer 2022 it is possible to build a setup package without any interaction with a graphical user interface. The build process is invisible, and you use command line parameters and switches to handle the build operations. And errors that occur (if there are any) are returned via a log file that contain detailed error descriptions and error codes etc.

Build servers
The silent build processes via command line parameters / switches makes it easy to call Visual Installer from build servers. A build server is useful if you work in a team and your team want to, for example, compile applications or build setup packages in one operation.

Batch files
You can also utilize this function from local batch files (for example from traditional .BAT files). You can add one line of code for each setup package that you want to build, in the batch file. For example:

VI.exe C:\MyProjects\MySetup.vip /BUILD /BUILDFOLDER:C:\MyCreatedSetups\Setup1

More information
In the following tip on our website you can read how to use this function in Visual Installer:

> Tip: Visual Installer’s command line parameters

How to use MultiMailer with a Google Gmail server

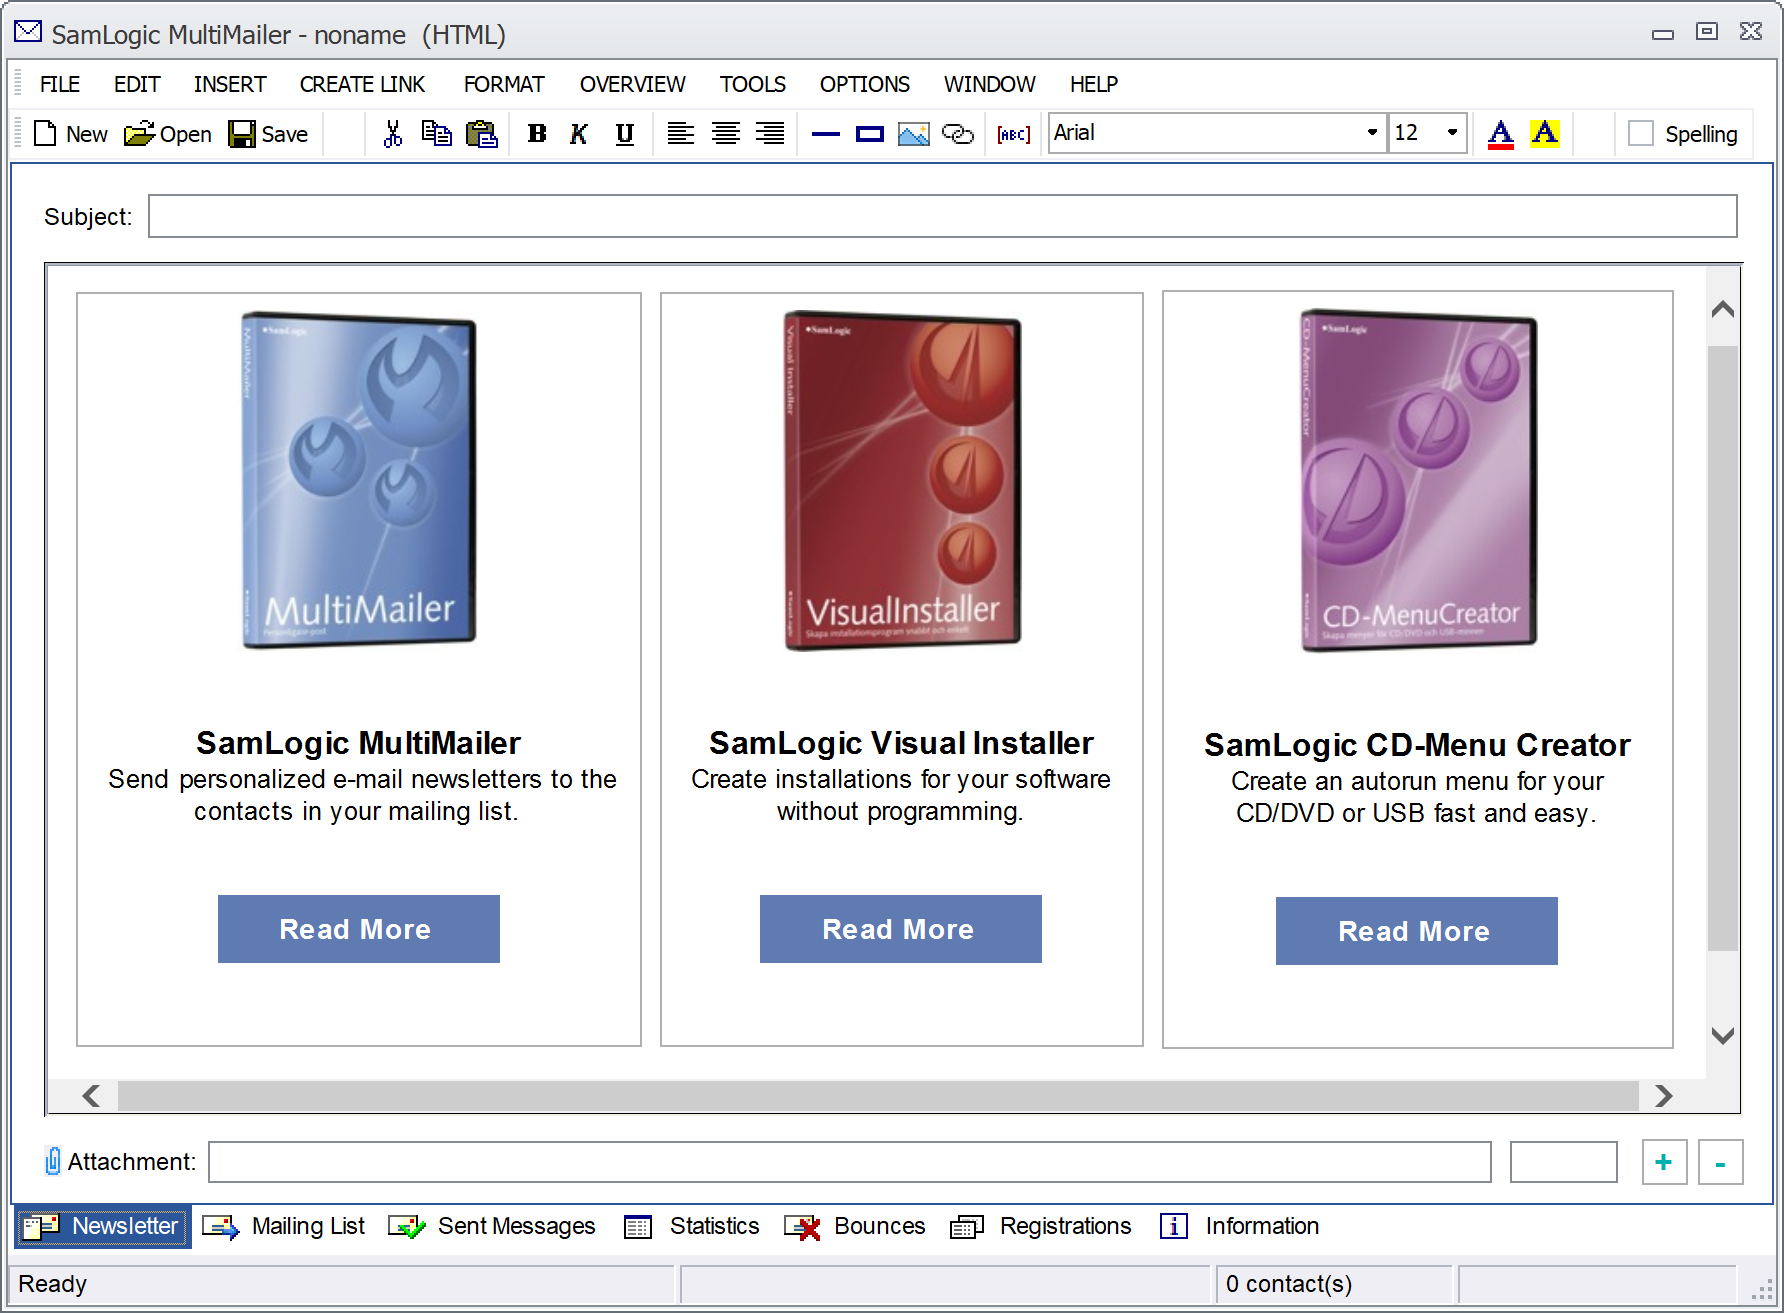
If you only send small amounts of e-mail, it is possible to use a Google Gmail server for your mailings when you use our e-mail delivery application MultiMailer. However, some functions in MultiMailer are disabled because they require our built-in e-mail server to work, but using a Google Gmail server is in any case possible and may be suitable for small mailing lists. We will show below step-by-step how to do that:

1. Activate two-step verification in your Google account
The first thing you need to do is enable two-step verification in your Google account, if you haven’t already. It’s a relatively simple process, and below you’ll see what the steps are:

Show steps

1. Open your Google account. For example, by opening the website google.com and then clicking on the round symbol at the top right. If you are not logged in, you must log in first. After you’ve logged in, you can click on the round symbol on the top right.

2. A menu will now appear. Click there on the Manage your Google Account option.

3. A web page with options should now appear. There, click on the Security option.

4. At the Signing in to Google section, click on the 2-Step Verification option.

5. Click the Get Started button.

6. Enter the password for your Google account.

7. Enter a phone number to which Google will send a verification code (via SMS).

8. Click Next.

9. A verification code will now be sent via SMS to your phone. Enter it at Enter the code.

10. Click Next. Then click Turn On to activate the function.

You have now activated two-step verification for your Google account (e.g. your Gmail account). In the next section, we will show you how to retrieve a username and password for MultiMailer.

2. Get username and password from Google
Now you will get your username and a password for MultiMailer. The password is not the same one you use when you sign in to your Google account, but a different password that is created by Google at request. We will show below how to retrieve this password. The username for MultiMailer is the same as when you log in to your Google account.

Show steps

1. If you have the <-- 2-Step Verification option visible on the web page, click on it.

2. The Security page should now appear. If not, open it.

3. Click on App passwords at Signing in to Google.

4. Enter your Google Account password again.

5. Click Select app.

6. Select Other (custom name).

7. Enter MultiMailer.
Name of app (in Google)
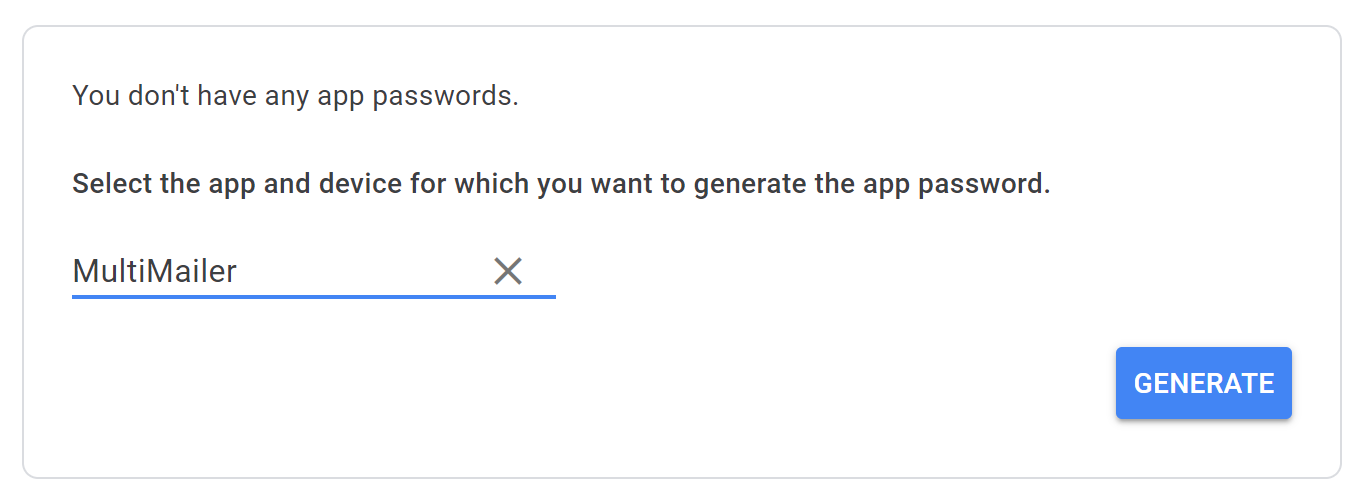
8. Click the Generate button.

9. A password will now appear in a window. Copy it off. Paste it into Notepad.
Password for app (in Google)
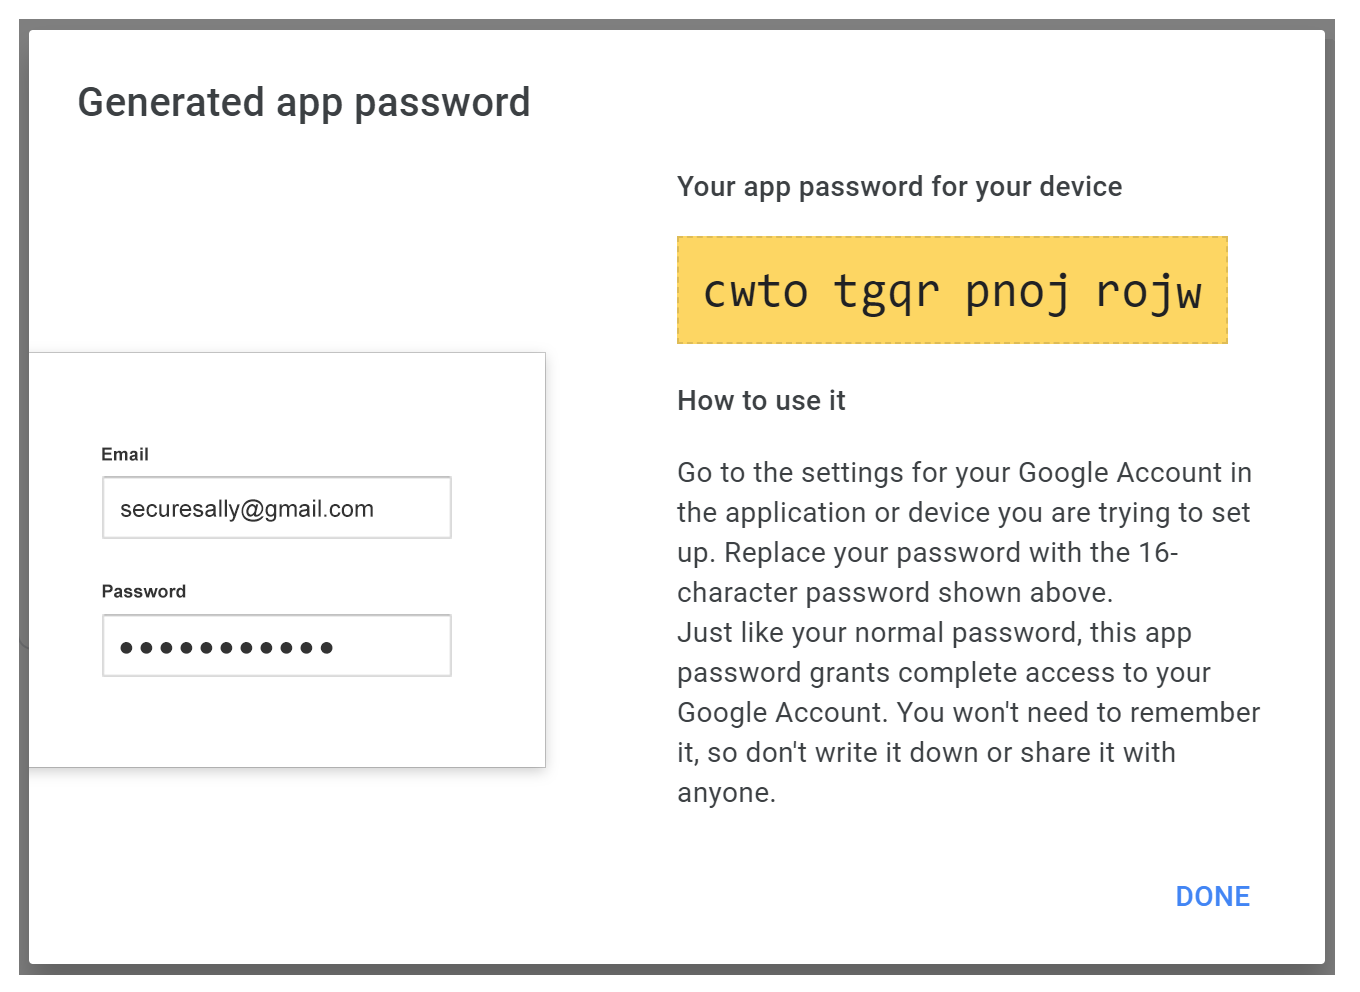
10. Click on Done when you have done it.

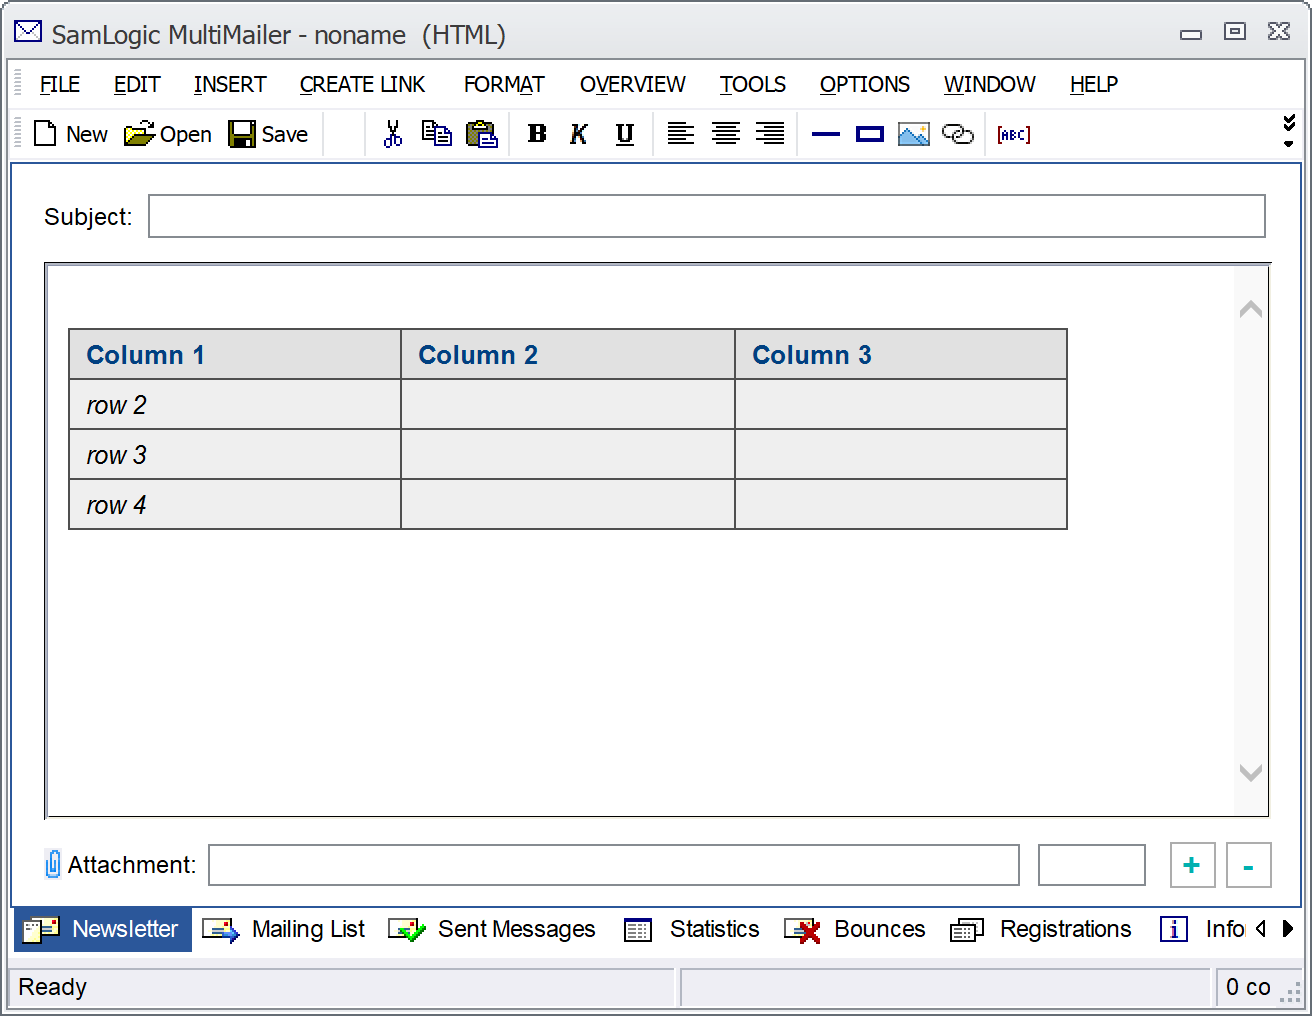
3. Specify username and password in MultiMailer
Now you must enter the correct username and password in MultiMailer. To do that, do the following:

Show steps

1. Start MultiMailer if you haven’t already.

2. Select the menu item Options – E-mail Account Settings.

3. Check the option Use e-mail server from my ISP or company.
Choose E-mail Server
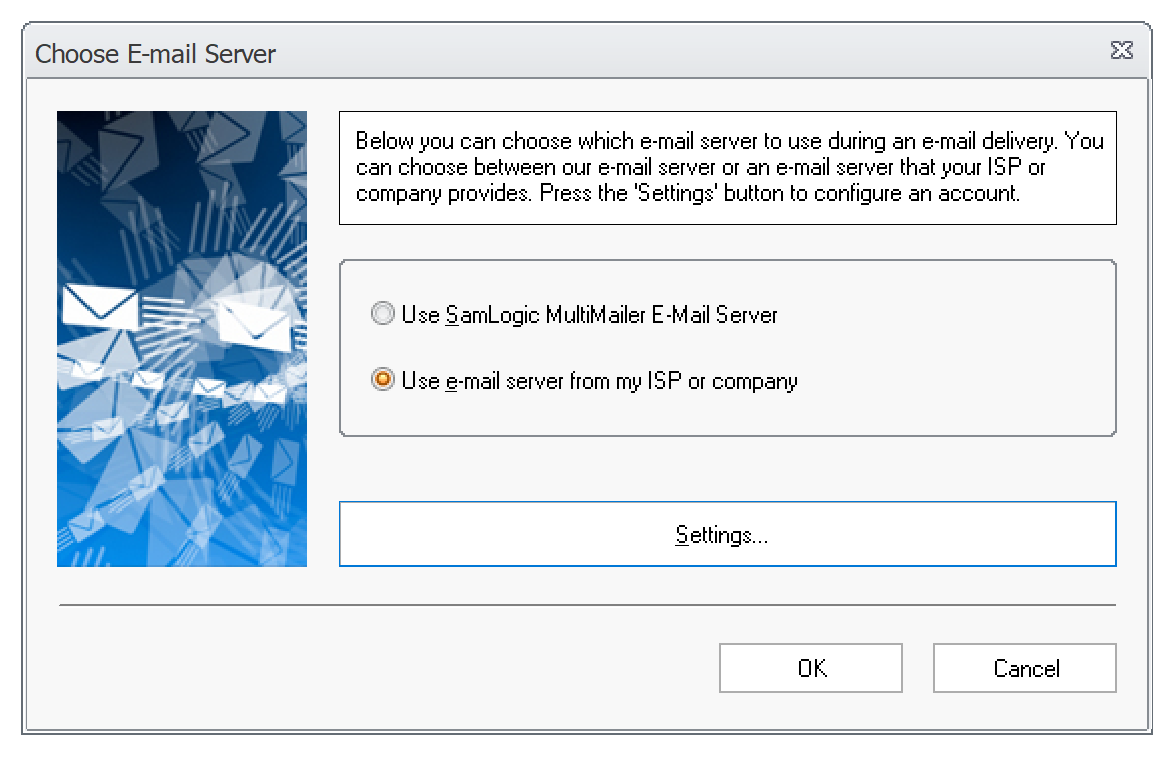
4. Click the Settings button.

5. The Email Account Settings dialog box will now appear.

6. In the dialog box, click on the Server List button.

7. Select the option Google: smtp.gmail.com (port 587).

8. At Username, enter the username/email address for your Google account.

9. At Password, paste the password you received in the previous section (see point 9).
E-Mail Account Settings
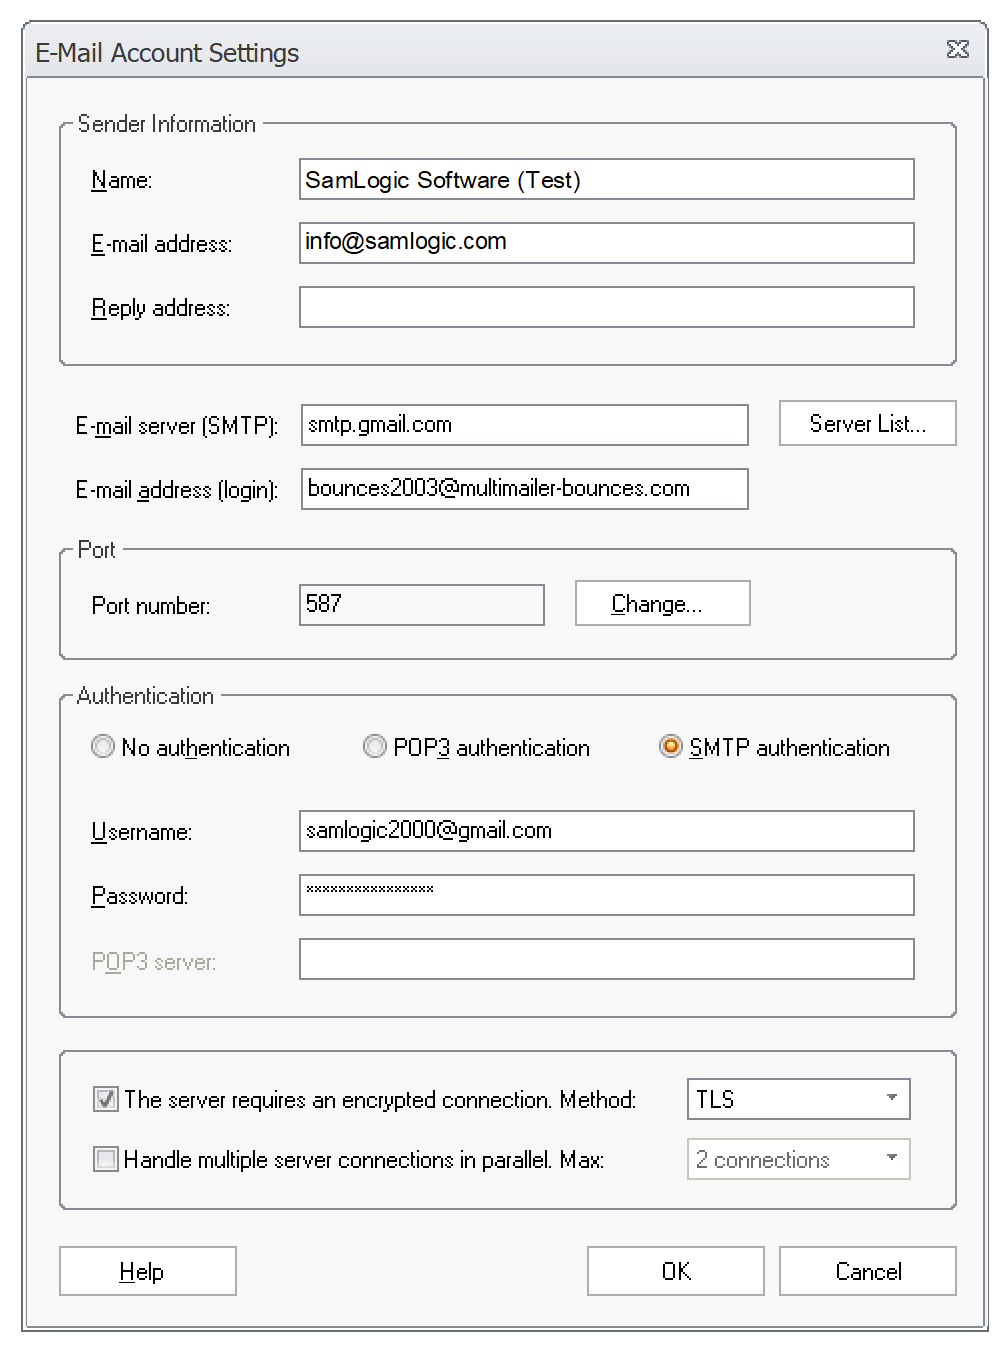
10. Click OK to close the dialog box. Click OK again.

Now you can use MultiMailer to send emails via your Google Gmail account. Note that Google has a limit on how many emails you can send per day. What the limit is depends on what kind of Google account you have.