Microsoft Access – Version numbers

In this blog post we describe how to use a conditional check in Visual Installer’s scripting language to see which version of Microsoft Access that is installed in a computer. The conditional check uses the version number of Access as parameter. In the table below you can see which version number of Access that corresponds to a specific version name:

10 = Access 2002
11 = Access 2003
12 = Access 2007
14 = Access 2010
15 = Access 2013
16 = Access 2016, Access 2019, Access 2021

See this Wikipedia article for more details.

You can now choose which shortcut to feature in the Start menu

If you add more than one shortcut to the Start menu in Windows during an installation, and one of the shortcuts is used to open your main application and the other shortcuts are used to open extra tools (when needed), you can now let Visual Installer inform Windows which of the shortcuts that opens your main application.

The shortcut to the main application will be more visible in the Start menu and the other shortcuts will be toned down. By using this new function in Visual Installer you will also eliminate the risk that wrong program is featured in the Start menu. This is a risk if you let Windows itself decide which program(s) that are the most important in your installation. Sometimes Windows makes a wrong guess here.

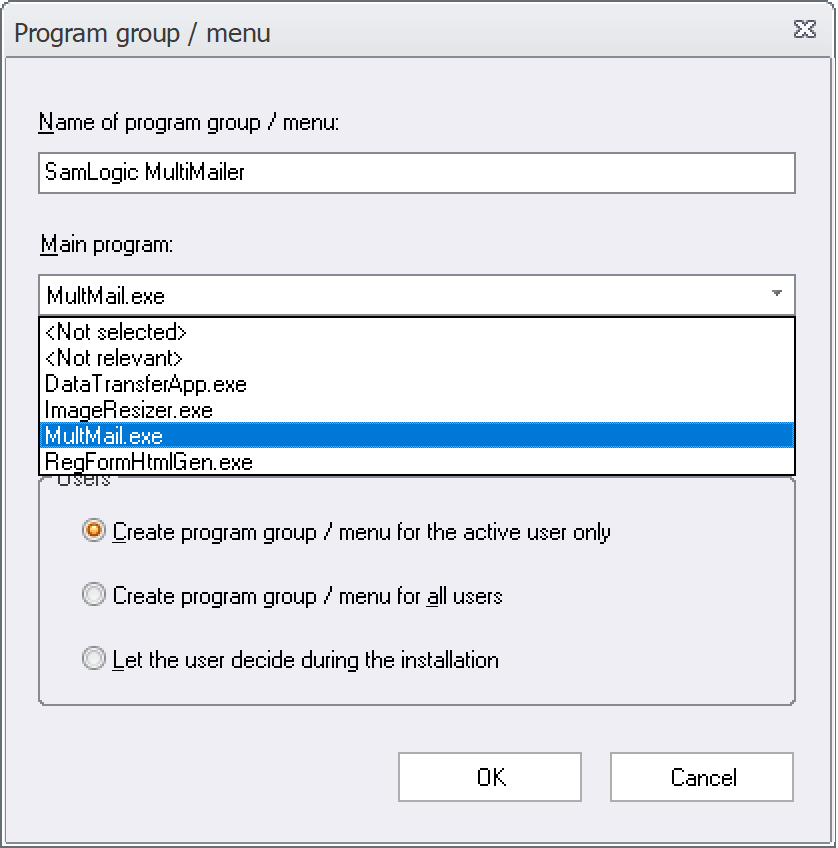
This is a new function in Visual Installer 2022 and is located in the Program group / menu dialog box in Visual Installer’s editor. A combobox with a list of all program files with shortcuts in the current installation project will be available in the dialog box. From the combobox you can choose which program is your installation’s main program. See the picture below for an example:

The 'Program Group' dialog box

The picture above shows the settings in the installation project for installation of our product MultiMailer 2022. The program file MultMail.exe has been selected as the installation’s main program. The other program files are tools that are seldom used, but they will be in the Start menu in a program group folder, and used when needed.

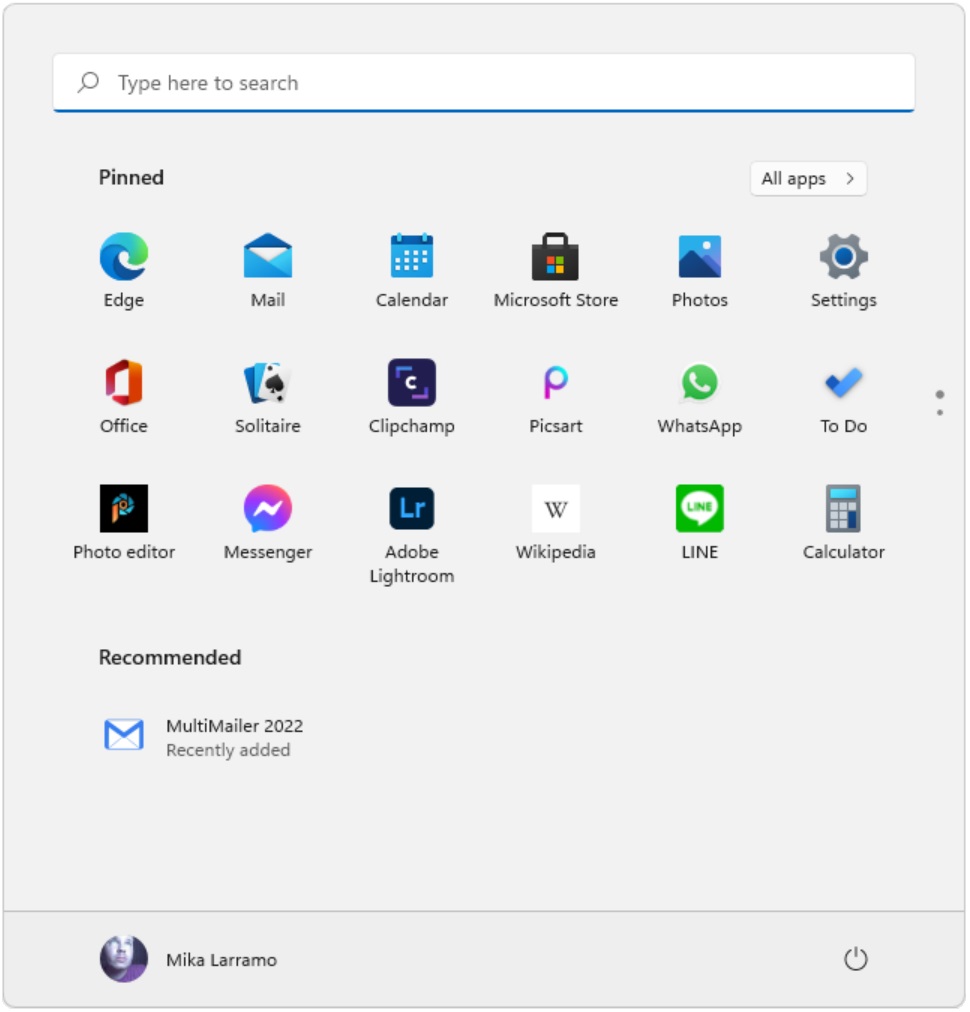
This new function is especially useful in Windows 11, where recently added shortcuts are featured in an extra clear way. For an example, see below:

Windows 11 Start menu - With MultiMailer

The example above shows how MultiMailer 2022 is featured in the Start menu in Windows 11. The other shortcuts in the installation project are not visible here. Instead they are visible if you click on the All apps button (in the upper right) and opens the program group folder (named SamLogic MultiMailer).

This function will also be useful in older Windows. Recently added shortcuts are featured also there, but in a different way compared with Windows 11.

How to test if Microsoft Access or Microsoft Excel is installed

Logotypes - Access and ExcelIn this blog post we described how to check if Microsoft Office is installed in a computer during an installation. But what if Microsoft Word and Microsoft PowerPoint is installed, but not Microsoft Access, which is what you want? How to handle this situation in Visual Installer?

In the new Visual Installer 2022 the answer is to use a new script condition that we have added to the script language. The name of the new script condition is IF ACCESS_INSTALLED and with this script condition you can check if Microsoft Access specifically has been installed in the computer. So instead of trying to use the Microsoft Office condition check (as described in the earlier blog post) you can use the new Microsoft Access condition check instead.

Below we show two examples of how to use the new condition:

// Example 1 – Tests if Microsoft Access is installed in the system
IF ACCESS_INSTALLED
  RUN %DESTDIR\InstallAccessTools.exe
END IF
 
// Example 2 – Tests if Microsoft Access is not installed in the system
IF NOT ACCESS_INSTALLED
  MSGBOX “Information”, “Microsoft Access is not installed in this computer!”, 2
END IF

 
You can also test if Microsoft Excel has been installed or not in the same way. Below we show two examples of how to use the Excel condition:

// Example 1 – Tests if Microsoft Excel is installed in the system
IF EXCEL_INSTALLED
  RUN %DESTDIR\InstallExcelTools.exe
END IF
 
// Example 2 – Tests if Microsoft Excel is not installed in the system
IF NOT EXCEL_INSTALLED
  MSGBOX “Information”, “Microsoft Excel is not installed in this computer!”, 2
END IF

 
It is also useful to know if the user has installed a 32 bit or 64 bit version of the Office program. But here you can use the same condition in Visual Installer’s script language as before (see the second half of this blog post for details).

How to run a program with correct bitness (from Visual Installer)

Symbolic image: 32 / 64 bitAssume that you have 64 bit version of a program that you want to be run in 64 bit Windows and a 32 bit version of a the same program that you want to be run in 32 bit Windows only. How do you do that from Visual Installer?

That is easy. Use conditional script.

Below we show how the script lines may look like:

// Run only in 32 bit Windows
IF OSBIT=32
  RUN %DESTDIR\App32.exe
END IF
 
// Run only in 64 bit Windows
IF OSBIT=64
  RUN %DESTDIR\App64.exe
END IF

   
You can use the same method to run an external installation package with a specific bitness. For example a 32 bit installation package in 32 bit Windows only and a 64 bit installation package in 64 bit Windows only.

See also:
> Visual Installer’s Scripting Language
> How to check bitness for an .EXE, .DLL or .OCX file
> How to install a 64 bit program

How to configure the Visual Installer editor

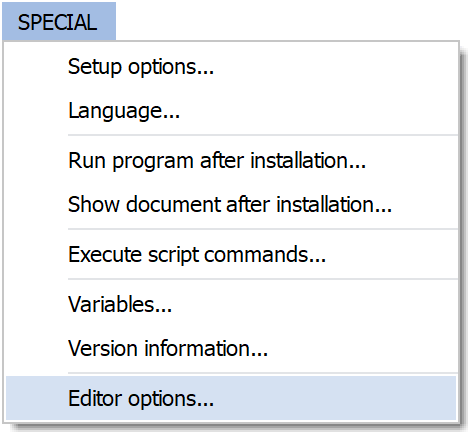
Visual Installer’s editor and user interface is configurable to some degree. If you choose the Special – Editor options menu option in Visual Installer’s editor, a dialog box with the title Editor Options is opened (see the pictures below):

The Editor options menu option

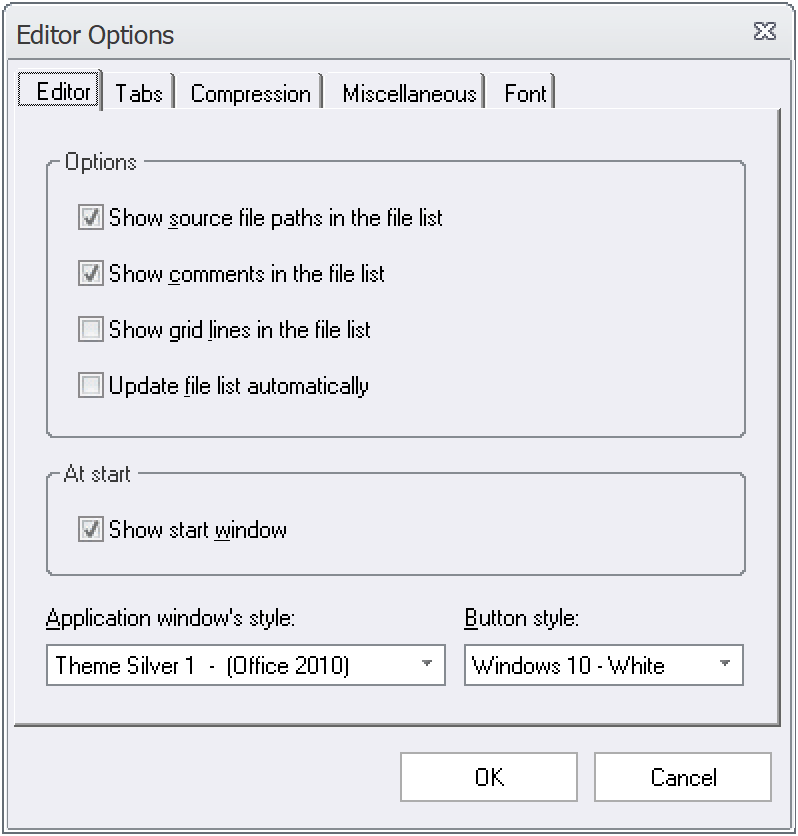
The Editor Options dialog box

The Editor Options dialog box contains various settings that can be used to change the behavior and visual appearance for Visual Installer’s editor. The settings are located in five different tabs in the dialog box (Editor, Tabs, Compression, Miscellaneous, Font), and in this blog post we will describe the settings in these tabs closer.

Tab: “Editor”
Via this tab you can change some common options for the editor that affects the visual appearance of the editor. The tab contains the following options:
 Show source file paths in the file list: If selected, source file paths are show in the file list.
 Show comments in the file list: If selected, comments are show in the file list. Read more.
 Show grid lines in the file list: If selected, grid lines are show in the file list.
 Update file list automatically: If selected, date, size etc. are retrieved when file list is opened.
 Show start window: If selected, the start window is shown when the editor starts.
 Application window’s style: Here you can select a visual style for the editor. Read more.
 Button style: Here you chose a style for the buttons in Visual Installer’s editor.

Tab: “Tabs”
Via this tab you can show or hide some of the main tabs in the Visual Installer editor. So if there is a main tab that you never use (for example the INI files tab) you can hide it in the editor. You can show/hide the following tabs: Registry, INI files, Components. Read more.

Main tabs in Visual Installer

Tab: “Compression”
Via this tab you can set some advanced options that affects the compression of created setup files. Normally the default values will do a good job, but if you want to change some options, you can do it in this tab.

Tab: “Miscellaneous”
Via this tab you can set some various options. You can for example change the default folder for your installation project files. Read more.

Tab: “Font”
Via this tab you can change the font for the editor. Read more in this blog post.

See also
> Information and tips pages: “Tips & tricks for SamLogic Visual Installer”

How to display a text message during an installation

It is possible to display a text message during an installation (that is created with Visual Installer). You can do it via Visual Installer’s script language. There are two commands available for this purpose:

MESSAGE : Displays a text message on the progress bar window.
MSGBOX : Shows a message box with a title, text and an OK button.

If you use the MESSAGE command, the text will be shown until another text need to be displayed or the progress bar is closed. If you use the MSGBOX command, the installation will pause until the end-user click the OK button in the message box.

MESSAGE
Below is an example of how to use the MESSAGE command:

MESSAGE My MSI installation is running
MSIEXEC %DESTDIR\MySetup.msi, /qn, WAIT

   
MSGBOX
Below is an example of how to use the MSGBOX command:

IF NOT OFFICEINSTALLED
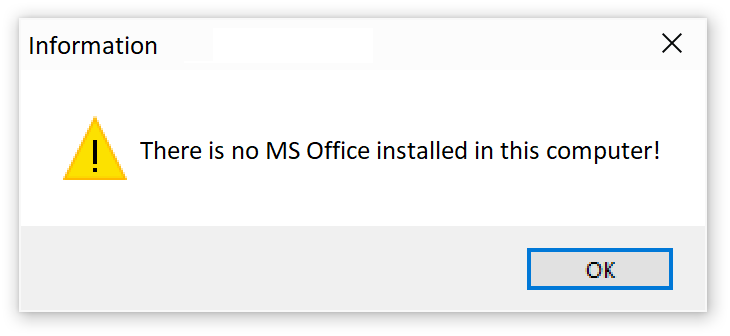
  MSGBOX Information, There is no MS Office installed in this computer! , 2
  EXIT
END IF

   
MSGBOXThe picture to the right shows how the message box created in the scripting code example above will look like when shown during an installation. When the end-user clicks on the OK button, the installation continues to the next script line, where the EXIT command halts the installation.
More information
More information about the commands described above is available in Visual Installer´s Help Documentation and User´s Guide. General information about Visual Installer’s script language can be found on this web page.

FAQ about destination folders for EXE, DLL & OCX files in Visual Installer

FAQThere are some common questions about destination folders for binary files (EXE, DLL, OCX files etc.) in Visual Installer that we sometimes get asked from our customers. You will find the questions & answers below, and if you are new to Visual Installer we recommend you to read them:

Questions and answers:


#1
Q: Should I use the C:\Program Files folder or the C:\Program Files (x86) folder as a destination for my application file?

A: It depends of the bitness of your application. 32 bit applications should be installed to the Program Files (x86) folder and 64 bit applications to the Program Files folder.

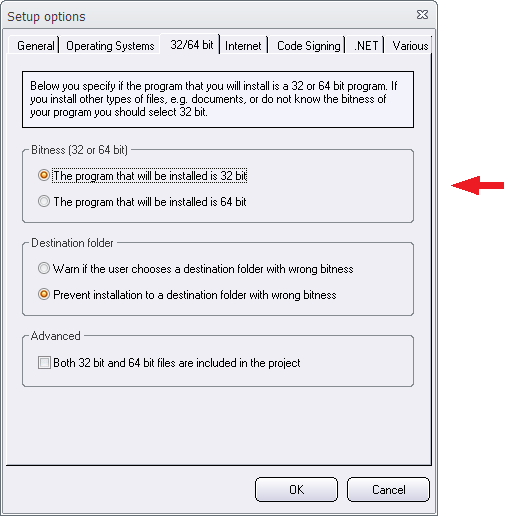
However, Visual Installer will choose correct folder automatically for you, if you specify your application’s bitness in the 32/64 bit tab in the Setup options dialog box in Visual Installer.

The Setup options dialog box

You can open this dialog box by choosing the Setup options menu item in the Special menu.


#2
Q: How do I do in Visual Installer to install a file to the program files folder?

A: Installing a file to the program files folder (the Program Files or the Program Files (x86) folder) is easy done in Visual Installer, but you need to specify the settings for this in two steps:

Step one:
1. Open the File list tab in Visual Installer’s editor.
2. Click on the […] button to the right of the Main folder text box in the tab (it is located in the upper right part of the editor window).
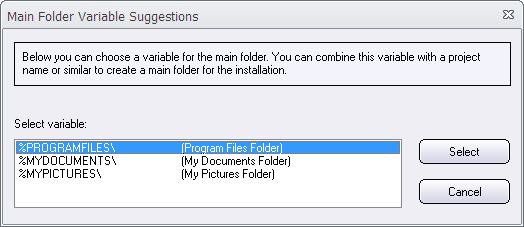
3. Select the %PROGRAMFILES option in the dialog box that is shown (see the picture below).

The Main Folder Variable Suggestions dialog box

4. Click the Select button.
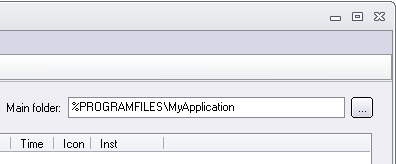
5. Add (enter) a sub folder name after the %PROGRAMFILES variable in the Main folder text box. Below is an example:

Main folder

You have now specified the main destination folder for your installation. In the next step we will specify the destination folder for the specific file that you want to install.

Step two:
1. Choose the List – Add – Add files menu item in Visual Installer’s editor.
2. Select your file in the Add files dialog box.
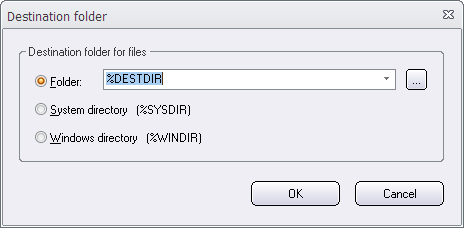
3. Confirm that the text after the Folder text box is %DESTDIR in the following dialog box:

The Destination folder dialog box (1)

4. Click the OK button.

Now this file will be installed to the Program Files or the Program Files (x86) folder during the installation. If your application is a 32 bit application, the Program Files (x86) folder will be used as a destination. You can read more in this blog post and in this tip.


#3
Q: How do I install a file to the system folder?

A: If you have for example a DLL or OCX file that need to be installed to Windows’ system folder it can be done in Visual Installer. Follow the instructions below to do it:

1. Open the File list tab in Visual Installer’s editor.
2. Choose the List – Add – Add files menu item in Visual Installer’s editor.
3. Select your file in the Add files dialog box.
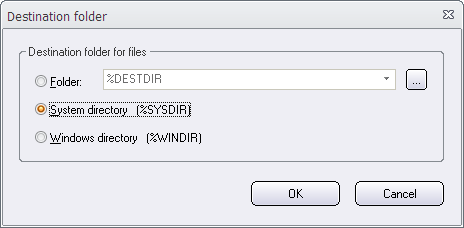
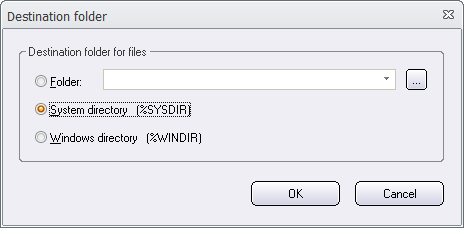
4. Select the System directory option in the following dialog box:

The Destination folder dialog box (2)

5. Click the OK button.

Now this file will be installed to Window’s system folder during the installation. The exact folder that is used depends of your installation project’s bitness (see question 1 above).


#4
Q: In some dialog boxes and other places in Visual Installer’s editor I see words like %PROGRAMFILES, %DESTDIR and %SYSDIR etc. What are they?

A: %PROGRAMFILES, %DESTDIR and %SYSDIR etc. are called variables. The name of the variable will be replaced with an actual text during the installation.

Variables are used when the actual text is not known, until the installation starts. Variables are usually used as a place holder for folder paths. For example the %PROGRAMFILES variable is a place holder for the program files folder in the system. When the installation starts, %PROGRAMFILES is replaced with the actual folder path. For example with C:\Program Files.

You can read more about variables in this blog post.


#5
Q: I have an international application. The name of the program files folder is different in different countries / languages. Can Visual Installer handle this?

A: Yes. Visual Installer will find the correct path to the program files folder regardless of country / language or version of Windows. You can read more in this blog post.

More information
If you want more information about the settings in the dialog boxes above, you can press the F1 button on your keyboard when the dialog box is open. We recommend you also to take a look on Visual Installer’s tips and tricks pages:

> Tips & tricks for SamLogic Visual Installer

How to install an ActiveX component with Visual Installer

ActiveX Logotype

Visual Installer supports installation of VB6 applications, and most VB6 applications use ActiveX components. An ActiveX component is an easy way to give applications access to powerful functions in a library or to put well designed visual objects on the application interface.

Visual Installer can install ActiveX components. If you import a VB6 project to Visual Installer (via File – Import Visual Studio project – Visual Basic 6.0 project) all ActiveX components in the Visual Basic project will be added automatically to Visual Installer’s file list. But you can also add additional ActiveX components manually, in this way:

1. Choose the List – Add – Add files menu item in Visual Installer’s menu.

2. Browse to the ActiveX component you want to add.

3. Select the ActiveX file and click on Open.

4. The following dialog box is now shown:

The Destination Directory dialog box

5. Choose a destination folder for the ActiveX.
Normally is System directory used as destination folder for ActiveX files in VB6 projects. If you don’t find other information about the destination folder, select the System directory option.

6. Now click OK.

The ActiveX component has now been added to Visual Installer’s file list. It will be automatically registered during the setup process. Registration is an important part when installing ActiveX components, and Visual Installer will do it for you.

Sometimes ActiveX are dependent on DLL files
Mostly ActiveX files can be distributed alone, but sometimes they are dependent on additional DLL files. If you add an ActiveX file manually (as described above) and you get problems in another computers when running your application, you should check the documentation for the ActiveX, if also DLL files must be distributed in the same time. You can add the DLLs to the file list in the same way as described above. The destination directory for the DLL file must be the same as the ActiveX file.

See also
> How to create an installation for a VB6 application (tip)
> How to install and register an ActiveX component (general article)

Frequently asked questions about titles in Visual Installer

FAQThere are some common questions about titles in Visual Installer that we get then and then from new customers. You will find the questions and answers below, and if you are new to Visual Installer we recommend you to read the questions and the answers:

Questions and answers:

#1
Q: I have created my first installation. But when the software is installing, there is the word “Title” in the top left hand corner of the graphical window. How can I change that to my application name?

A: If you want to change the text of the title in the graphical setup window to another text, you can follow the steps below:
1. Open the Design tab in the editor.
2. Select the menu option Object – Title.
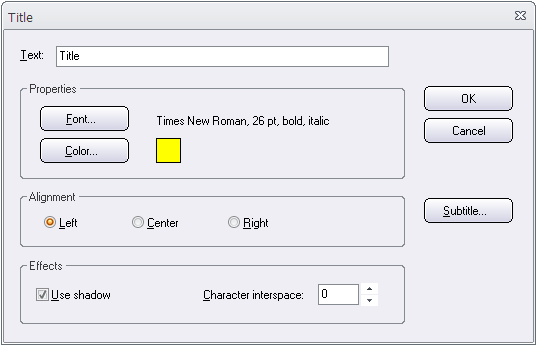
3. The following dialog box is opened:

The Title dialog box

4. Enter a new title at Text. Enter for example your application name here.
5. Click OK to close the dialog box.

The title is now updated. If you also want to add a subtitle, you can press the Subtitle button in the Title dialog box.

#2
Q: I have put the application name in the title of the graphical window. But all of that text is covered up by the installation dialog boxes in the beginning of the installation. How do I make this text visible?

A: There are two things that you can look at:
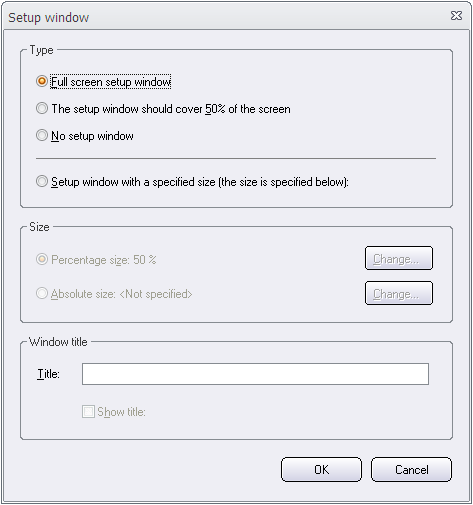
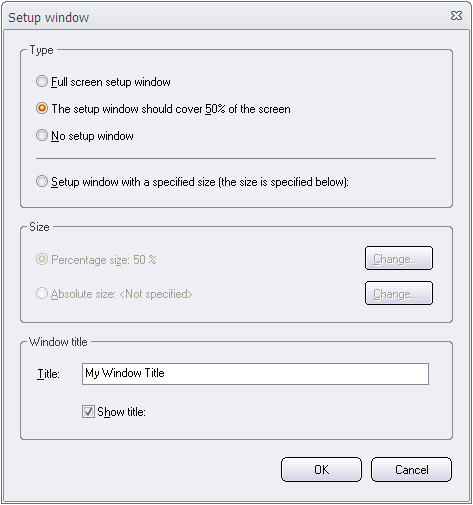
1. You can adjust the size of the graphical setup window by opening the Object – Setup window menu item in the editor and adjust the windows size in the dialog box that is shown. Full screen size is the biggest size. But you can also have another size.

The Setup Window dialog box (1)

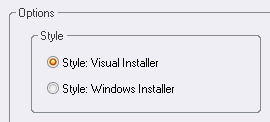
2. In the Dialog boxes tab in the editor you can choose the “Style: Visual Installer” style, if you have not. It creates smaller dialog boxes.

Style

#3
Q: In the Setup window dialog box in the editor, there is a Title input box in the Window title frame. What is the difference between this title and the title that is specified when choosing the Object – Title menu item?

A: The title that you specify in the Title input box in the Setup window dialog box (see the picture below) is shown in Window’s task bar, and in the caption bar of the setup window if you have also selected the Show title option in the dialog box.

The Setup Window dialog box (2)

The title that you specify via the Object – Title menu item is the title that is shown in the graphical setup window. You can change font, colors, size, alignment etc. for this title.

More information
If you want more information about the settings in the dialog boxes above, you can press the F1 button on your keyboard when the dialog box is open. We recommend you also to take a look on Visual Installer’s tips and tricks pages:

> Tips & tricks for SamLogic Visual Installer

How to copy/move many files at once in Visual Installer’s script language

There is a built-in script language available in Visual Installer. The script language is very versatile and with the script commands you can do different kind of file operations and other types of operations during an installation.

File copy operationOne common operation is to copy or move files during an installation. There are commands available in Visual Installer’s script language that can do this. If you need to copy or move many files at once, you can use the MCOPY and MMOVE commands for this purpose. Below is the syntax of these two commands described:

MCOPY %Source, %DestinationDir
Copies many files at once. %Source specifies the source file path and %DestinationDir specifies the destination folder for the files.

MMOVE %Source, %DestinationDir
Moves many files at once. %Source specifies the source file path and %DestinationDir specifies the destination folder for the files.

   
You can use wildcards with the %Source parameter. Example: “%DESTDIR\Data\*.txt”. The code examples below show how to use these two commands with wildcards etc.:

Example 1 – Copy many files at once
Copies all files in the %DESTDIR\Data folder to the %DESTDIR\NewPlace folder:

MCOPY %DESTDIR\Data\*.*, %DESTDIR\NewPlace

Example 2 – Move many files at once
Moves all text files in the %DESTDIR\Data folder to the %DESTDIR\NewPlace folder:

MMOVE %DESTDIR\Data\*.txt, %DESTDIR\NewPlace

To add script commands to an installation, you need to open the Special – Execute script commands menu item in Visual Installer’s editor. More information is available in this tip.

   
More information
For more information about Visual Installer’s script language, see this web page:

> Advanced Tips & Tricks for SamLogic Visual Installer