Using the ‘Add tree’ function in Visual Installer

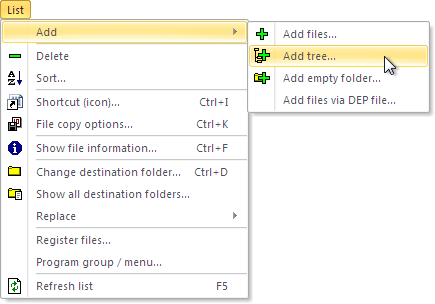
If you already have created a folder structure on your hard drive, with the files that you want to install, and want to create a similar folder structure on the destination drive, there is a very useful function in Visual Installer that you can use. The name of the function is Add tree and you can access it via the List menu in Visual Installer, by choosing the List – Add – Add tree menu item (see the picture below):

The 'Add tree' menu option

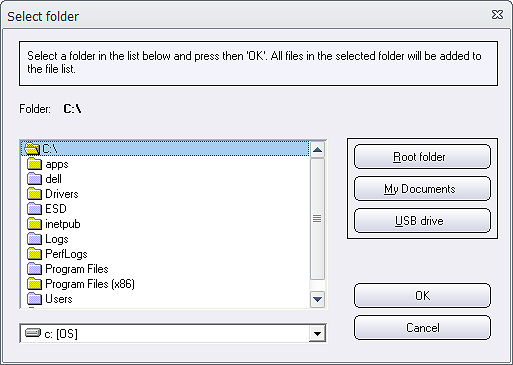
After you have chosen this menu item, the following dialog box is shown:

The 'Select folder' dialog box (1)

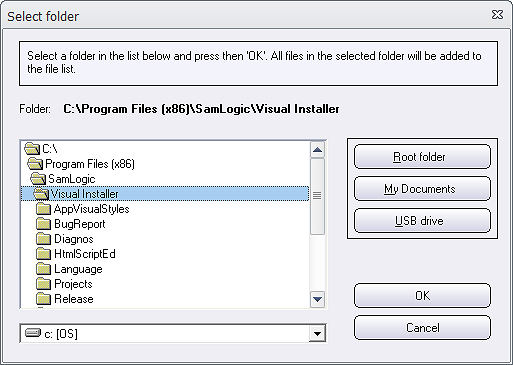
Via this dialog box you can browse to the folder, with sub folders and files, that you want to add to Visual Installer’s file list. For example like:

The 'Select folder' dialog box (2)

You can see the current folder path to the right of the Folder field name in the dialog box.

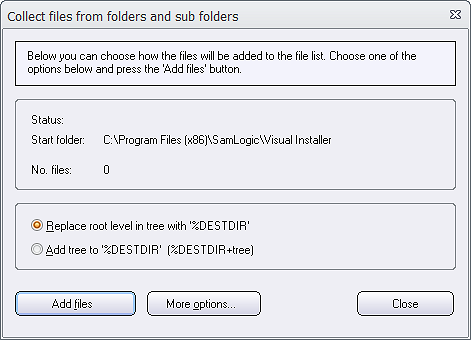
After you have selected your folder, you can click on the OK button to continue. The following dialog box will now be shown:

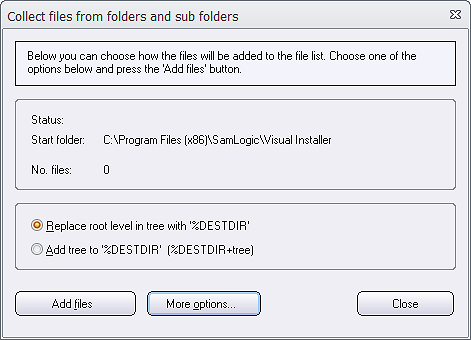
Collect files from folders and sub folders

In the option frame (above the three buttons) you can choose how the folder structure will be built in Visual Installer’s file list. You can choose between replacing the root level of the folder tree with the %DESTDIR variable, or add the folder tree to the %DESTDIR variable.

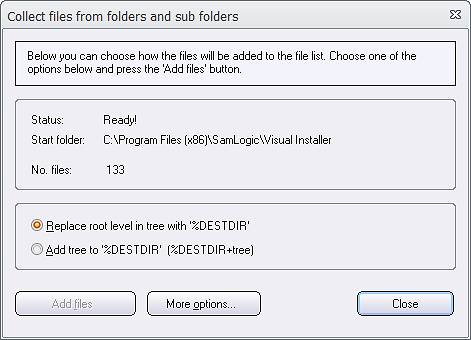
When you have decided how you want to build the folder tree, you can press the Add files button. Now Visual Installer’s file list will be filled with the files and folders. And you can see how many files that were collected in the No. files field name in the dialog box:

Ready!

To return to the file list, just press Close in the dialog box.

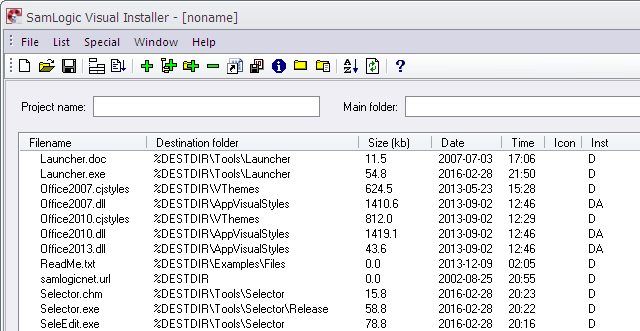
The collected files

How to obtain only folders of a folder tree
Instead of collecting the files in a folder tree you can also extract only the folders (directories) of the tree and skip all files. In this blog post we explain how to do this.

How to add a folder tree to Visual Installer’s file list

With the Add tree function in Visual Installer you can add a folder structure including files to Visual Installer’s file list in an easy way. It is also possible to add a folder structure without files to Visual Installer’s file list with the same Add tree function. We will show below how to do this.

1. Open the List menu and choose the Add – Add tree menu item.

The 'Add tree' menu option

2. Select a folder in the Select folder dialog box and click OK.

The 'Select folder' dialog box

3. Click on the More options button in the Collect files from folders and sub folders dialog box that now appears.

Collect files from folders and sub folders

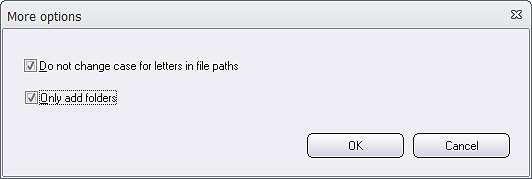
4. Select the Only add folders option in the More options dialog box that now is shown.

The 'More options' dialog box

5. Click OK to close the dialog box. The text in the previous opened dialog box will be updated to:

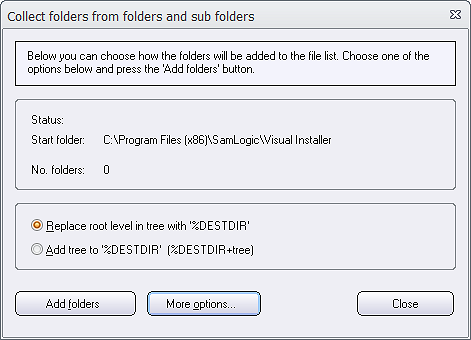
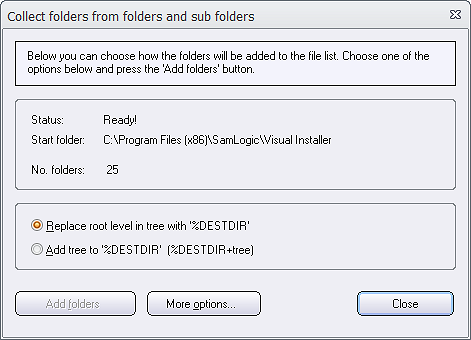
Collect folders from folders and sub folders

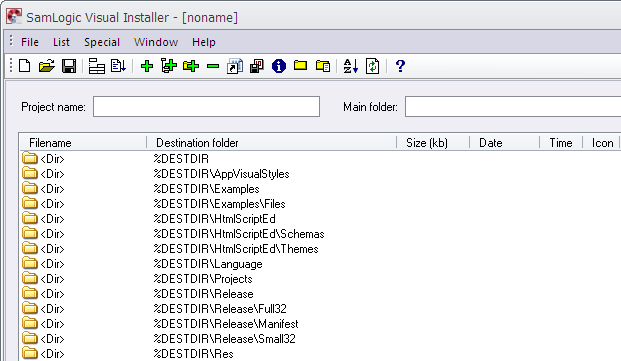
6. Now click on the Add folders button to start collecting folder. All folders and sub folders in the selected folder (in step 2) will be added to Visual Installer’s file list. The number of collected folders will be displayed after the No. files field name in the dialog box.

Ready!

7. Click the Close button in the dialog box to return to the file list.

The collected folders

How to check if Microsoft Office is installed during an installation

We have added new conditions to Visual Installer’s script language that can be used to:

• check whether Microsoft Office is installed in the computer or not
• check if the installed Microsoft Office is 32 bit or 64 bit

This can be useful if you for example:

• install files that require that Microsoft Office is installed in the computer
• install files that require a specific bitness of Microsoft Office (for example 32 bit Office)
• want to install different files depending on the bitness of Microsoft Office

You can read more in this blog post:

> How to check if Microsoft Office is installed during an installation

Using the log function in Visual Installer’s script language

When using the script language in Visual Installer, it may sometimes be useful to see in detail what happen when the script lines are executed. To get detailed information about the execution of script commands, you can activate a log function in Visual Installer’s script language. When the log is activated, detailed information about every script line that is executed are stored in a log file. Here you can see the contents of the parameters that are passed to the script commands and see the return value (for example error codes) of every command. If you use variables in the script (for example %DESTDIR) you can see their actual values.

How to activate the log function
To activate the log function, you can use the USELOG script command. To enable the log, enter the following in the beginning of your script code:

USELOG 1

As default, the log file is stored in the main destination folder of the installation (the folder path that is stored in the %DESTDIR variable) but you can also specify your own folder for the log file via parameter 2. For example:

USELOG 1, C:\MyLogFolder

To turn off the log, somewhere in the script, you can enter the following:

USELOG 0

If you want to log all lines in the script, you don’t need to turn off the log at the end. It will be turned off automatically after the last executed script line.

In the picture below, you can see an example of how the USELOG command can be used:

USELOG

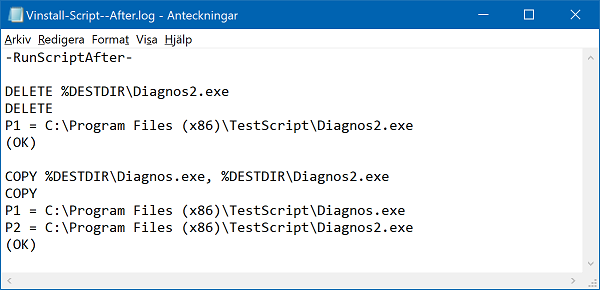
And below is an example of how the log file may look like:

Log (OK)

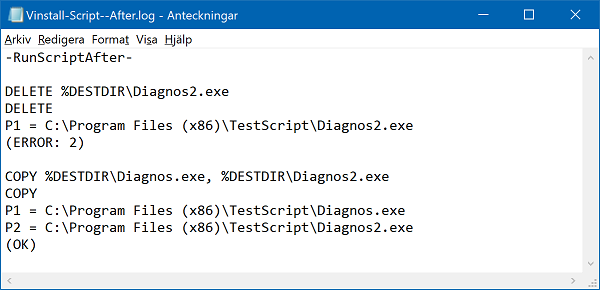
If a script command succeeds, it returns OK. Otherwise it returns ERROR and an error code. Below is an example of how the log file may look like if an error occurs:

Log (Error)

Most error codes can be found on this web page at Microsoft’s web site:

> Windows Dev Center: System Error Codes (0-499)

Some common error codes are:

2 : File not found!
3 : Path not found!
5 : Access denied!
183 : File already exists!

Filenames
The filename of the log file is Vinstall-Script–Before.log if the script lines are executed in the Before installation tab in the Execute script commands window in Visual Installer, and the filename is Vinstall-Script–After.log if the script lines are executed in the After installation tab in the same window. The filenames can not be changed, but you can change the folder where the log files are stored (as described above).

See also
> Visual Installer’s Scripting Language

Two useful tips about Visual Installer and .NET Framework

Do you use SamLogic Visual Installer to create installation packages for your .NET applications and .NET components? If yes, then you should check the following two tips that we have published on the tips section for Visual Installer:

Tip 1
Explains how to handle situations when the required version of .NET Framework is not installed in the end-users computer:
> How to prevent an installation if wrong .NET version

Tip 2
Explains how to register a .NET assembly, and when it is needed:
> How to register a .NET assembly

More tips
More tips for Visual Installer are available here:
> Tips & tricks for SamLogic Visual Installer

CD-Menu Creator: How to protect a document with a password

If you have documents (for example PDF or Word documents) that you want to distribute to other people via a CD, DVD or USB flash drive, CD-Menu Creator is the right tool for you. You can create a menu interface very fast and you can have clickable buttons that the end-user click on to open your documents.

Password protected documentIf you have sensitive documents that you only want some specific persons open and read, you can password protect the access to the documents. You can also have the documents encrypted on the CD, DVD or USB flash drive, so nobody can read them directly on the disc or drive. And if any person copies the documents from the disc / drive to another place, they are unreadable. The documents can only be read via the menu interface and by entering the correct password. The menu interface will ask for a password when the end-user clicks on the button that opens the document.

Tip: How to password protect a document
The tip below explains how to password protect a document that is opened via a button in a menu interface that is created with CD-Menu Creator. The document will also be stored encrypted on the disc or drive, and can only be read via the menu interface.

1. Start CD-Menu Creator.

2. Open the Buttons (text) tab in the editor.

3. Click the Add Button button.

4. Enter a button text at Text (button).

5. Select the Show Document command in the Command combobox.

6. Click the “…” button and choose a document (for example a PDF document).

7. Click the Options button in the dialog box.

8. Open the Password tab.

9. Select the Password protect this button option.

10. Enter a password in the Password input box.

11. Select the Encrypt the file linked to the button option.
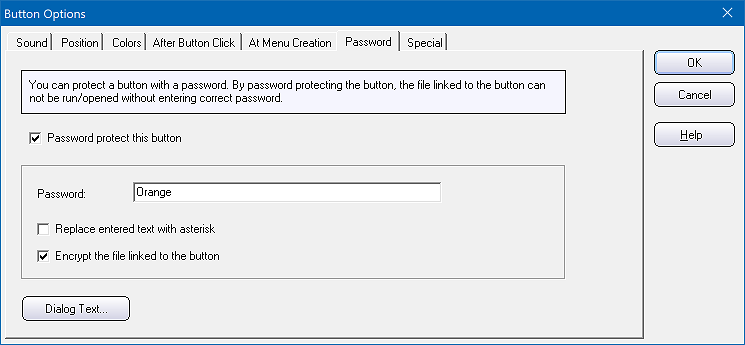
The 'Password' tab in the 'Button Options' dialog box

12. Click OK. And thereafter OK again.

13. Now create your menu!

After you have created your menu you can click on the button in the menu interface. A dialog box that asks for a password is now shown. Now enter the password that you entered at step 10 above to open the document. If you enter another text, the document can not be opened.

How to increase the security even more
The password and encryption function protects the document, so nobody can open it without the password. But if you also want to assure that nobody can save or print the document via the document viewer that is used to show the document, you must disable these functions in the document viewer or choose a document viewer that does not have this functionality. You can read the documentation to your document viewer/editor to find more information about this.

If you distribute a document viewer with your CD, DVD or USB flash drive, you can choose the Run Program command at step 5 above and enter the path to the document viewer in the Filename text box and a path to the document file in the Parameters input box. If needed, you can also enter some switches to the document viewer program in this input box.

Some document viewers have built-in encryption/decryption
Instead of using the encryption/decryption function in CD-Menu Creator, you can also use a document viewer that supports encryption and decryption. To have maximum security, this may be a better choice because they are specialized tools, and as a such, the security may be better.

See also
> CD-Menu Creator: How to encrypt a document without a password

CD-Menu Creator: How to encrypt a document without a password
In this blog post we explained how to protect a document with a password and how to store it encrypted on a CD, DVD or USB flash drive. Sometimes it may be useful to only have the document encrypted, but without requiring (asking for) a password. This is also possible with CD-Menu Creator.

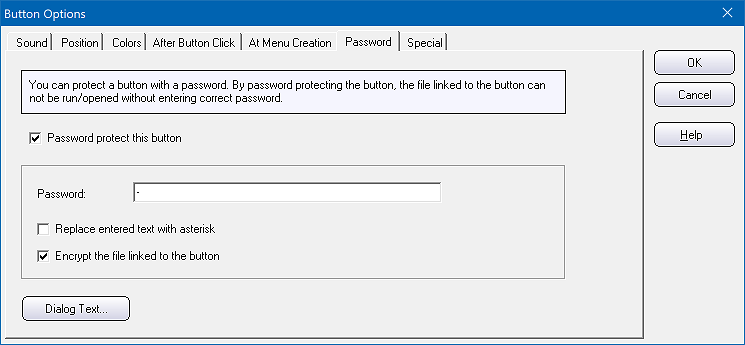
If you follow the tip in the How to protect a document with a password blog post, but enters a hyphen (“-“) instead of a password at step 10 in the tip, the document will not be password protected; it will only be encrypted.

The 'Password' tab in the 'Button Options' dialog box

Copy protection
One benefit when doing this is that you will have a limited copy protection of your document. Nobody can copy the document directly from the CD, DVD or USB flash drive to another drive or disc, and have it opened. It can only be opened via CD-Menu Creator’s menu interface. If somebody tries to open the document in other way, it will not be opened because the contents is encrypted and will be unreadable for the document viewer or editor.

See also
> CD-Menu Creator: How to protect a document with a password

Visual Installer: How to block a license key

In Visual Installer it is possible to block specific license keys from be accepted during an installation. This is useful when using prime number based license keys because they are created and verified mathematically. So if the license key is evaluated correctly, it will be accepted.

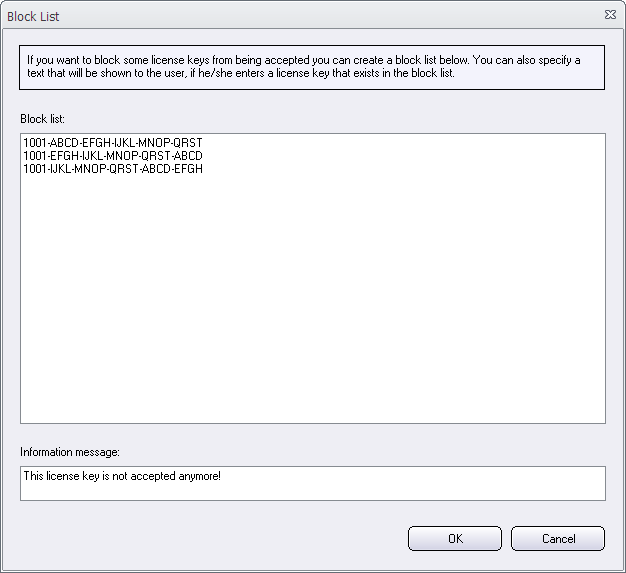
In Visual Installer you can create a block list with prime number based license keys that should not be accepted, although they are mathematically correct. This is done via the Block List dialog box in Visual Installer:

The 'Block List' dialog box in Visual Installer

In this dialog box you can enter a list with license keys that should not be accepted by Visual Installer during an installation. The block list is stored per installation project and is saved with the .VIP project file. So it is not a global block list. It only adds the block list to the specific installation project.

Where to find the ‘Block List’ dialog box?
You can open the Block List dialog box by following these steps:

1. Open the Dialog boxes tab in Visual Installer’s editor.
2. Click on the “” button to the right of the License key option.
3. Click on the More options button.
4. Click on the Block List button.

In the Block List dialog box that is now opened you can enter a list with license keys to block. One license key per row. You can also specify an information message that is shown to the user if he/she enters a blocked license key. If no text is specified, a default text is used.

Note
Both prime number based license keys and static license keys can be blocked with this method, although this function is most useful when used with prime number based license keys.

See also
> Visual Installer: Prime number based license keys
> Visual Installer can show visually when a license key is correct
> The setup wizard in Visual Installer

Visual Installer: How to run a program with administrator rights

Sometimes an installed program must be run with administrator rights when it is started. This gives the program more privileges, which sometimes is necessary to make a program function as expected. In Visual Installer you can set an installed program to run with administrator privileges in an easy way.

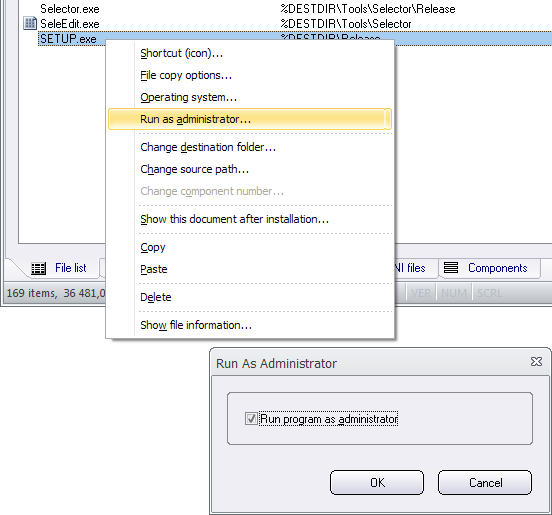
To make an installed program to run with administrator rights you can right-click on the program file in Visual Installer’s file list and choose the Run as administrator menu item in the menu that is shown. Thereafter you can select the Run program as administrator option in the dialog box that appears and press OK (see picture below).

Run program as administrator

After installation, the installed program will be run with administrator rights when it is started. If the UAC is activated in the Windows, the system will ask the end-user for permission before it elevates the privileges.

USB AutoRun Creator: The AutoRun driver can be downloaded from the Internet

USB flash drivesBefore AutoRun can work with USB flash drives in a computer, our AutoRun driver must be installed in the computer. You can distribute the AutoRun driver with your USB stick or you can let the user download and install it from the Internet.

In some situations using the Internet can be the preferable way because you can email your customers in advance and let them download and install the driver from your web site. And thereafter, when they receive your USB stick, AutoRun will work immediately when they plug the USB stick into the USB port.

When you install USB AutoRun Creator, the product is installed in this folder on your hard drive as default:

C:\Program Files (x86)\SamLogic\USB AutoRun Creator

If you look in this folder, you will find the following file there:

SETUP-USB-Supervisor-Internet.exe

You can upload this file to your web server and let the user download it, when needed.

The SETUP-USB-Supervisor-Internet.exe file is a small installation package, and the installation is very simple. The following two steps-wizard is shown to the user:

Step 1:
Installation of the AutoRun driver - Step 1
Step 2:
Installation of the AutoRun driver - Step 2

So the installation of the AutoRun driver is done in seconds.

See also
> USB AutoRun Creator – Overview (PDF)