How to view source paths in the file list in Visual Installer

As default source paths for files in the file list are not shown in Visual Installer, but it is easy to turn on this setting, so source file paths will be shown in the editor. The short tip below shows how to do this:

1. Start Visual Installer.
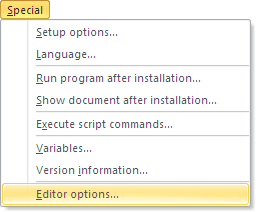
2. Choose the Special – Editor options menu item.

Special - Editor options

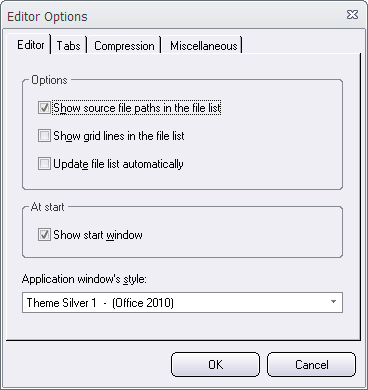
3. Select the Show source file paths in the file list option in the dialog box that opens.

Editor Options

4. Press OK to close the dialog box.

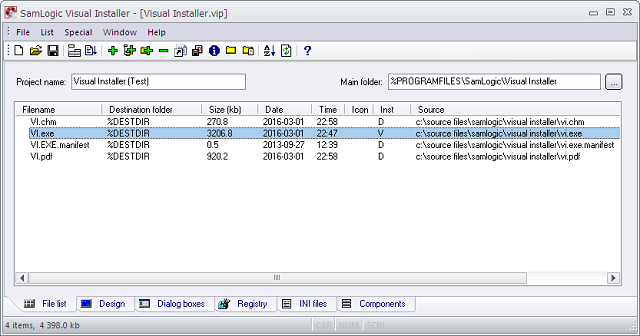
Now you have enabled the show source file paths option in Visual Installer. The picture below shows how it may look like:

Visual Installer editor

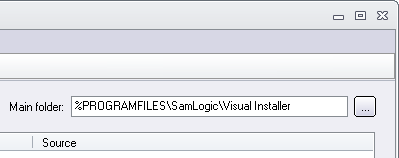
The source paths are displayed in Source column in the file list.

See also
> How to add more files from a previously used folder

An update of Visual Installer 2015 is now available

There is now an update of SamLogic Visual Installer 2015 available. The version number is 10.5.16, and some of the news and improvements in this version are:

• The code signing function in Visual Installer now supports SHA-2 and dual code signing (SHA-1 + SHA-2). Windows 7 and later requires SHA-2 for setup packages that are code signed from January 1, 2016 and later. Read more.

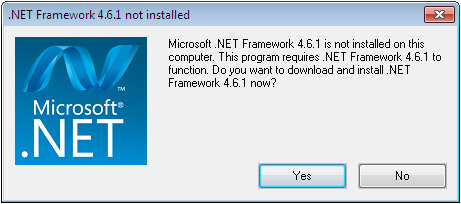
• Improved support for Microsoft .NET Framework. Now are also sub versions of .NET Framework supported (for example version 4.5.1, 4.5.2 etc.). And you can let Visual Installer download and install a specific version of .NET Framework, if it is missing in the end-user’s computer. We have added a mini wizard that handles this. Read more.

• Easier to register a type library for a .NET assembly. Read more.

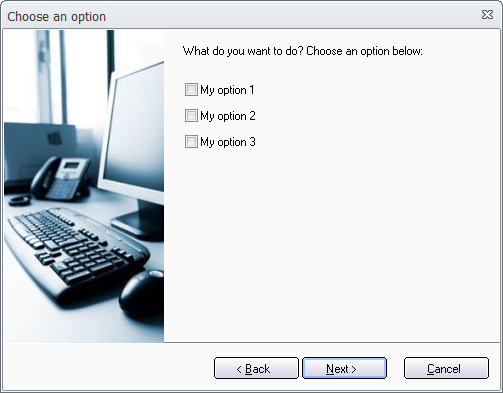
• A new setup dialog box has been added to Visual Installer’s setup wizard: User Options. It’s a general option dialog box where the user can select and unselect options that you have created and added to the installation project. These options co-operates with condition statements in Visual Installer’s scripting language and Visual Installer’s Registry tab. Read more.

• It is now possible to import a VB.NET project that compiles a DLL rather than an EXE file.

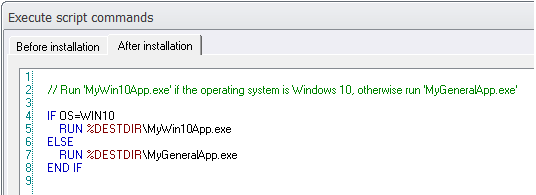
• Visual Installer’s scripting language now supports ELSE. Read more.

• Visual Installer now supports environment variables. An environment variable can be expanded during an installation (for example in the Registry tab), and with a new script command, SETENV, that we have added to the script language you can set an environment variable to a specified value.

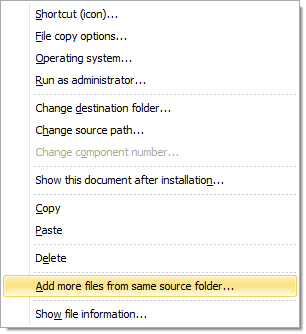
• The local (right-click) menu in the File list tab has been extended with a new menu item: Add more files from same source folder. This menu command is very useful if you want to add more files to the file list from a previously used folder in the file list. Read more.

How to download the update
If you have Visual Installer 2015 and a 12 months maintenance plan you can download the update from the following download page:

> Download – Visual Installer 2015 – Latest update

If you have an older version of Visual Installer, for example Visual Installer 2014, you can upgrade to the latest version of Visual Installer from this order page:

> Upgrade to Visual Installer 2015

Visual Installer now supports SHA-2 and dual code signing

Since January 1, 2016, Windows 7 and newer Windows will no longer trust software that is signed with a SHA-1 code signing certificate, if the software is downloaded from the Internet and the software is time-stamped with a value greater than January 1, 2016. This means that if you code sign a binary file (for example an EXE file) this year and uses SHA-1 as a hash algorithm, it will not be trusted in newer Windows. Instead you must use a SHA-2 (SHA-256) code signing certificate; then the binary file will be trusted by Windows 7 and newer. You can read more about this in the following articles on Microsoft’s website:
> Windows Enforcement of Authenticode Code Signing and Timestamping
> Deprecation of SHA-1 Hashing Algorithm for Microsoft Root Certificate Program

Updated Visual Installer
We have updated our installation tool Visual Installer to support SHA-2 (SHA-256) when it code signs a setup package. We have also updated Visual Installer to support dual signing, so you can code sign a setup package with both SHA-1 and SHA-2. This is very useful if you have software that should be able to run also in older Windows (for example in Windows XP). By code signing a setup package twice, first with SHA-1 and then with SHA-2, your code sign certificate will be useful in both older Windows and newer Windows.

How to change hash algorithm from SHA-1 to SHA-2
In Visual Installer you can change the hash algorithm from SHA-1 to SHA-2, for an existing project, by following the steps below:

1. Start Visual Installer
2. Open your project
3. Choose the Special – Setup options menu item
4. Open the Code Signing tab in the Setup options dialog box
5. Open the Option sub tab
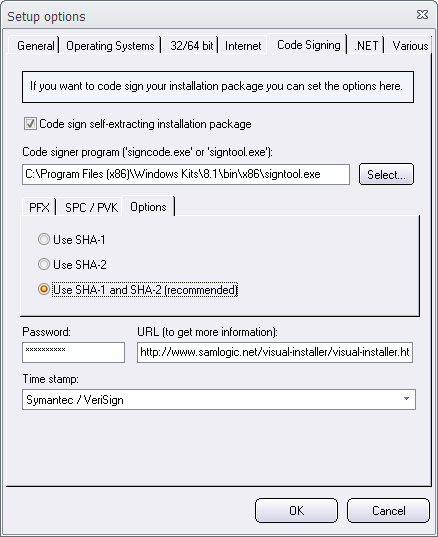
6. Select the Use SHA-2 option

Code Signing - Use SHA-2

7. Close the dialog box

If your minimum system requirements is Windows 7, you can use SHA-2 as a hash algorithm. But if you also want to support older Windows, follow the steps below:

How to dual sign a setup package (SHA-1 and SHA-2)
1. Start Visual Installer
2. Open your project
3. Choose the Special – Setup options menu item
4. Open the Code Signing tab in the Setup options dialog box
5. Open the Option sub tab
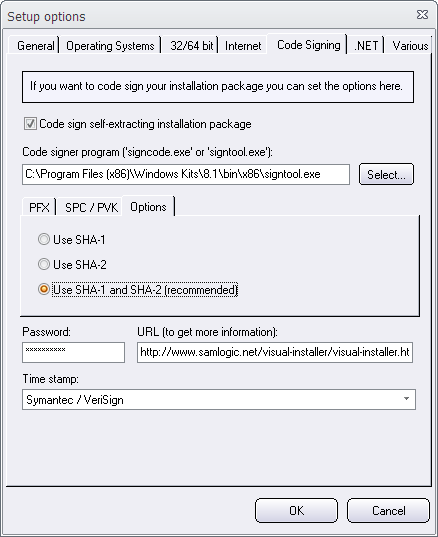
6. Select the Use SHA-1 and SHA-2 (recommended) option

Code Signing -Use SHA-1 and SHA-2

7. Close the dialog box

When you open your project file
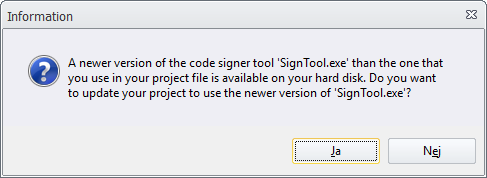
If you have installed the latest version of Visual Installer 2015 (version 10.5.16 or later) and opens a project file, you may see this message box when you open your project:

Update SignTool.exe

It is recommended to answer yes, so the latest version of Microsoft’s code signing tool is used when a setup package is code signed. If you want to dual sign a setup package, you must have a quite new version of the code signing tool. You can read more in this blog post.

Available in Visual Installer 2015 version 10.5.16 and later
The functionality described above is available in Visual Installer 2015 version 10.5.16 and later; in both the Standard and Professional versions of Visual Installer. If you have an active 1 or 12 months maintenance plan for Visual Installer 2015, you can download this update for free from our download page.

See also
> What is SHA-1 and SHA-2 and what’s the difference between them?
> How to code sign a setup package (Visual Installer tip)

What is SHA-1 and SHA-2 and what’s the difference between them?

As we wrote in this blog post, Visual Installer now supports both SHA-1 and SHA-2 hash algorithms when it code signs setup packages. But maybe you wonder what this really means and what the difference is between SHA-1 and SHA-2? We will give a short explanation below.

SHA (in SHA-1 and SHA-2) is an acronym for Secure Hash Algorithm. SHA-1 and SHA-2 is a set of cryptographic hash functions designed by NSA. Cryptographic hash functions are mathematical operations run on digital data, and by comparing a computed “hash” (the output from an execution of the algorithm) to a known and expected hash value, it is possible to determine the integrity of the data. For example, computing the hash of a downloaded file and comparing the result to a known hash result can show if the downloaded file has been modified or tampered with since it was created.

SHA-1 is older than SHA-2 and it is no longer considered as secure. Operating systems (as Windows) and web browsers will soon not accept SHA-1 anymore. Instead must SHA-2 be used. SHA-2 is a family of six hash functions and one of them is SHA-256, which is commonly used when code signing binary files (for example program files, DLL files and setup packages). SHA-256 produces a 256 bit hash value. That is more than the older SHA-1, that only produces a 160 bit hash value.

For further reading, we recommend the following Wikipedia pages:
> Secure Hash Algorithm
> SHA-1 (Secure Hash Algorithm 1)
> SHA-2 (Secure Hash Algorithm 2)

See also
> What is Code Signing / Digital Signature / Digital Certificate? (Q&A)

Where can I find the latest version of signtool.exe?

When Visual Installer signs a setup package, it runs an external signer tool. Before you could choose between signcode.exe or signtool.exe, but today it is strongly recommended to use signtool.exe because it is newer, and it is the only one that supports SHA-2.

The signtool.exe tool is installed with Visual Studio and with Windows SDK, and Visual Installer will normally find the newest installed version by itself. But if not, you can select the program file manually in Visual Installer’s editor. If you don’t know where it is located, you can search for “signtool.exe” in Windows Explorer.

Try to choose the newest version of signtool.exe that you can find on your hard drive. If you want to dual sign your setup package (with SHA-1 and SHA-2) you must use the signtool.exe tool version that is shipped with Windows 8.1 SDK or Windows 10 SDK. They are usually located in the following folders:

C:\Program Files (x86)\Windows Kits\8.1\bin\x86
C:\Program Files (x86)\Windows Kits\10\bin\x86

If you don’t have any of these folders on your hard disk, you may have not installed Windows 8.1 SDK or Windows 10 SDK. But these SDK:s can be downloaded for free from Microsoft’s website:

> Windows Software Development Kit (SDK) for Windows 8.1
> Windows Software Development Kit (SDK) for Windows 10

CD-Menu Creator’s button commands explained

Buttons are an important part of a menu interface that is created with CD-Menu Creator. By clicking on buttons the end-user can run programs, open documents, play videos, open web pages, open sub menus, and much more.

To every menu interface button you can select a command that will be executed when the end-user clicks on the button. You can select a command via the Command combo box in the Add Button or Edit Button dialog box.

Below we have listed all button commands that CD-Menu Creator supports. In some cases you can click on a link to read more about the button command and get an example of how to use the command.

Button Commands

Run Program
Choose this command if you want to run a program or start an installation when the button is clicked. This command can be used to run both an EXE file and an MSI file.

Run Program

Run Program & Close
As above, but the menu interface is automatically closed when the button is clicked.

Show Document
Choose this command if you want to open a document when the button is clicked; for example open a PDF document, a word document, a text file or an HTML document.

Show Document

Show Internet Page
Choose this command if you want to open a web site or web page on the Internet. It can also be used to open a PDF document on the Internet. If you want to open a HTML page that is distributed with your menu, you can use the Show Document command instead.

Play Movie
Choose this command if you want to play a video when the button is clicked. You can choose between playing the video in a menu window or playing the video using Windows Media Player.

Play Music
Choose this command if you want to play music or play a sound clip when the button is clicked.

Play Flash Animation
Choose this command if you want to show a flash animation. It can also be used to show a video that is saved in the SWF file format.

Show RTF Document
Shows a RTF document in a built-in window. This is useful if you want to show short formated text. No external document viewer needs to be opened.

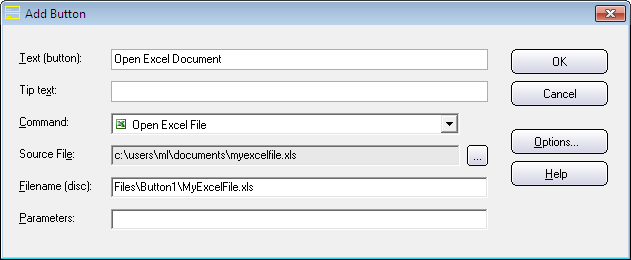
Open Excel File
Opens an Excel file. Read more about this command here.

Open Picture Gallery
Opens a picture gallery when the button is clicked. If you have some photos or drawings that you want to arrange in a gallery you can use this command. This command can also be used to handle a video clip gallery.

Open Picture Gallery

Open Folder
If you want to open a folder on the same drive as the menu when the button is clicked, you can choose this command. The folder will be opened in Windows Explorer.

Open Folder

Send E-mail
If you choose this command and a user clicks on the button, his/her e-mail client will be opened. You can specify a receiver (an e-mail address) and a subject line that is pre-filled, when the e-mail client is opened.

Open New Menu
Opens a new menu with other buttons created with CD-Menu Creator, for example a sub menu.

Open New Menu

Return To Previous Menu
Co-operates with the Open New Menu command. Returns to the previous menu, before this menu was opened.

Return To Main Menu
Co-operates with the Open New Menu command. Returns to the main menu. The main menu is typically the first menu that is shown when the CD/DVD or USB stick is inserted in the drive.

Exit
Closes the menu.

Visual Installer: If a specific version of .NET Framework is missing

We have improved Visual Installer’s behaviour in situations where a required version of Microsoft .NET Framework is missing in a computer. Before you could choose between stop the installation or warn the user if a specific version of .NET Framework was missing in the end-user´s computer. But now you can also let the end-user download the missing version of .NET Framework from the Internet and install it. Or, if you distribute .NET Framework with your software, you can start an installation of Microsoft .NET Framework directly from Visual Installer.

This was partially possible already in earlier versions of Visual Installer / Professional using script commands, but now this can be done without script. You can choose if you want this behaviour by selecting an option in Visual Installer’s editor.

How it works
If Visual Installer discovers during the installation of your software that the required version of Microsoft .NET Framework is missing, a mini wizard is started. The mini wizard will help the end-user to start an installation of .NET Framework. Visual Installer pauses the installation until .NET Framework is installed. The pictures below show an example of how it may look like:

Step 1 – Initial information
Step 1

Step 2 – Download information
Step 2

Step 3 – Information about how to continue
Step 3

Where to find this new functionality?
You can turn on and off this new functionality by opening the SpecialSetup options menu item and opening the .NET tab:

Setup Options - .NET

In the .NET tab you will find a new option named Download and install .NET Framework. If you select this option, the new behaviour will be invoked if the required version of .NET is missing in the end-user’s computer. If you click on the Options button, you can set some options for this new function. You can for example specify your own download page if you don’t want to use the default download page at Microsoft’s website. You can also specify a language for the download page.

See also
> Visual Installer: More available versions of .NET Framework
> Tip: How to prevent an installation if wrong .NET version

Visual Installer: More available versions of .NET Framework

We have increased the list of available versions of .NET Framework in Visual Installer to also include sub versions of .NET Framework, for example version 4.5.1, 4.5.2 etc. The picture below shows which versions of .NET Framework that Visual Installer currently supports:

More available versions of .NET Framework

Also the scripting language in Visual Installer have been extended to support the above versions.

You can use this functionality, for example, to install a missing version of .NET Framework or to run different tools depending of which versions of .NET Framework that are installed.

Available in Visual Installer 2015 version 10.5.15 and later
The extended list of supported .NET versions is available in Visual Installer 2015 version 10.5.15 and later. If you have an active 1 or 12 months maintenance plan for Visual Installer 2015, you can download this update for free from our download page.

See also
> Visual Installer: If a specific version of .NET Framework is missing

CD-Menu Creator: How to open a folder from a menu

From a menu created with CD-Menu Creator you can run programs, show documents, show pictures, play videos, open web pages + much more. But if you only want to open a folder on the drive. Is it possible?

Yes. It is easy done. Follow the steps below to create a button that opens a folder on the same drive as the menu:

1. Start CD-Menu Creator.
2. Create a new project or open an existing project.
3. Open the Buttons (text) tab.
4. Click on the Add Button button.
5. Enter a button text at the Text (button) input box, for example “Open Folder”.
6. Choose the Open Folder command from the Command list.
7. Enter a folder name at Folder (disc). This is the folder that will be opened when the user clicks on the button. The Add Button dialog box should now look like this:

Add Button dialog box

8. Click OK.
9. Create the menu.

If you have not created the folder (specified at step 7) on your drive yet, you can follow the steps below to create it:
10. Open the folder where the menu was created.
11. Add a sub folder in the creation folder with the same folder name that you specified at step 7 above. For example a sub folder with the folder name MyFolder.

Now you can test your menu. Click on the button in the menu interface that you created:

Open Folder button

and the folder will be opened:

The MyFolder folder opened

In the example above we have added three text files to the folder. But you can add what contents you want to the folder; for example pictures or videos.

See also
> CD-Menu Creator’s button commands explained

CD-Menu Creator: How to open a web page from a menu

Besides opening documents on the local drive you can also open web pages on the Internet from a menu interface created with CD-Menu Creator. There is button command with the name Show Internet Page that can be used to open the web page.

Show Internet Page (1)

If you choose this command from the Command combo box in the Add Button or Edit Button dialog box, a text box with the name Web Page (URL) is shown. Here you can enter a URL to a web site or web page on the Internet. For example:

http://www.samlogic.net/cd-menu-creator/cd-menu-creator.htm

Also PDF documents can be opened
You can also enter a URL to a PDF document on the web in the Web Page (URL) text box. For example:

http://www.mycompany.com/mydocuments/myuserguide.pdf

If you specify a URL to a PDF document, the PDF document will be opened in the end-user’s web browser. Specifying a URL to a PDF document on the Internet instead of specifying a file path to a local version of the PDF document (that is distributed with your CD/DVD or USB stick) can be a good idea if you update the PDF often. The end-user will then always have access to the latest version of your PDF document. But if you do not update the PDF so often, it is probably better to distribute the PDF with your menu and use the Show Document command in CD-Menu Creator to open the PDF.

If your URL contains uppercase letters
CD-Menu Creator converts normally uppercase letters in URL’s to lowercase letters, but if you need to preserve the uppercase letters in the URL, you can insert a @ character in the beginning of the URL. For example:

@http://www.mycompany.com/MyWebFolder/MyPage.htm

See also the picture below:

Show Internet Page (2)

Both HTTP and HTTPS is supported
Both the HTTP and the HTTPS protocol is supported. So you can start the URL with http:// or https://. You can also omit the protocol. Then is the HTTP protocol (http://) used automatically with the URL. But it is a good practice to always include the protocol when dealing with URL’s.

How to open local web pages
The Show Internet Page can only be used to open web pages on the Internet. If you need to open a web page (HTML page) that is located on the same drive as your menu (or on another drive in the computer) you must use the Open Document command instead.

See also
> CD-Menu Creator’s button commands explained