Visual Installer: If a specific version of .NET Framework is missing

We have improved Visual Installer’s behaviour in situations where a required version of Microsoft .NET Framework is missing in a computer. Before you could choose between stop the installation or warn the user if a specific version of .NET Framework was missing in the end-user´s computer. But now you can also let the end-user download the missing version of .NET Framework from the Internet and install it. Or, if you distribute .NET Framework with your software, you can start an installation of Microsoft .NET Framework directly from Visual Installer.

This was partially possible already in earlier versions of Visual Installer / Professional using script commands, but now this can be done without script. You can choose if you want this behaviour by selecting an option in Visual Installer’s editor.

How it works
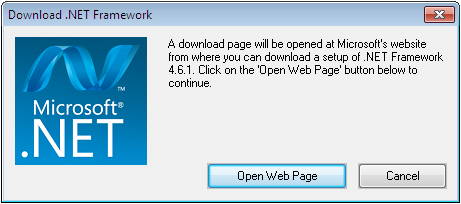
If Visual Installer discovers during the installation of your software that the required version of Microsoft .NET Framework is missing, a mini wizard is started. The mini wizard will help the end-user to start an installation of .NET Framework. Visual Installer pauses the installation until .NET Framework is installed. The pictures below show an example of how it may look like:

Step 1 – Initial information
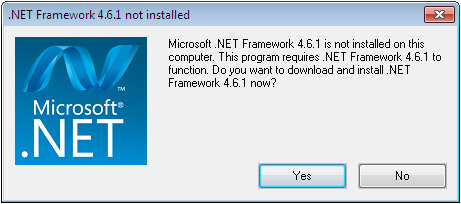
Step 1

Step 2 – Download information
Step 2

Step 3 – Information about how to continue
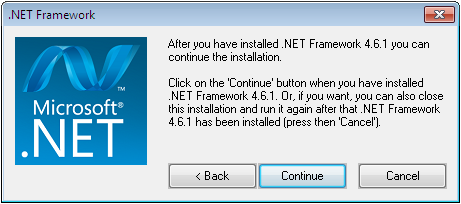
Step 3

Where to find this new functionality?
You can turn on and off this new functionality by opening the SpecialSetup options menu item and opening the .NET tab:
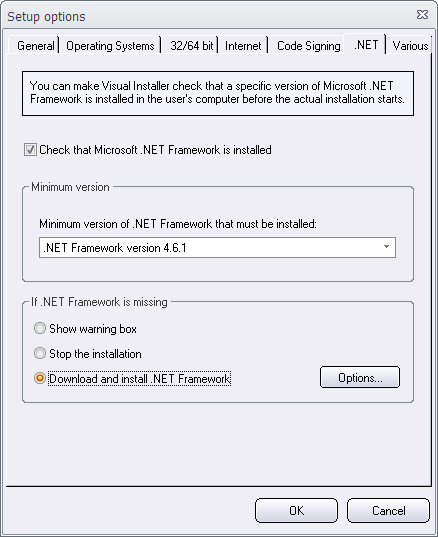
Setup Options - .NET

In the .NET tab you will find a new option named Download and install .NET Framework. If you select this option, the new behaviour will be invoked if the required version of .NET is missing in the end-user’s computer. If you click on the Options button, you can set some options for this new function. You can for example specify your own download page if you don’t want to use the default download page at Microsoft’s website. You can also specify a language for the download page.

See also
> Visual Installer: More available versions of .NET Framework
> Tip: How to prevent an installation if wrong .NET version

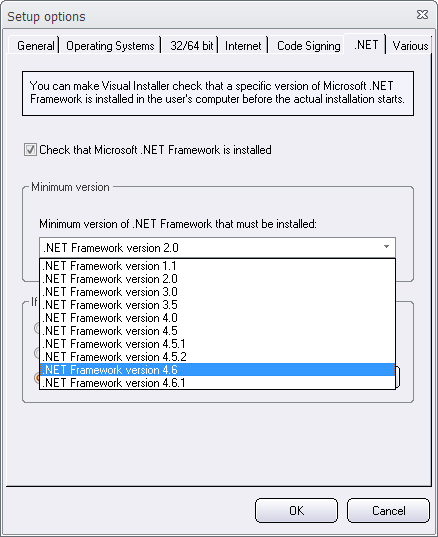
Visual Installer: More available versions of .NET Framework

We have increased the list of available versions of .NET Framework in Visual Installer to also include sub versions of .NET Framework, for example version 4.5.1, 4.5.2 etc. The picture below shows which versions of .NET Framework that Visual Installer currently supports:

More available versions of .NET Framework

Also the scripting language in Visual Installer have been extended to support the above versions.

You can use this functionality, for example, to install a missing version of .NET Framework or to run different tools depending of which versions of .NET Framework that are installed.

Available in Visual Installer 2015 version 10.5.15 and later
The extended list of supported .NET versions is available in Visual Installer 2015 version 10.5.15 and later. If you have an active 1 or 12 months maintenance plan for Visual Installer 2015, you can download this update for free from our download page.

See also
> Visual Installer: If a specific version of .NET Framework is missing

CD-Menu Creator: How to open a folder from a menu

From a menu created with CD-Menu Creator you can run programs, show documents, show pictures, play videos, open web pages + much more. But if you only want to open a folder on the drive. Is it possible?

Yes. It is easy done. Follow the steps below to create a button that opens a folder on the same drive as the menu:

1. Start CD-Menu Creator.
2. Create a new project or open an existing project.
3. Open the Buttons (text) tab.
4. Click on the Add Button button.
5. Enter a button text at the Text (button) input box, for example “Open Folder”.
6. Choose the Open Folder command from the Command list.
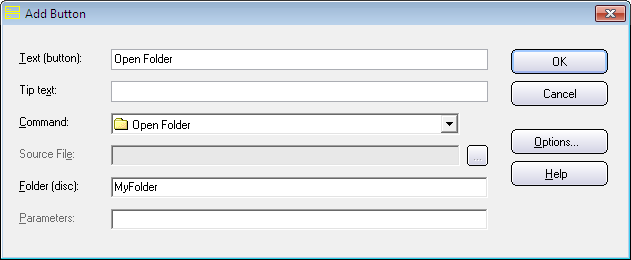
7. Enter a folder name at Folder (disc). This is the folder that will be opened when the user clicks on the button. The Add Button dialog box should now look like this:

Add Button dialog box

8. Click OK.
9. Create the menu.

If you have not created the folder (specified at step 7) on your drive yet, you can follow the steps below to create it:
10. Open the folder where the menu was created.
11. Add a sub folder in the creation folder with the same folder name that you specified at step 7 above. For example a sub folder with the folder name MyFolder.

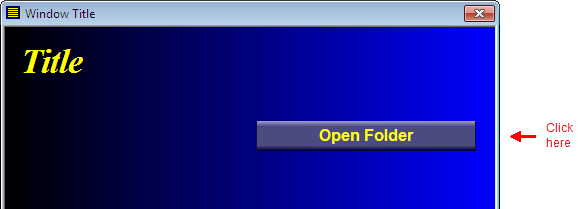
Now you can test your menu. Click on the button in the menu interface that you created:

Open Folder button

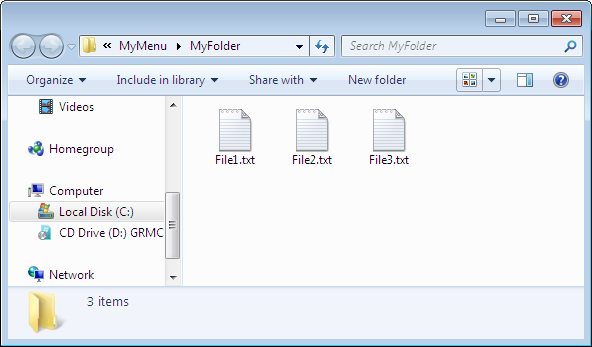
and the folder will be opened:

The MyFolder folder opened

In the example above we have added three text files to the folder. But you can add what contents you want to the folder; for example pictures or videos.

See also
> CD-Menu Creator’s button commands explained

CD-Menu Creator: How to open a web page from a menu

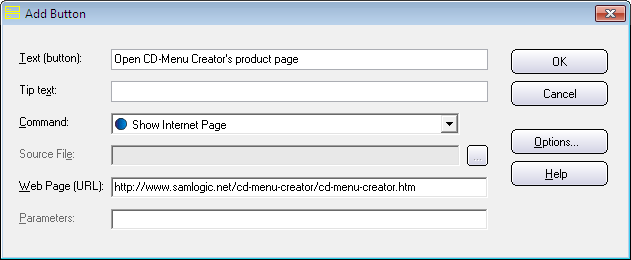
Besides opening documents on the local drive you can also open web pages on the Internet from a menu interface created with CD-Menu Creator. There is button command with the name Show Internet Page that can be used to open the web page.

Show Internet Page (1)

If you choose this command from the Command combo box in the Add Button or Edit Button dialog box, a text box with the name Web Page (URL) is shown. Here you can enter a URL to a web site or web page on the Internet. For example:

http://www.samlogic.net/cd-menu-creator/cd-menu-creator.htm

Also PDF documents can be opened
You can also enter a URL to a PDF document on the web in the Web Page (URL) text box. For example:

http://www.mycompany.com/mydocuments/myuserguide.pdf

If you specify a URL to a PDF document, the PDF document will be opened in the end-user’s web browser. Specifying a URL to a PDF document on the Internet instead of specifying a file path to a local version of the PDF document (that is distributed with your CD/DVD or USB stick) can be a good idea if you update the PDF often. The end-user will then always have access to the latest version of your PDF document. But if you do not update the PDF so often, it is probably better to distribute the PDF with your menu and use the Show Document command in CD-Menu Creator to open the PDF.

If your URL contains uppercase letters
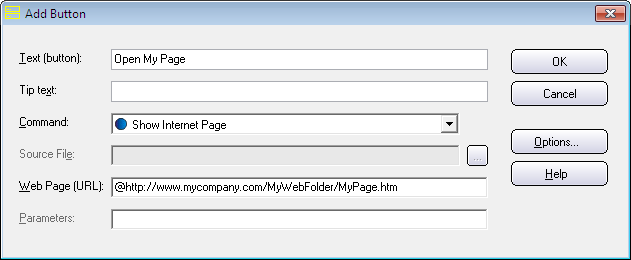
CD-Menu Creator converts normally uppercase letters in URL’s to lowercase letters, but if you need to preserve the uppercase letters in the URL, you can insert a @ character in the beginning of the URL. For example:

@http://www.mycompany.com/MyWebFolder/MyPage.htm

See also the picture below:

Show Internet Page (2)

Both HTTP and HTTPS is supported
Both the HTTP and the HTTPS protocol is supported. So you can start the URL with http:// or https://. You can also omit the protocol. Then is the HTTP protocol (http://) used automatically with the URL. But it is a good practice to always include the protocol when dealing with URL’s.

How to open local web pages
The Show Internet Page can only be used to open web pages on the Internet. If you need to open a web page (HTML page) that is located on the same drive as your menu (or on another drive in the computer) you must use the Open Document command instead.

See also
> CD-Menu Creator’s button commands explained

New setup dialog box in Visual Installer: User Options

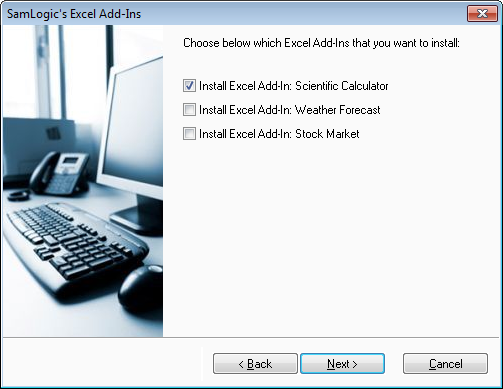
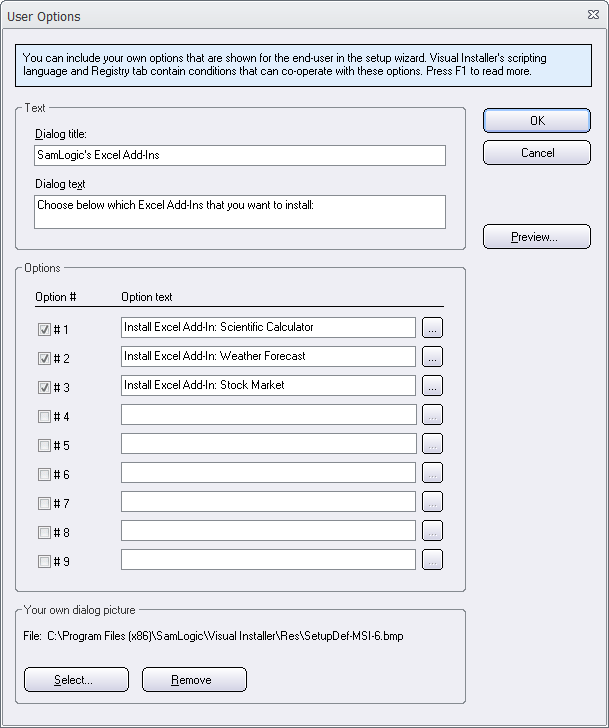
We have added a new setup dialog box to the Professional version of Visual Installer. The name of the dialog box is User Options and it is a general dialog box where the user can select and unselect options that you add to the setup project. These options co-operates with conditional statements in Visual Installer’s scripting language and with Visual Installer’s Registry tab. Below is an example of how the User Options setup dialog box may look like and how it can be used:

In the example above we have added three options to the setup dialog box. The user can select and unselect the options of his/her choice.

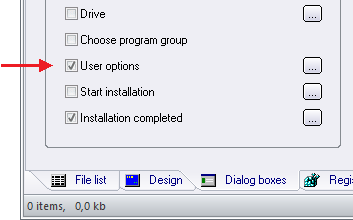
To activate this dialog box, you need first open the Dialog boxes tab in Visual Installer’s editor and check the User options option:

Then you can click on the button marked “…” to the right of the option. This will open a new dialog box in the Visual Installer editor with the title User Options. Below we have filled the dialog box with the text and options that is needed to create the setup dialog box in the example above:

As you see, it is very easy to create a setup dialog box with your own options. You just need to enter a title, a short description text and your options. And it is done!

Co-operates with Visual Installer’s scripting language and ‘Registry’ tab
The main purpose of this new option dialog box is to let the end-user decide which script lines to execute and which keys and values to add to the Registry, during the setup process. This is a more flexible way to handle user choices than file components (file groups) because you don’t necessary need to copy files based on user choices; instead you can use Visual Installer’s whole scripting language to do whatever you want. This is useful if some special operations must be done, based on user choices.

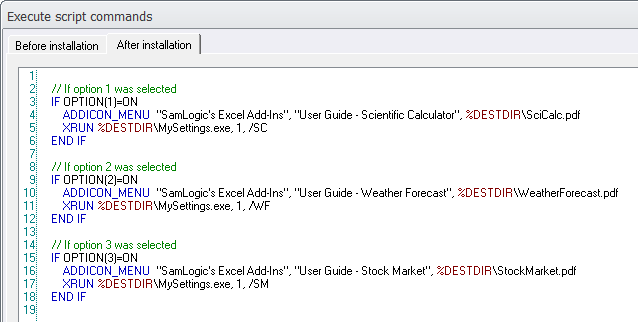
Below we show how Visual Installer’s scripting language can co-operate with the User Options dialog box:

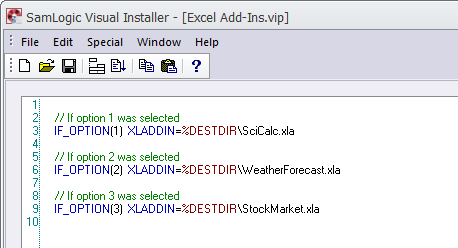
And below we show how the Registry tab in Visual Installer can co-operate with the User Options dialog box:

Scripting language
In Visual Installer’s scripting language we have added a new condition check, IF OPTION(n), that can be used to check which options the user has selected in the User Options setup dialog box. We have added a similar condition check to Visual Installer’s Registry tab: IF_OPTION(n).

The IF OPTION(n) condition in the script language can check both if an option is ON (selected) or OFF (unselected). So for example to examine if option 2 was selected by the end-user, you can enter the following condition:

IF OPTION(2)=ON

END IF

If you for example need to examine if option 3 was not selected, you can enter the following condition:

IF OPTION(3)=OFF

END IF

‘Registry’ tab
The condition check in the Registry tab works in a similar way. IF_OPTION(n) or IF_OPTION(n)=ON can be used to examine if an option was selected by the end-user. IF_OPTION(n)=OFF can be used to check if an option was not selected.

If you use IF_OPTION(n) and the option number n was selected by the end-user, the key or value will be added to the registry. The example below shows how to examine if option number 1 is selected, and if yes, add a value to registry:

See also
> Tip: How to use the ‘User Options’ dialog box with script

Visual Installer’s scripting language now supports ELSE

SamLogic Visual Installer LogotypeWe have updated Visual Installer’s built-in scripting language so it now supports an ELSE statement. This will help creating simpler scripts in some situations.

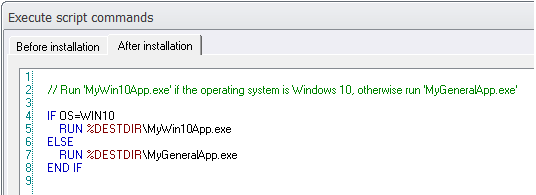
For example, assume that you want to run a particular and specialized application or setup program in a specific version of Windows, and a general application or setup program in all other versions of Windows. Before you needed to cover all Windows version with IF statements and OS checks, but now you only need to check for one OS, and add an ELSE statement to cover the rest. Example:

Example how to use ELSE

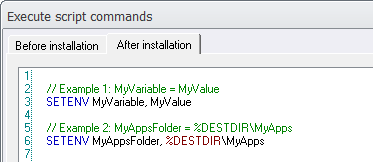
With the SETENV command you can set environment variables from Visual Installer

In this blog post we explained how to use Windows’ environment variables in Visual Installer; for example as a part of a file path. You can also create or change values for environment variables in the system during an installation by using a script command in Visual Installer’s scripting language. The name of the command is SETENV and you can use this command to set an environment variable to a specific value. If the environment variable does not exists, it will be created. If it already exists, its value will be updated.

Examples of usage
The example below shows how to use the SETENV command to set an environment variable with the variable name MyVariable to the value MyValue:

// Example 1: Set MyVariable = MyValue
SETENV MyVariable, MyValue

You can also use Visual Installer’s variables (for example %DESTDIR) when you set values. The example below shows how to set an environment variable with the variable name MyAppsFolder to the path %DESTDIR\MyApps:

// Example 2: Set MyAppsFolder = %DESTDIR\MyApps
SETENV MyAppsFolder, %DESTDIR\MyApps

The picture below shows same examples in Visual Installer’s scripting editor:

SamLogic’s Newsletter Issues in 2015

We have an international newsletter that is targeted for our international customers where we publish information and news related to our products and our company. We send the newsletter about 1-2 times / month. In the newsletter you can read about:

  • Information about SamLogic Software´s products
  • Tips and tricks for SamLogic Software´s programs
  • Technical and non-technical articles
  • Videos (tip videos and information videos etc.)
  • Special offers

Below you can view all newsletter issues that we sent during 2015:

> 13/2015 – Most read articles, read blog posts and viewed videos
> 12/2015 – How to code sign a setup package in Visual Installer
> 11/2015 – How to build a setup package or menu interface silently using a batch file
> 10/2015 – How to create a menu interface in any language in the world
> 09/2015 – A new wizard in CD-Menu Creator makes it easy to create multiple menu pages
> 08/2015 – New 2015 versions of our products – All adapted to Windows 10
> 07/2015 – CD-Menu Creator 2015 is coming soon
> 06/2015 – Visual Installer 2015 is coming soon
> 05/2015 – How to remotely control a Windows application from a tablet
> 04/2015 – Special issue about 64 bit installations
> 03/2015 – How to create a menu interface with 3 columns with buttons
> 02/2015 – New update of Visual Installer 2014
> 01/2015 – Most read articles, read blog posts and viewed videos

Subscribe to our newsletter
If you want to subscribe to our newsletter you can visit the web page below:
> Subscribe to SamLogic Software’s newsletter

Easier to register a type library for a .NET assembly (in Visual Installer)

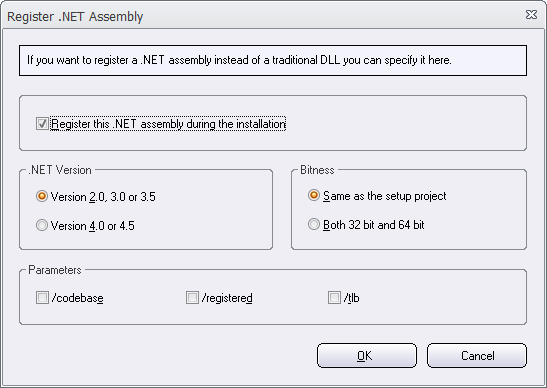
In the previous version of Visual Installer we added a function that makes it possible to register a .NET assembly. In Visual Installer 2015 (version 10.5.5 and newer) we have extended this functionality so you also can create and register a type library for the .NET assembly.

We have added a new /tlb option to the Register .NET Assembly dialog box. You can see the new option to the right in the Parameters frame in the screen dump below:

If you select this option, a type library will be created in the same folder as the .NET assembly. The type library will have the same filename as the assembly (the .DLL file), but with a .TLB filename extension. For example, if the filename of the DLL is MyFile.DLL, the filename of the type library will be MyFile.TLB.

The type library will be automatically registered after creation.

See also
> Tip: How to register a .NET assembly

How to count the number of shortcuts and tiles in the Start menu in Windows 10

As mentioned in this blog post, the Start menu in Windows 10 has a limit of number of shortcuts and tiles that can be added to the menu. In the first release of Windows 10 the limit was 512 items. But in the latest update of Windows 10 (the “Threshold 2″ update) the limit has been increased to 2048 items.

If you use Visual Installer to install files and encounter problems with shortcuts that are not visible in the Start menu, a good first step is to count the number of shortcuts and tiles in the Start menu. This can be done by using Windows PowerShell and running the Get-StartApps | measure command there:

Get-StartApps | measure

Windows Powershell will then display the number of items in the Start menu in the PowerShell window. For example:

Count

If the build number of your Windows 10 is less than 10547 and the count is above 512 you have added / installed too many shortcuts and tiles to the Start menu. If you have a build number that is 10547 or above and the count is above 2048, you have added / installed too many shortcuts and tiles to the Start menu. In the latter case you need to remove some items before you can add new. In the first case you need to update your Windows 10 to the latest version of the operating system.

(To open Windows PowerShell you can enter “powershell” in Windows search box and press Enter; then Windows PowerShell is started. To see the build number you can enter “winver” in the same search box and choose the winver command in the list that is shown.)