How to delay deletion of a file until reboot

Sometimes a file need to be deleted during an installation, but it can not be done because of the file is active and locked by the system. To handle this we have added a new script command to Visual Installer with the name RDELETE that can be used to mark a file for deletion and let the system delete the file when the computer restarts.

When you use this command, no attempt will be made to delete the file during the installation. Instead Visual Installer will inform the system that the file need to be deleted during the next system reboot.

The command syntax is the following:

RDELETE filepath

Example:

RDELETE %DESTDIR\CleanUp\CleanUp.exe

This command is useful when a file need to be deleted, but there is no hurry to delete the file. You can then call this command and let the system delete it later.

See also
> 4 delete commands available in the script language – when to use which
> Visual Installer’s Scripting Language

You can now set an absolute position for a title

You can now in CD-Menu Creator set an absolute position for a title, subtitle and button group title. In the latest update of CD-Menu Creator we have added this functionality.

Normally the X and Y position of a title, subtitle and button group titles are set automatically by CD-Menu Creator. But now you can set the coordinates for these objects manually. This is useful if you really want to have total control of these objects’ positions in a menu window.

How to set coordinates
To set coordinates for a title, subtitle and button group titles, you can add a prefix before the actual title text. The syntax is the following:

[X,Y] My Title

Where X specifies the X position of the title and Y specifies the Y position of the title (in pixels). Below is an example where X and Y has been replaced with numerical values:

[10,50] My Title

In the example the X position is set to 10 pixels and the Y position is set to 50 pixels.

When you add coordinates to a title, the coordinates must be set between brackets, “[” and “]”, and the X coordinate and the Y coordinate must be separated with a comma (“,”). Like this:

[20,80]

The actual title must then be placed after the ending bracket. For example:

[20,80] My menu title

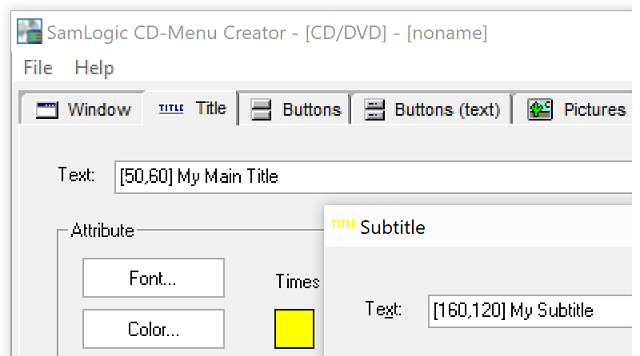
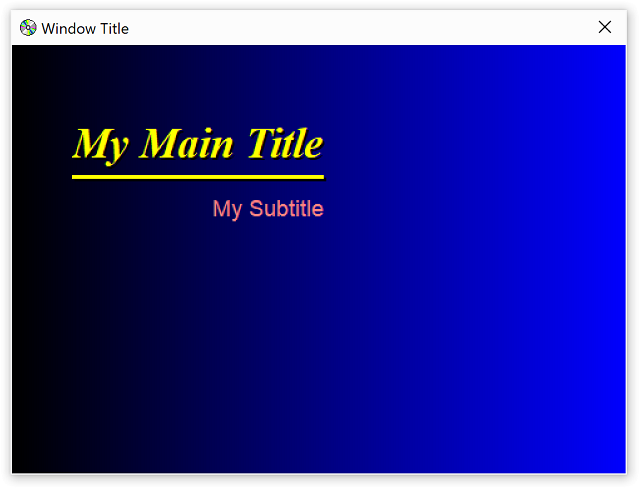
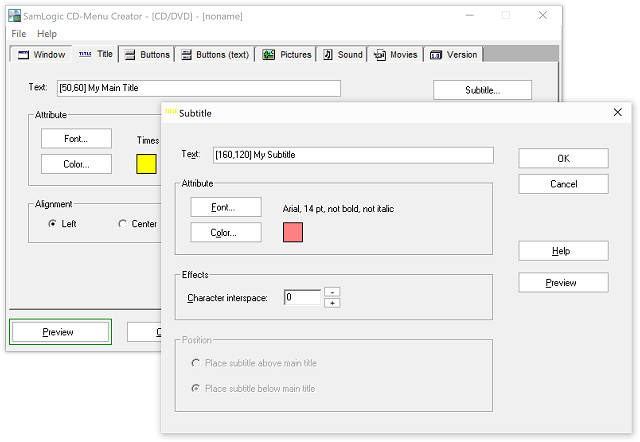
See also the picture below for an example. The main title coordinates have been set to [50,60] and the sub title coordinates have been set to [160,120]:

Also button’s positions can be set in this way
There is already functionality in CD-Menu Creator to set absolute positions for buttons (via the Button Options dialog box) but this new method can also be used for buttons, if you prefer it and want to be consistent with how to set coordinates for objects.

SamLogic’s Newsletter Issues in 2019

We have an international newsletter that is targeted for our international customers where we publish information and news related to our products and our company. We send the newsletter about 6-7 times/year. In the newsletter you can read about:

  • Information about SamLogic Software´s products
  • Tips and tricks for SamLogic Software´s programs
  • Technical and non-technical articles
  • Videos (tip videos and information videos etc.)
  • Special offers

Below you can view all newsletter issues that we sent during 2019:

> 07/2019 – Special Issue – 40 tips for Visual Installer 2020 and CD-Menu Creator 2020
> 06/2019 – How to comment files in Visual Installers file list
> 05/2019 – The new Visual Installer 2020 supports Visual C#
> 04/2019 – Visual Installer 2020 and CD-Menu Creator 2020 has now been released
> 03/2019 – Summer special – 40 tips for Visual Installer and CD-Menu Creator
> 02/2019 – How to test an installation before creating it
> 01/2019 – Top Lists 2018 – Most read articles, read blog posts and viewed videos

Subscribe to our newsletter
If you want to subscribe to our newsletter you can visit the web page below:
> Subscribe to SamLogic Software’s newsletter

Word To HTML Converter

A common problem when copying formatted text from Word to a HTML editor or to an e-mail / newsletter editor is that a lot of Word / Office specific tags follows, which creates problem in the HTML. It can be problematic to get everything correct afterwards. A better idea is to filter out (remove) the Word / Office specific tags before the formatted text is inserted in the HTML.

We have a .NET class that does this work. It converts HTML received from Word to a clean HTML with a simple syntax that can be used in all kind of HTML editors. The class is written C# but can be used with other .NET programming languages also.

The class is system independent and can be used with .NET Framework 2.0 and later, .NET Core, .NET Standard and Xamarin. You can read more about the class on this web page:

> SamLogic Word To HTML Converter Class

Tips & Tricks Pages for SamLogic Software’s Products

Did you knew that there are tips & tricks pages available for our programs? In the tips & tricks pages we show how to use the software in different circumstances, and we describe some technical details about the programs that are not found in the program’s User’s guides. The tips are in step-by-step format which makes them easy to follow. Many of the tips contain images (screen dumps etc.), and some of the tips have also informative video clips that demonstrate the tip.
Below are direct links to tips index pages for our programs. Click on a link to read more about the tips that are available for every program:

> Tips & tricks for SamLogic CD-Menu Creator
> Tips & tricks for SamLogic USB AutoRun Creator
> Tips & tricks for SamLogic USB AutoRun Creator / Small Office
> Tips & tricks for SamLogic Visual Installer
> Tips & tricks for SamLogic MultiMailer

The tips index pages are also available via the Help menu in our programs. If you click on the Tips and Tricks menu item, your web browser is opened with the tips index page (for your product) opened.

Visual Installer 2020 has now been released

We have now released a new version of our setup tool SamLogic Visual Installer. The name of the new version is SamLogic Visual Installer 2020 and the version number is 11.8. Some new features in the new version are:

• Supports the latest version of Windows 10.
• Supports Microsoft .NET Framework 4.7.2 and 4.8.
• Supports AutoCAD 2019 and 2020.
• Supports Visual Basic 2019.
• Supports now also Visual C#.
• You can now comment files in the file list.
• The Registration dialog box now supports region/state and ZIP/postal code.
• Updated Run program after installation function.
• You can now specify your own picture to the uninstallation program/dialog box.

A detailed list of new features in Visual Installer 2020 is available on this web page.

CD-Menu Creator 2020 has now been released

A new version of our menu designer tool CD-Menu Creator has now been released. The name of the new version is SamLogic CD-Menu Creator 2020, and some of the new features in the new version are:

• Supports the latest version of Windows 10.
• You can now specify a position for the sub title text.
• You can change font size for the button’s tip text.
• Supports https in web links.
• New menu interface examples have been included.

A more detailed list with the new features is available on this page.

Visual Installer’s file list can be refreshed automatically

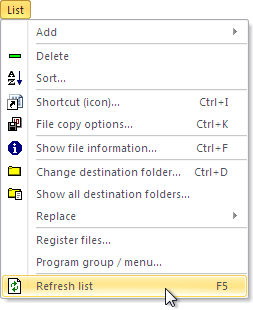
You may already know that if you press the F5 key on your keyboard or choose the List – Refresh List menu item in Visual Installer’s editor, the contents of the file list (in the editor’s File List tab) is refreshed.

When a file list is refreshed, file dates and size information etc. is updated. If a file is missing at a source file path, you will be informed about that.

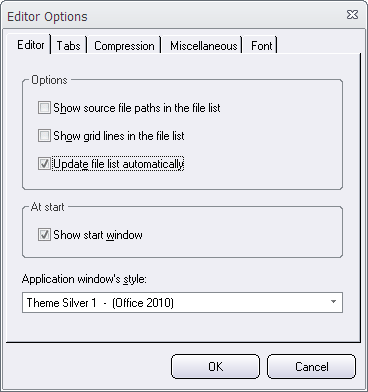
If you want to have the file list refreshed automatically when a project is opened, this is also possible. If you choose the Special – Editor options menu item and select the Update file list automatically option in the dialog box that is shown (see the picture below)

the file list will be updated automatically when the .VIP project file is opened.

How to ask for a drive instead of a folder during an installation

Normally when a user runs an installation, the installer will ask for a destination folder. A default folder name and folder path is shown, but the user can usually change the folder name and the folder path, and enter his/her own.

But there are situations when the folder name and folder path must stay unchanged, but the user should have the possibility to change the drive letter.

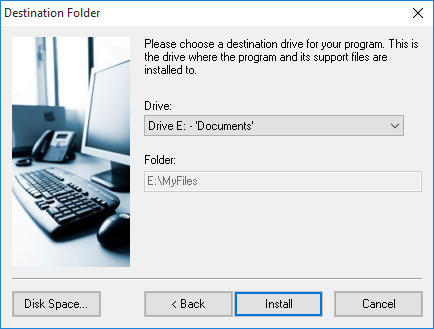
In Visual Installer we have a special setup dialog box that is designed for this purpose. You can include this dialog box in your installation by checking the Drive option in the Dialog boxes tab in the Visual Installer editor.

If you check this option, the following setup dialog box will be shown in the installation:

In this dialog box the end-user can change the drive letter, but not the folder path. The folder path is shown for the end-user, but it is a read-only field. He can not change the path.