Normally when a shortcut is created for a program file,
document, video etc. in Windows, the file's default icon is
used. But if you want to use another icon for a file, it is
possible to do this with the
SamLogic Visual
Installer installation tool.
You can change icon for all types of files; for example
applications, Word documents, PDF documents, Excel sheets, MPEG
videos etc. The tip below shows how to specify your own icon for
a file that will be installed in a computer.
|
How to attach your own
icon to a file: |
1. Start Visual Installer and open an installation
project, or create a new project.
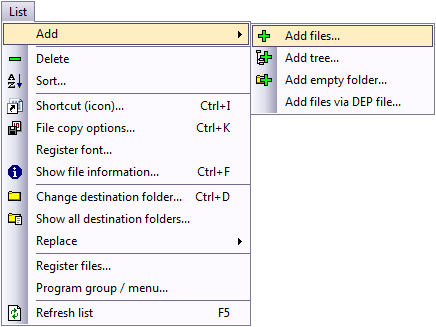
2. Select
the Add - Add files menu item from the List menu:

3. Add
the icon file (.ICO file) that you want to use to the file list.
4. Select the file in the file list that you want
specify a new icon for.
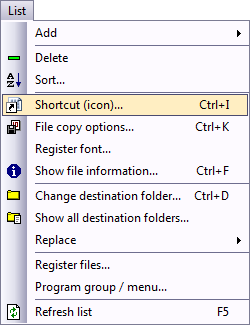
5.
Select the Shortcut (icon) menu item from the List
menu:

6.
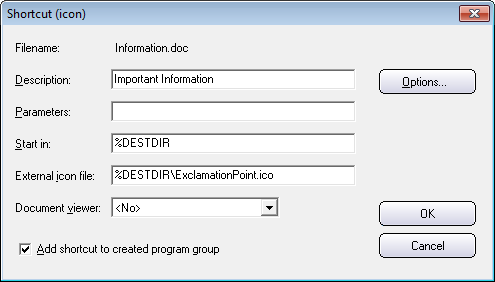
The Shortcut (icon) dialog box is now shown. It looks like:

7. Enter a description of the file in the Description
text box
8. Specify the
folder that the icon will be installed to in the
External icon file text box. This is the destination folder
in the file list for the icon file. It must be the exactly same
folder path. The dialog box will now look similar to this:

9. Close the dialog and create a new installation
During the installation the icon will be added to the Program
menu in Windows, as a part of a shortcut for the file. You can
also place the icon in other parts of Windows. If you press the
Options button in the Shortcut (icon) dialog box
you will see some additional options, that you can use to
specify where in Windows to put the icon. See the tip described
below for more details:
Related tip
Below you will find another tip for icons. This tip
shows how to place an icon / shortcut on the desktop in
Windows:
 How
to create a desktop shortcut How
to create a desktop shortcut
|
|